Overview
Buy Raid on Iran from
Noble Knight Games
I was rummaging through my old game archives and found a game that I haven’t played in a few years: Raid on Iran by Steven Jackson Games, published in 1980 (OK, so it’s actually “31 Years Later”). I was living in Tustin, CA in 1980 and found this game in one of the many little hobby shops that dotted the Orange County landscape in those days. Never having heard of Steve Jackson Games and being more of an “SPI Central Front Series” kind of guy at the time, I almost passed on making the purchase. But I’m glad I didn’t. Besides, for $3 you can’t go wrong…
Editor’s Note: Raid on Iran has been spotted on Amazon Marketplace for $320 (July 2011) – not a bad return for a $3 investment…
Raid on Iran is a two player game simulating the U.S. attempt to rescue American hostages who were being held by the newly formed Islamic Republic of Iran after the ouster of the U.S.-backed Shah of Iran. The real rescue attempt ended tragically and unsuccessfully in the deserts of Iran without ever having even come close to the location of the hostages. A series of unfortunate events left 8 American service men dead and an insufficient number of operational helicopters to proceed with the mission. A decision was made to call the mission off, and everyone packed up and headed home. The subject matter was quite topical at the time of publication, when the hostage crisis was still in the news headlines but, sadly, it’s still topical today as the United States and Iran are no closer to reconciliation now than in 1980.
In the game, one player controls the Iranian “Militants” who were physically holding the hostages on the grounds of the American Embassy in Teheran, the capital city of Iran, and the other player controls the American military “Commando” units that were attempting to rescue the hostages.
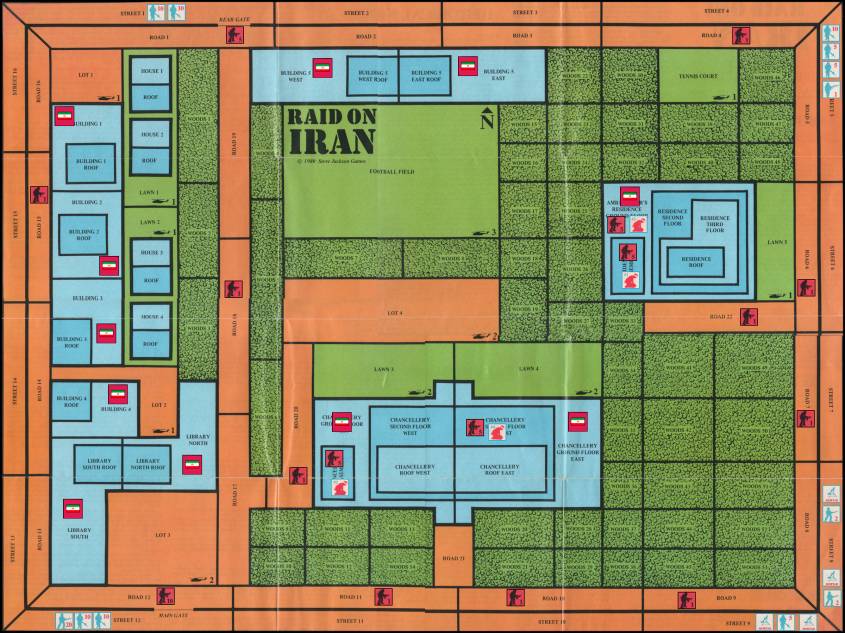
The game map is a depiction of the American Embassy complex and the streets immediately outside its walls, and is based on actual aerial photos of the embassy. An “area movement” system is used and various areas are distorted from their real world proportions to facilitate game movement (and probably because the layout of all U.S. embassies is classified information). The game does not provide a map scale other than a mention in the Historical Notes that it is a “27 acre enclave”. Based on photos I’ve seen of the embassy, it looks like the entire area covered by the game map could be walked from end to end in about 15 minutes. The military unit counters represent individuals or groups of soldiers, airmen, hostages, students, militants, etc. There are also helicopter units which represent single helicopters.
The main scenario involves a full scale rescue mission and allows players a decent range of options for deployment and maneuver. This scenario generally takes about 2 hours to complete, but could end much sooner if either side meets its victory conditions. There is a bonus scenario, title “Sauce for the Goose” which proposes an American mission to actually snatch the Ayatollah Khomeini himself and use him as a bargaining chip in the hostage negotiations.
Raid on Iran asks the question, “What might have happened if the rescue team had gone in?” Could 50 hostages have been rescued and spirited out of Iran without suffering an unacceptable level of American casualties (civilian and/or military)? Let’s see how well the game provides players the tools to answer that question.
Rules and Components
Let me start by pointing out that, although this was a “small package” game (originally sold in those little plastic clip-boxes then later in zip-lock bags), it has quite a bit of depth to it. The rules are printed (front and back) on a sheet that measures 12″ x 21″, in small print. When I scanned and transformed the rules into a standard 2-column Word document, it resulted in an 12 page doc, with 8pt font. And that’s just the core rules! The “About this Game”, “Historical Notes”, and “Sauce for the Gander” scenario rules are printed on the back of the 16″ x 21″ game map. I transformed these sections into another 3 page, double column document. I’m not trying to scare anyone off, or imply that it’s a terribly complex game. I’m just trying to point out that the rules are not the 3-page afterthought that I thought they would be, judging from the small package.
The map is printed on very thin paper but has held up surprisingly well considering its age. The unit counters are not mounted and had to be cut manually, but they’re printed on fairly sturdy paper and have also held up well. Every piece of paper you see is back-printed with something else. Even what passes as the “box cover” of the game is back-printed with charts that are essential to game play. Steve Jackson knows how to economize…
I have created a custom Raid on Iran Player Aid Sheet as well as custom counters that can be freely downloaded and used.
Playing the Game
Now, on to the really important part: playing the game.
Setup
The setup instructions are quite clear (nothing will make me chuck a game quicker than ambiguous setup instructions), but setup is not strictly mechanical in Raid on Iran. In this game, setup options are a big part of overall game strategy and therefore require some knowledge of the game’s processes in order to choose wisely.

The Iranian player has the option of where to place the American hostages (with some constraints). Hostages are kept track of on paper and “Hostage” counters are placed on the map, so the American player does not know the location of all the hostages. Iranian setup also allows for placement of a variable number of “guards” with each hostage counter. A certain number of “sentries” are placed in the street areas and the rest of the units are distributed throughout all the buildings in the compound. (Note that “guards” and “sentries” don’t have separate counters; they’re represented by the same generic “militant” units. But they have different functions and rules in the early part of the game). There are dummy counters included initially in the Iranian mix, and a large number of Iranian units are placed randomly, face down, so that even the Iranian player does not know where all his units are!
The U.S. player has several options for gaining entry to the embassy grounds. He may attempt entry by “Stealth”, “Deceit” or “Force”. Each method has its advantages and disadvantages. The sooner the Iranian sentries and guards are alerted, the sooner large numbers of Iranian reinforcements will arrive. So, while kicking down the front door may be an appealing option, an entry by Force must be planned carefully. Stealth entry involves climbing over the walls in small groups and attempting to take out sentries and guards with non-lethal or silenced weapons. Entry by Deceit is a very high risk proposition with a potentially huge payoff, as it may allow a large group of American commandos to enter the grounds, all at once, without being detected (i.e. in a phony “supply convoy”).
As if there weren’t enough decisions to be made already, each player is allowed to choose one “Special Advantage”. Some American advantage options include “Farsi Speakers” which gives the U.S. advantages in any negotiations or attempts at deceit, and “Mole in the Militants” that allows the U.S. player to begin the game knowing the exact location of every hostage. Iranian special advantages such as “Extra Manpower” and “Changed Hostage Location” (I’m sure you can figure out the benefits conferred by each of those) make the game extremely unpredictable and boost the replay value considerably.
Objectives
Once the game is underway, it becomes a contest for control of the hostages. The U.S. player tries to ascertain, as quickly as possible, the location of all the hostages and the total strength of the militants guarding them. Although it’s not likely to happen, the Americans would be quite happy to get through the entire game without firing a shot, as long as the hostages are secured. Any fire fights run the possibility of hostages being killed and commandos being killed or wounded. Guess what happens to a wounded commando who ends up captured by the Iranians? Yep. Another hostage. So the Iranians could potentially end up with more hostages than they had at the start of the game resulting in a blowout Iranian victory, for sure. The ultimate American objective: rescue all 50 hostages unharmed and take no commando casualties.
The Iranians are no match for American commandos in a stand up fight, so the Iranian player must be careful not to take too many casualties before reinforcements start arriving. The hostages may be split up into separate groups to confuse the U.S. player. As long as one Iranian militant unit is present in an area, that unit completely controls the movement of all hostages in that area. If hostages are alone or accompanied by U.S. commando units, the American player controls their movement. The Iranians must decide if they’re going to hole up in one of the buildings and fight, defying the commandos to storm the place and risk killing hostages, or head off into the woods, perhaps sub-dividing into smaller groups, forcing the commandos to spread themselves thin. The ultimate Iranian objective: retain all 50 American hostages, and inflict as many casualties as possible on the commandos.
Movement
There are 138 movement areas on the map. Basic movement for commando/militant units is one area per turn (although U.S. commandos may perform a “double move” once per turn). The Road areas tend to be long, bordering on many areas, which simulates the fact that road movement is more efficient. Woods areas are smaller and take more time to move through. The battle space is also 3 dimensional in the sense that some buildings have multiple floors and vertical movement between these floors is required. Other than roads, woods and buildings, there are relatively open areas, such as lawns and parking lots, that are much larger than the other areas. Again, this simulates the speed with which these areas can be traversed. Any of these open spaces with a helicopter symbol on it indicates that the area can be used as a landing zone for U.S. helicopters.
Combat
There are two kinds of combat: Ranged Attacks and Close Attacks. Ranged combat permits units to fire into adjacent areas, and occurs before movement. Close Attacks only occur between enemy units sharing the same space. Generally speaking, units that execute Ranged Attacks may not move during the same turn. However, a U.S. “double move” would permit U.S. commandos to make a ranged attack, and then move into a close combat situation in the same turn. The Ranged Combat results table is pretty basic. Cross reference the number of units firing with a die roll, apply modifiers and inflict x number of casualties (or none at all) on the target. The Close Attack results table is based on attacker/defender odds (2-1, 3-1, etc.) and may inflict casualties on both the attacker and defender.
Any combat action in an area that contains hostages may cause hostage casualties. The U.S. may use non-lethal techniques to avoid hurting the hostages, but this will reduce the effectiveness of their attacks. The militants are free, at any time, to attempt to execute hostages. For the Iranians, a dead hostage is not worth as much as a live one, but it may be better than allowing them to be rescued. For the U.S. player, dead hostages are a disaster.
Ending and Winning the Game

The game’s duration is open-ended. There are no set number of turns and it could potentially go on forever. In my experience the average game lasts somewhere between 15 and 30 turns (1.5 to 2 hours of real time). U.S. forces cannot remain on the ground indefinitely. Iranian casualties are replenished through the reinforcement process, but the U.S. receives no reinforcements at all. Every minute that U.S. commandos remain inside the embassy compound, the odds lengthen on them. Even if all the hostages have not been rescued, at some point the U.S. player must make the decision to evacuate all U.S. commandos and rescued hostages in order to secure the highest possible victory level.
Both players accumulate victory points according to a predefined victory point schedule. Iran gains victory points for hostages held at the instant the last U.S. military unit leaves the map, and for killing U.S. forces. The U.S. player gains victory points for rescuing hostages, and loses points for hostages or U.S. forces killed.
Each player has an independent level of victory corresponding to the number of victory points he has accumulated. In addition, the magnitude of the victory is determined by the spread between the U.S. total and the Iranian total.
The next section will take you through the early turns of a sample game. It will hopefully provide a good feel for how the game works.
Game Start Example
The Iranian Plan
For initial setup, the Iranian player places 10 militants in Road 12/Main Gate and 5 militants in Road 1/Rear Gate, as directed by the setup instructions, and chooses to place the maximum allowable 5 militants (temporarily functioning as “guards”) with each of the four hostage counters. Setup instructions dictate that 15 hostages must initially be placed in the Ambassador’s Residence basement and 20 hostages in the Chancellery basement. These are represented by Hostage counters #1 and #2, respectively. The Iranian player, opting to use the #3 and #4 Hostage counters, assigns 14 of the 15 remaining hostages to Hostage counter #3 and places it on the ground floor of the Residence building. The final 1 hostage is assigned to Hostage counter #4 and is placed on the 2nd Floor East of the Chancellery.
The 10 allowable “sentries” (i.e. militants temporarily functioning as sentries) are scattered throughout the road net, concentrating on the roads closest to the Residence and Chancellery to make it more difficult for the U.S. commandos to get into these building undetected. A few sentries are placed near the bulk of the “sleeping” militant units in Buildings 1 through 5 to help wake these guys up as quickly as possible after the sentries are alerted.
The Iranian plan, at this point, is to take the single hostage in Hostage counter #4 to the roof of the Chancellery and try to draw as many commandos as possible towards this building (the U.S. player does not know how many hostages are there). In addition, the militants plan a fight to the death for the 20 hostages in Hostage counter #2 in the Chancellery basement, hoping for a prolonged standoff by threatening to execute them if the U.S. commandos get too close. As sentries are alerted, and the sleeping militants woken up, they will all coverge on the Chancellery to make the U.S. rescue attempt there as costly as possible.
Hostage counters #1 (with 15 hostages) and #3 (with 14 hostages) will attempt to exit the Residence building and split up in the surrounding woods.
If things go as planned, the bulk of the U.S. commandos will be bogged down in negotiations and/or close quarters combat in the Chancellery, while the remaining commandos will have to split up into smaller groups to chase down the dispersed hostages in the woods.
Keeping in line with the selected strategy, the Iranian player choose “Special Advantage” option 3, Extreme Fanaticism. This will benefit him in three important ways:
- He believes that the U.S. will attempt an Entry by Deceit, trying to sneak a large number of commandos into the compound disguised as a supply convoy, and choosing the Extreme Fanaticism option will make this much more difficult.
- He wants to strengthen his militants’ resistance to U.S. attempts to negotiate.
- It’s a little extra insurance that his militants will obey orders to execute hostages.
Note that all of the Iranian militant units and Hostage counters would actually be starting the game face down, so the U.S. would not have any idea of the actual militant strengths.
The U.S. Plan
The U.S. player has the tiny advantage of setting up after the Iranian has completed his setup. I say tiny advantage because, as all Iranian units are placed face down, there’s very little intel that can be gleaned. However, he notices a few things:
- There are Iranian units on the 2nd Floor East of the Chancellery. Remember that all Iranian units are placed face-down, so the American player does not know exactly what’s there. The basic setup only calls for hostage placement in the basements of the Residence and the Chancellery. The only way that Iranian units could be on the 2nd Floor of the Chancellery is if he chose the optional setup which allows for up to two additional hostage counters (and accompanying guards) to be placed. Therefore, the U.S. commander can safely assume that the 2nd Floor units are hostages and guards.
- Other than the mandatory military units at the front gate and rear gate, there are 10 Road areas that contain a single unit. A dead giveaway that the sentries are all 1-strength units. This can be useful for planning stealth movement and “quiet” attacks.
- Also, since the ten 1-strength sentries are scattered around the map, and the Main Gate and Rear Gate roads only contain a single unit, he can be sure that they are the mandatory 10-strength (Main Gate) and 5-strength (Read Gate) units from the setup instructions. The Iranian has not chosen to augment the gate guards, which allows the U.S. to plan out exactly how many strength points will be needed to get 4-1 attacks on the Close Attack table.
Of the 90 commando units available to the U.S. player, he places 40 in Street 12, outside the Main Gate, and 20 in Street 1, outside the Rear Gate. This insures 4-1 attacks in both places (if executed before the Iranians can reinforce, of course).
As will soon become depressingly apparent to the Iranian player, the U.S. player has not decided on a Entry by Deceit approach. He has decided on a hybrid Entry by Stealth/Entry by Force method. 21 commandos are set up in Street 5. This group will attempt to stealthily enter the compound by climbing the walls and then maneuver into position in the woods just outside the Chancellery building.
The “Special Advantage” chosen by the U.S. player is option 5, More Special Weapons, and he has selected the two additional mortars, for a total of four mortars. Four commandos will set up with two mortars in Street 9, and the remaining five commandos will set up in Street 8 with the other two mortars. These four mortars will be the primary weapon for keeping Iranian reinforcements at bay, blasting anyone that tries to cross the open areas between the Chancellery and the building along the west and north edges of the compound.
The American plan is to stealthily move five commandos each turn from Street 5 over the wall to Road 5. As long as he does not roll snake eyes on the “Entry by Stealth” table, the commandos will remain undetected. Once all 21 commandos are over the wall, they will start neutralizing the sentries in the area using “Quiet Attacks” (see rules section 10). Once all three sentries are eliminated (Road 6, Road 7, Road 22), the commandos will storm the Residence, quickly secure Hostage counter #3 on the ground floor, and then move quickly into the basement to rescue Hostage counter #1. Standard rifle fire in this building will not alert any other sentries, because none are within 2 areas of the building.
While the takedown of the Residence is in progress, the large commando groups outside the Main and Rear Gates will stand by. They will crash both gates the instant:
- All the hostages in the Residence are secured and prepared for extraction… OR
- The sentries are somehow alerted before the Residence hostages can be secured.
From that moment on, it will be a mad, violent dash to secure the Chancellery hostages and get out to Lawn 3 or Lawn 4 for extraction via helicopter. The combined 20 strength points of mortars will pulverize anything that moves out in the open.
The First Ten Turns
Turns 1 - 5
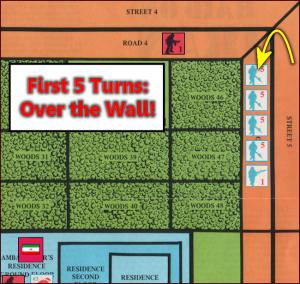
The opening turns of most games will only involve American movement. The Iranians may not move or take any action at all until their sentries are alerted. So, the first five game turns are used to move the U.S. commando units from Street 5 to Road 5. That’s five commandos going over the wall on each of the first four turns and the last commando going solo on the fifth turn. Each turn a roll is made on the “Entry by Stealth” table, but no snake eyes are rolled, so the American intruders remain undetected.
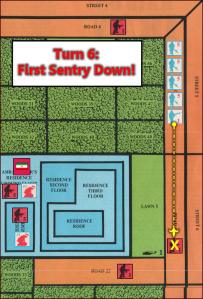
Turn 6
On turn 6, the U.S. makes its first “quiet” ranged attack on the sentry in Road 6. Consulting the “Ranged Combat” table, the U.S. player applies the -2 “Quiet Attack” modifier and rolls on the 21-30 column (i.e. the number of shooters). Even with a -2 modifier the U.S. can’t miss scoring at least one kill and so the sentry goes down without a sound. The commandos remain undetected. The American use their once-per-turn double move to advance all 21 commandos into Road 6.
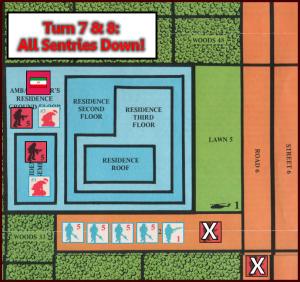
Turns 7 - 8
Turn 7, another guaranteed “quiet” kill on the sentry in Road 7. On turn 8, the final sentries in Road 7 and Road 22 go quietly down for the count. A double move on turn 8 puts all the commandos in Road 22 where they are poised to enter the Residence itself.
Quiet attacks are not allowed inside buildings so the first burst of gunfire will alert all Sentries on the map (they’re presumed to be carrying radios). Note that the commandos could make a ranged attack from Road 22 directly into the building but, in addition to alerting the sentries, this would reduce the effectiveness of their fire and possibly endanger any hostages that might be present there (unless they reduce their fire effectiveness further to insure no hostages are hit). So the best option is to wait until turn 9 and then move in for a Close Attack. There is no danger of hostages being harmed during a close combat.
Turn 9
Another option available to the American player is Negotiation. Before any movement or combat on the American turn, U.S. units may call on militants in adjacent areas to lay down their weapons and free the hostages. This can turn out extremely well, or disastrously bad, depending on the outcome of the negotiations. The U.S. player does not yet know that the Iranian chose the “Extreme Fanaticsim” option which will make negotiations extremely difficult. Blissfully unaware of this, and hoping the secure the hostages without alerting the sentries, at the start of turn 9 he calls for the fanatics to surrender.
The call for negotiations immediately alerts all Iranian units in the area being addressed. The Iranian player flips over the face-down unit to reveal a dummy counter which is removed from play. The other unit is a 5-strength militant unit. Finally, the American is informed that Hostage counter #3 contains 14 hostages. Now the U.S. player must roll to determine the outcome of the negotiations. A roll of 6 or higher on a d6 will cause all militants in the area to surrender and release the hostages unharmed. The U.S. is awarded +1 to his die roll because he outnumbers the militants by 4-1, but gets a -2 because of the Iranian “Extreme Fanaticism” option, for a net -1 modifier. He rolls a 4 which is reduced to 3. A result of 3 means that “the militants prepare to shoot the hostages. If the U.S. player cannot eliminate all militants in the aread before the next Iranian turn, they will then roll one die and shoot that many hostages.”
Oops! Things have taken a definite turn for the worse. There’s nothing for it now but to storm the building and take out the militants in a Close Attack.
The moment of truth arrives and the commandos charge from Road 22 to the ground floor of the Residence. The movement phase ends and the first Close Attack of the game begins.
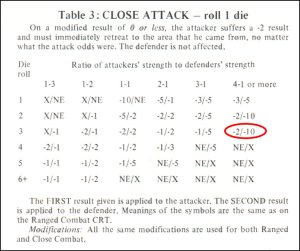
There are 21 American Commandos and 5 Iranian Militants, so the combat will be fought on the 4-1 column of the Close Attack table. The only modifier will be a -2 to the American die roll as the defenders are in a Building. The die roll is 5, which adjusts to 3 after the -2 modifier. This result translates to 2 American casualties and 10 Iranian KIA. As there are only 5 militants in the combat, they are all eliminated. Whenever the U.S. takes casualties, half of those casualties are considered KIA and the other half are only wounded. So, the U.S. has sustained 1 KIA and 1 wounded commando is added to Hostage counter #3 (i.e. the American keeps track of all this on a piece of paper… or he can use
my custom Raid on Iran Player Aid Sheet). The end result is that the American player is now in control of the movement of Hostage counter #3.
Note that there are never “wounded” militants; they’re all just KIA. And notice that, in close attacks the American player does not run the risk of harming the hostages as would be the case with ranged attacks.
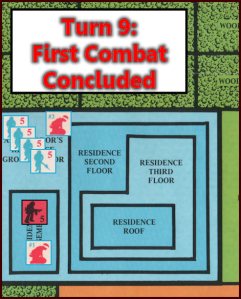
The ruckus in the Ambassador’s Residence also immediately alerts the militants guarding the hostages in the basement, as well as ALL the sentries on the map. Those units are turned face up to indicate their alerted status. In the basement, Hostage counter #1 and a 5-strength militant guard unit are revealed. No other combat will occur so we move on to the first Iranian player phase of the game.
Now, it’s the Iranian turn. The first order of business is to have the sentries start “waking up” the militants and guards that are dispersed among all the buildings. The hostage guard unit in the basement is alerted but, unless he wants to charge up the stairs into the waiting gun sights of 20 commandos, he will make no move. Needless to say, the militants holding the hostages in the Residence basement are in a tough spot. There’s only one way out; directly through the commandos on the ground floor. Although things have not turned out as the Iranian player planned, he intends to stick to the basic posture he chose during setup: confrontational and fanatical. Accordingly, he declares that he will attempt to execute the hostages.
Hostage executions do not happen automatically (otherwise it might be a pretty short game). The Iranian player must roll one die to see if the guards will actually shoot the hostages. The following results are possible:
- 3 or Less – No hostages are executed.
- 4 or 5 – Some hostages will be killed as a warning. Roll another die and kill that many hostages.
- 6 or More – All hostages are killed.
There is a +2 modifier to this die roll as Iran chose the “Extreme Fanaticism” option during setup. The die roll is 2, modified to 4, so “some” hostages will be executed. A second die is rolled, and results in a 6. The militants execute 6 hostages immediately! This is a big setback for the American player. Instead of earning 10 victory points for each hostage rescued, he will suffer a -2 for each of the six just executed. The only silver lining to the situation is that, from now until the end of the game, U.S. commandos will add +1 to all the attack die rolls, due to “commando outrage” at the executions.
The Iranian player scratches 6 hostages off of the total for Hostage counter #1, and the U.S. player adds 6 to his tally of hostages killed. There’s nothing else for the Iranian to do, so we proceed to Turn 10.
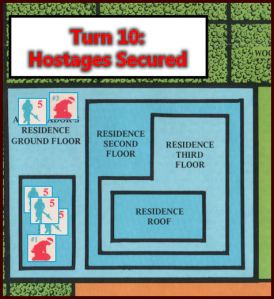
Turn 10
The commandos outside the compound are sitting tight, waiting just one more turn for the hostages in the Residence basement to be secured before crashing the gates. Because he is reasonably certain that the hostages in the Ambassador’s Residence will be rescued this turn, he decides to call for two helicopters. When summoned using this method (as opposed to pre-planning the arrival turns during game setup), the helicopters will arrive 5 turns later. So, he can expect these two helos to show up at the start of game turn 15.
Now, to secure Hostage counter #1. During the movement phase 15 of the commandos charge down the stairs into a Close Attack. Five commandos remain on the ground floor with Hostage counter #3, representing 14 hostage and 1 wounded commando. The battle odds are 3-1 in favor of the attacker (15 commandos to 5 militants), and the U.S. die roll is 5. This is modified to 4 (-2 for defender in building, +1 for commando outrage). The final combat result is “NE/-5” which means “No Effect” for the attacker and 5 losses for the defender. Once again, all the defenders are blown away, and the next group of 15 hostages is secured.
During the next few turns, while some of the commandos hunker down in the Residence with the hostages and the wounded, 10 or 15 of them will start moving through the woods towards the Chancellery to assist in that rescue. Once the sentries are alerted, things get hot very quickly. Every turn the militants’ numbers will grow. The commandos outside the Main and Rear Gates, as well as the mortar crews can start blasting away at the gate sentries, or can hold fire until it gets closer to turn 15 when the first of the helicopters is scheduled to arrive. There’s always that balancing act between moving too soon… and waiting too long.
Of course, the American player is free to change his mind and shift his units away from the gates and attempt to breach the wall directly in front of the Chancellery, where there are fewer sentries. Although in this example it seems like the U.S. has had it fairly easy, securing over half the hostages in the first 10 turns, things could have turned out very differently. A failed Entry by Stealth roll on the first few turns would have totally changed the complexion of the game. The real contest is just beginning.
And with 21 hostages still unsecured, this mission is far from over.
Summary
It should be apparent by now that I’m a big fan of this game. It’s one of the most underrated games of the last 30 years. It’s exciting, tense, plays quickly, and turns out differently each time. All the things that make gaming worthwhile.
There’s a lot of good stuff I didn’t cover in this article (I don’t want it to become just a summary of the entire rule book), like the whole drama of landing helicopters, loading them, and taking off again. As helicopters get damaged, they’re more likely to malfunction. The helicopter rules are such that, even an undamaged helicopter may fail at the critical moment. When a helicopter fails, it must discharge its crew of 5… who then have to be loaded into another helicopter for extraction. The more U.S. personnel on the ground, the greater the chance of taking casualties or, in the worst case, becoming hostages themselves.
If I had to put forth a criticism, I guess it would be that there is no consideration of absolute time in the game. What I mean by that is, for example, in the beginning turns of the scenario above, the U.S. commandos were going over the wall 5 at a time to minimize the possibility of rolling a failure on the Entry by Stealth table. What if all 90 commandos enter like this? It would take 18 turns to get them over the wall, while the Iranian player twiddles his thumbs. Also, I have seen games (on rare occasions) where the U.S. player has not secured all the hostages, the helicopters are getting shot up, and the commandos just run all around the compound, evading the militants by using the commando double-move, and looking for an opportunity to snag the remaining hostages. It becomes like the Keystone Cops trying to snag the criminals, who are always just out of reach. For these reasons, I’ve always felt like there should be an absolute time limit on the game. Nothing too restrictive; maybe 40 turns. Just something to impose a greater sense of urgency on the U.S. player. Let’s see him take 18 turns to climb the walls when he’s only got 40 turns total!
Like most games from 30 or 40 years ago, it could use a facelift. I have created a PDF document that contains the rules and charts in a more organized fashion. I have also created a new set of counters that simplify some of the bookkeeping tasks. For example, I always felt the wounded commandos and helicopter crews should have their own counters, rather than being lumped into a hostage counter. I’m also working on a “face-lift” for the game map and will post that when its complete.
If you can find a copy of this game on eBay for a reasonable price, snag it! You won’t regret it.