Editor's Note: Gamer Chris Cooper spotted a mistaken assumption in this article and wanted to share it with Grognard visitors.
Author Mark D. states that you can perform part of a Command, then part of the Special Ability, then back to the Command, then back to
the Special Ability, etc., which is incorrect.
Rule 4.1 states that "A Faction may execute its Special Ability at any one time immediately
before, during, or immediately after its Command." So in the article example, Caesar would not be able to Scout twice, in Provincia and again
at the end of his March in Nervii.
The article still illustrates interesting game tactics and therefore is still worth a read, however.
So we're leaving it in place, with this caveat.
Overview
Buy Falling Sky from
Noble Knight Games

A few years back, I wrote an article for the "Inside GMT" blog that was credited as being the first Strategy Article published in Inside GMT. It was
titled
Perfect Openings: First Turn VC Strategy in 'Fire in the Lake', and proposed a "perfect" set of opening moves for the Viet Cong on Game Turn 1 of Fire in the Lake, GMT's COIN
Series game that covers the Vietnam War. I wrote: "The player who gets the first move of the game should capitalize on this advantage. It can set the tone for the early portion of the
game and, in Fire in the Lake, it's the only move that can be planned with any certainty. After that very first move, the game can go off in a thousand different
directions... but the first move can be carefully planned."
I have spent a decent amount of time during the COVID-19 lockdown playing a more recent title from the COIN Series, called Falling Sky: The Gallic Revolt Against Caesar.
It is a 4-player game that uses the same core mechanics as any of the COIN Series games, but is layered with special rules that make the COIN framework fit the period of the conflict.
Sometimes this can seem more like "tormenting" the framework to fit the period but, all in all, if you enjoy the COIN Series, you'll probably enjoy Falling Sky too. I'm a
big fan of the period, so I looked forward to trying the game.
The thought of writing a comprehensive review of the whole game just made my head hurt. Like all the COIN Series games I've played, there's just too much going on in Falling Sky
to attempt to condense it down to a 2,000 word article. So I found myself drawn again to thinking about "perfect" opening moves. Manageable, quantifiable, easy to evaluate and judge.
Of course, just using the word "perfect" in an article such as this is just *asking* for someone to shoot it down. But here goes...
In this article, I'll discuss opening moves for the Roman player, assuming they are graced with the very first move in the Reconquest of Gaul: 53 BC scenario.
The scenario takes place after Caesar had beaten all comers in Gaul and Germania and had thought to settle down to enjoy the fruits of his victories. But the Gauls were not
ones to accept defeat for any length of time. New Gallic leaders appeared and rallied their people to rise up against the Roman oppressor one more time.
(Note: It is assumed that the reader is familiar with the game or at least with the COIN framework in general, so basic rules will not be discussed in any detail)
The Trouble With Belgae
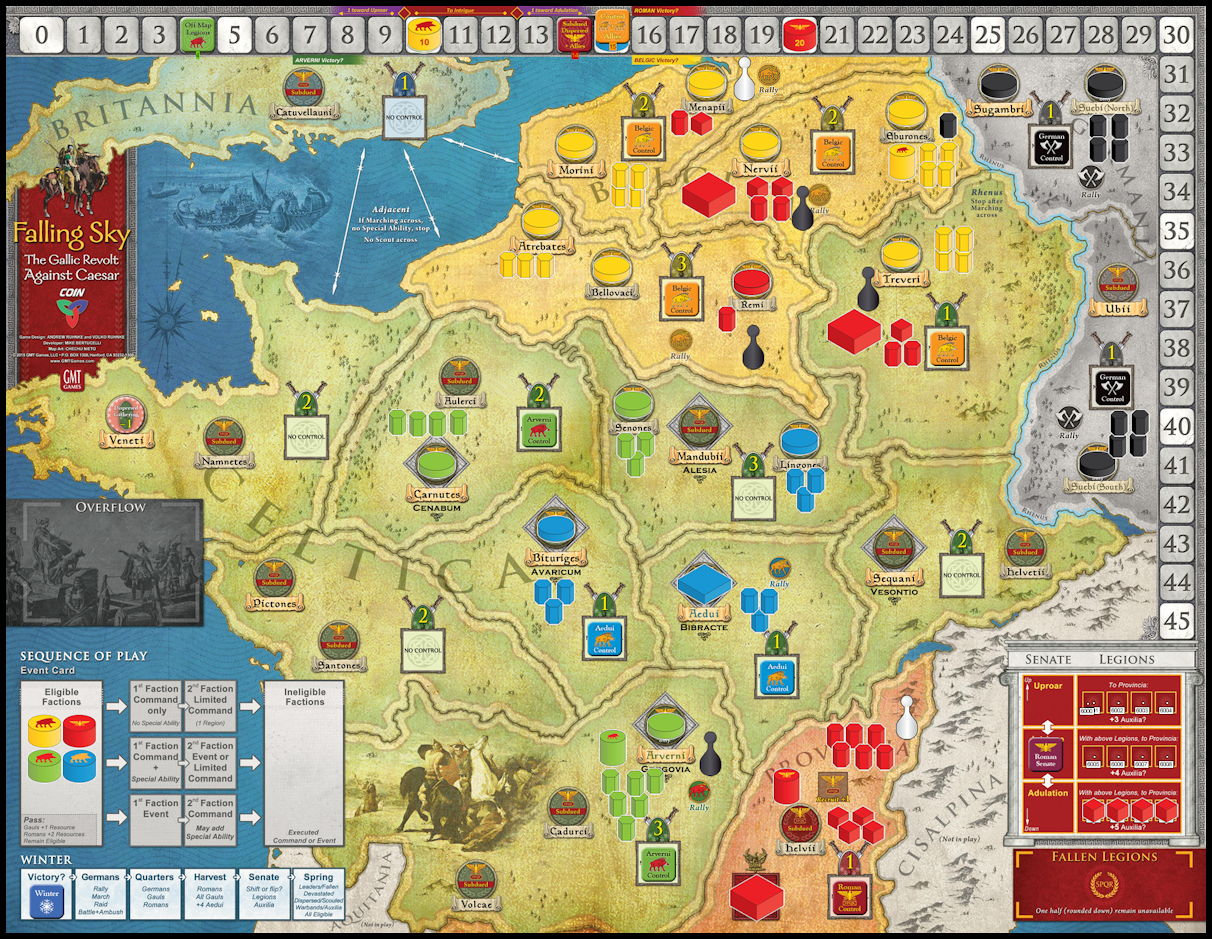
Reconquest of Gaul: 53 BC - Starting Moves
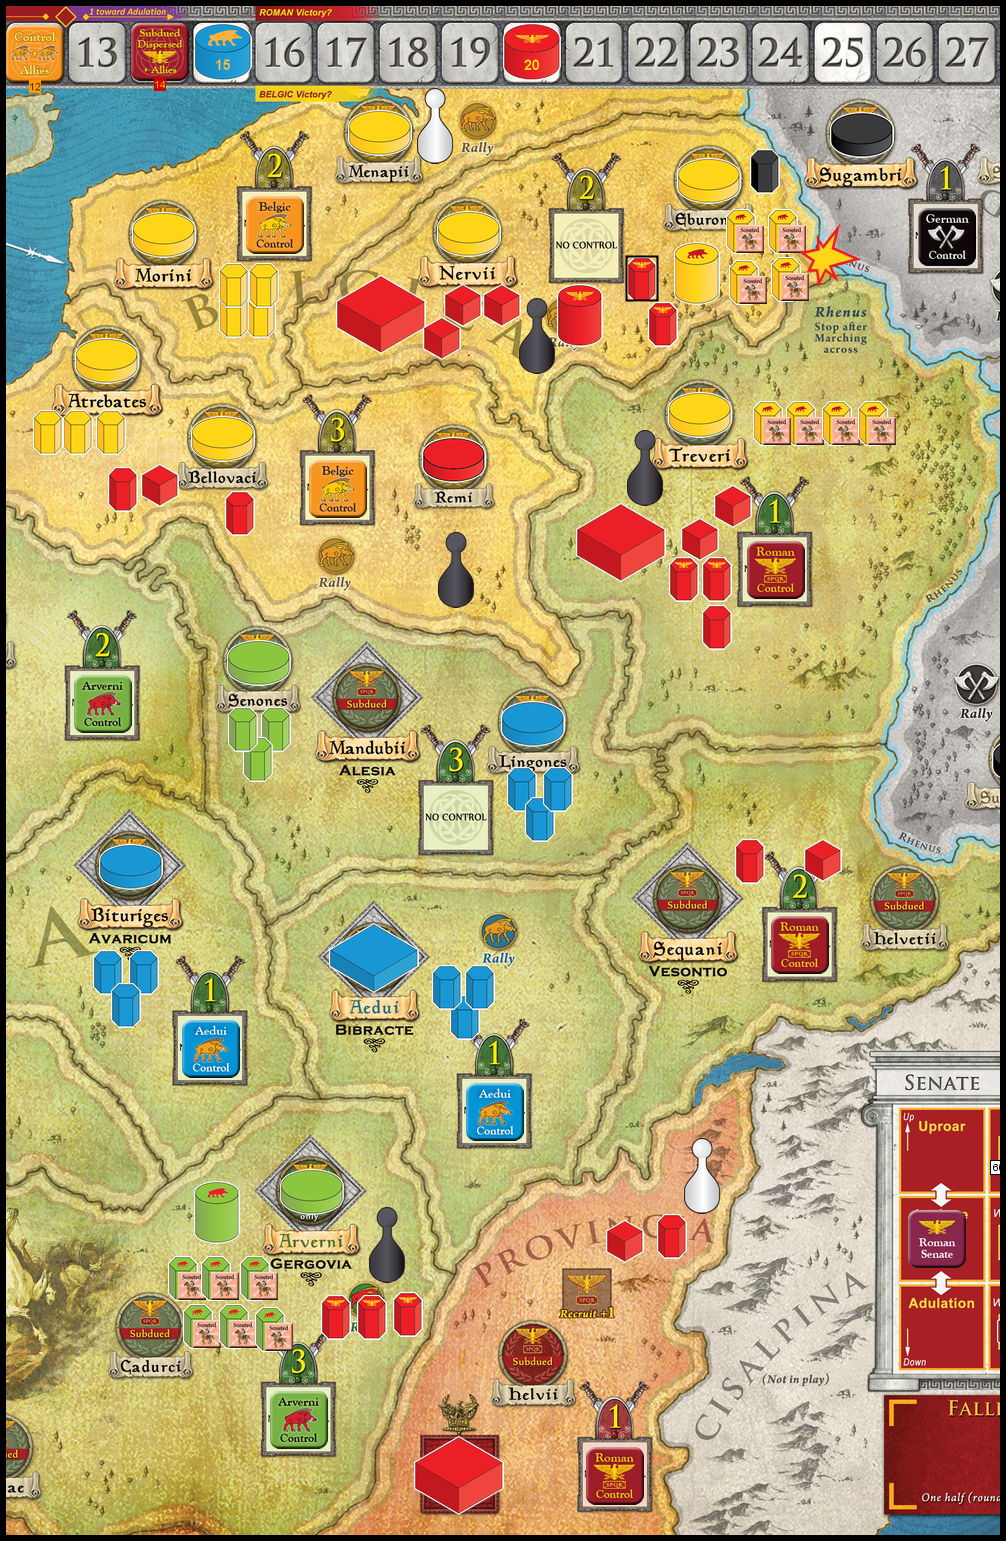
The first graphic, above, shows the opening setup for the scenario. The Romans are the red pieces, Aedui are blue, Arverni are green,
and the Belgic Tribes (aka Belgae) are yellow. The Romans begin in kind of a precarious situation, scattered as they are throughout
the Belgae regions. A "perfect" turn would accomplish several things:
- Create a Roman-controlled supply line from Provincia to all Romans in the field.
- Knock Gallic forces off-balance, reducing the liklihood of an attack.
- Ensure that in the event of a battle, Romans will prevail.
- Position the Romans to knock the Belgic Tribes out of the war for good.

Toward that end, the Roman player has placed white pawns in the following Regions: Provincia, where Caesar and 4 Legions currently reside, and
Morini, where a Roman Legion and associated Auxilia have over-extended themselves and now face danger of being isolated. The white pawns indicate
the main Command that will be executed. In this case MARCH. Caesar will march north to take matters in hand, and the Legion and Auxilia in
Morini will move to a more defensible position.

Next, the Roman player places black pawns which indicate Regions where he will perform the SCOUT Special Ability. Scouting reduces capabilities
of the target Gallic units such as their ability to Ambush or Rampage, which may place them at a serious disadvantage. The Romans intend to
Scout in 4 Regions: Arverni, Treveri, Nervii and Atrebates>
It's important that the Command and Special Abilities are executed in the proper order for maximum effectiveness. Players have a great deal of latitude in
how they sequence their Commands and Special Abilities and this must be understood in order to play effectively.
Roman Scouting and Marching
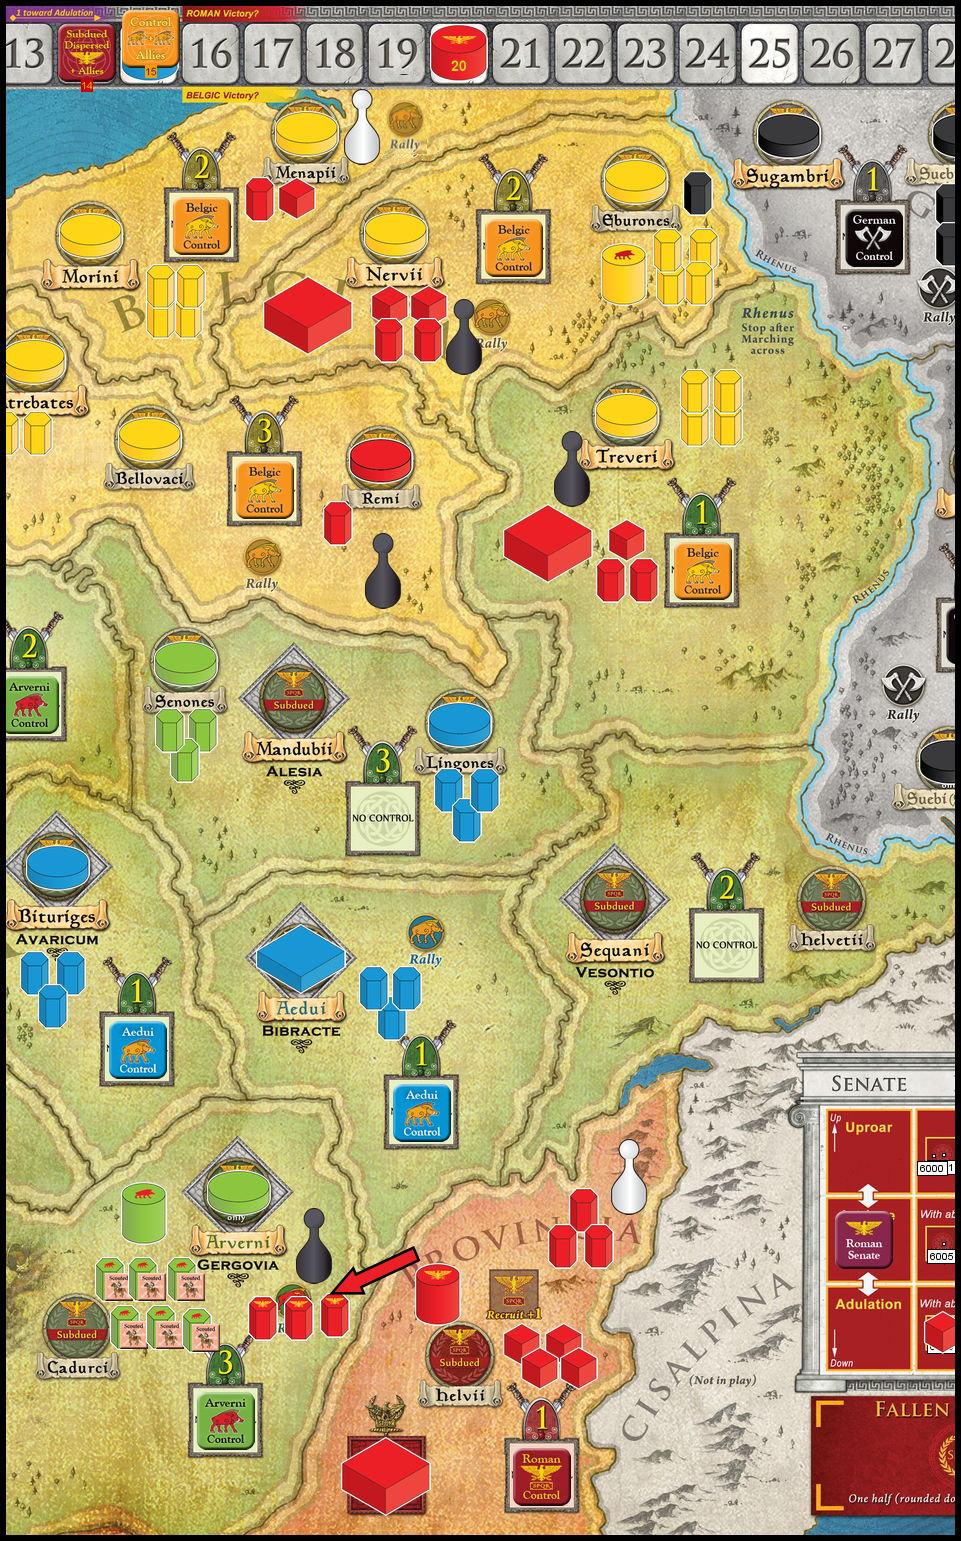
Falling Sky - Initial Scouting
First, to neutralize any threat from the Arverni in the west, 3 Auxilia move from Provincia to Arverni and SCOUT, revealing all 6 Arverni Warbands and
placing Scouted markers on them. This, of course, reveals the Auxilia that Scouted them as well. Rules generally allow the execution of Commands and Special Abilities
in any order. In this case, the Romans can Scout in one area while Caesar is in an adjacent Region, even though Caesar may (and will) subsequently move out of that Region.
Falling Sky - Caesar on the March
Caesar marches north to the Sequani Region, leaving behind a Legion and an Auxilia to man the fort in Provincia. Roman Control is immediately established in Sequani.

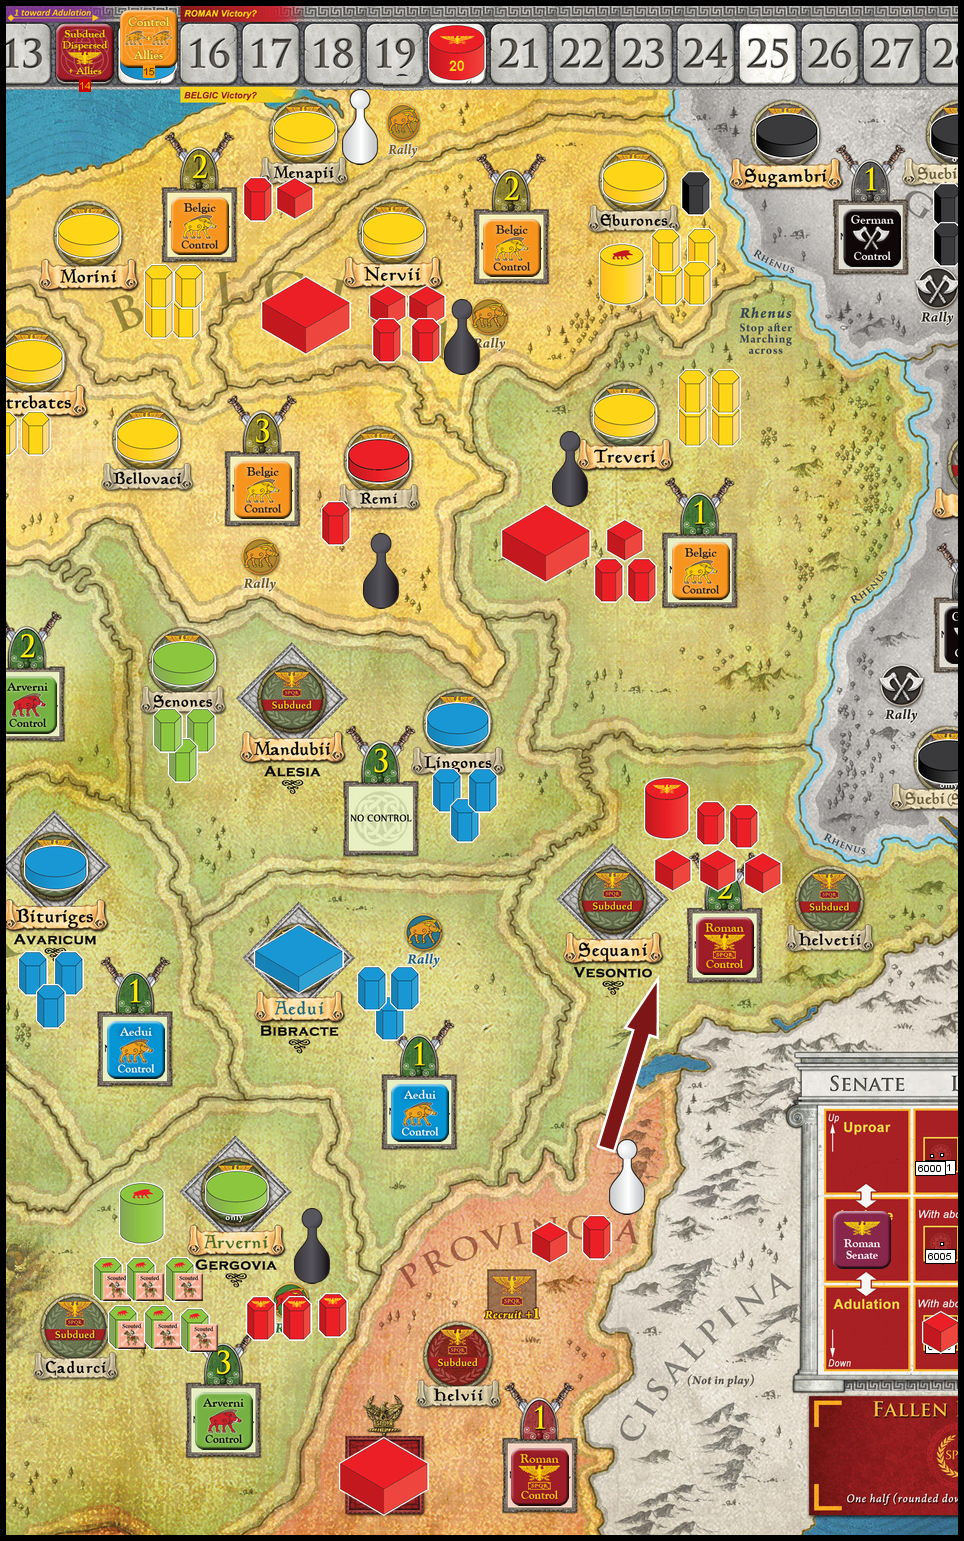
Falling Sky - Caesar's March Continues
Caesar leaves behind a Legion and an Auxilia in the Sequani Region to retain Control and to fend off any aggression by the normally friendly
Aedui, and continues marching north to the Treveri Region, immediately taking Control there too.

Falling Sky - Caesar Arrives in the Belgae heartland
Caesar leaves behind another Legion and Auxilia in the Treveri Region, and continues marching north to the Belgae heartland, the Nervii Region.
Because none of the Factions have more pieces in the Region than all the others combined, the Region changes to No Control.
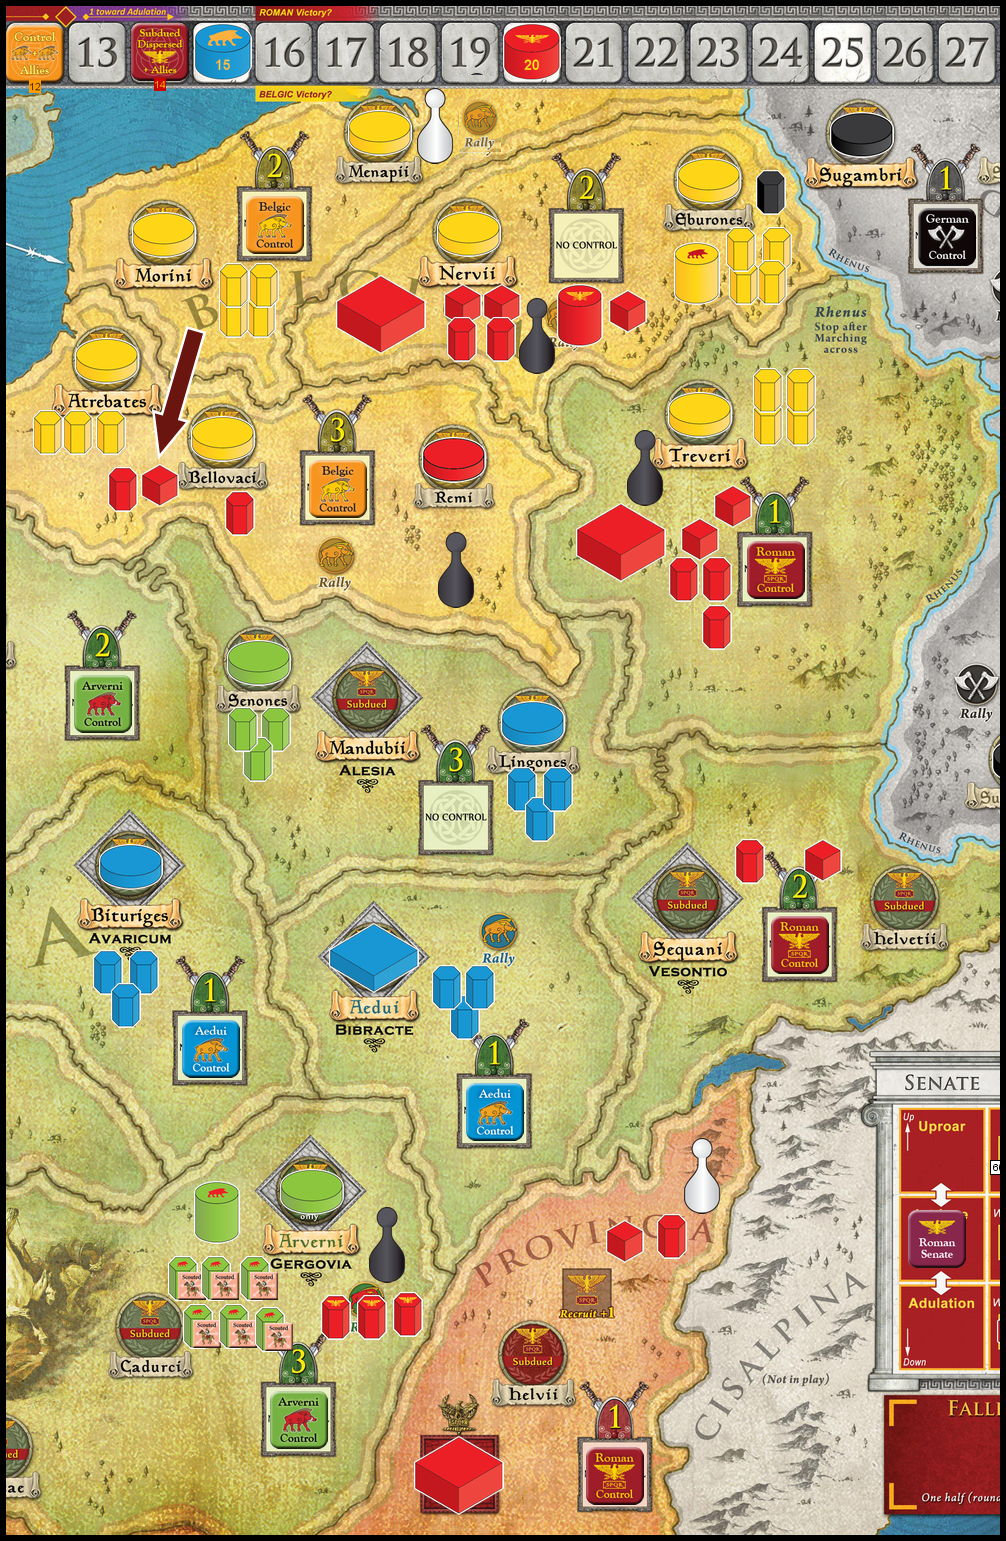
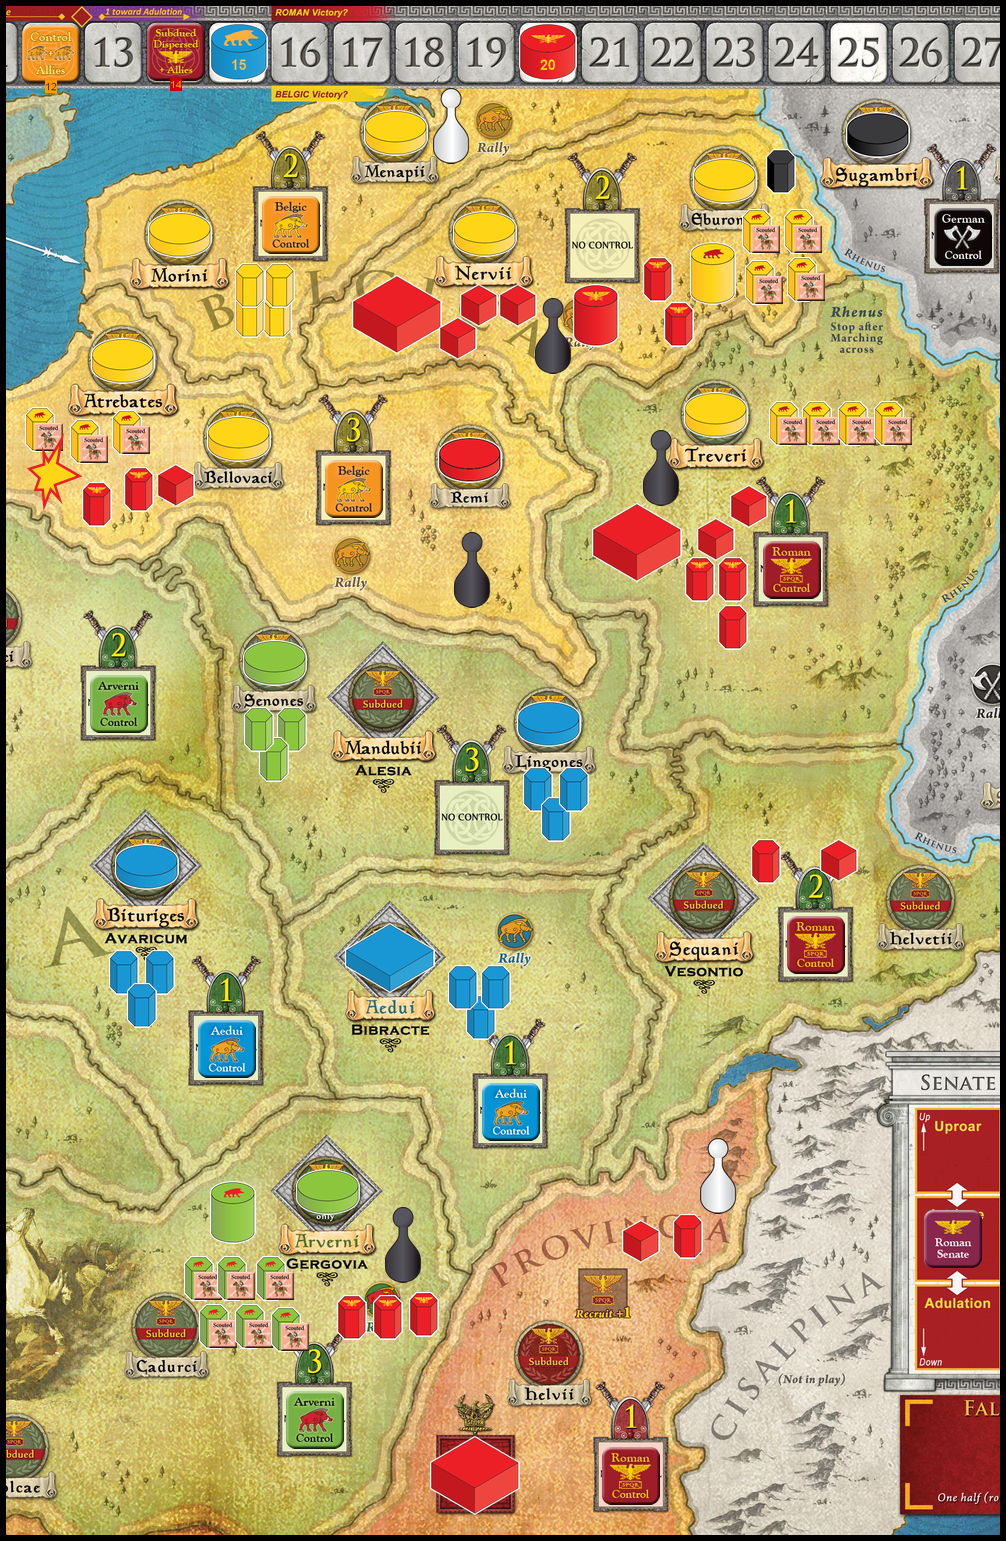
Falling Sky - Endangered Romans on the move
Lest they be stranded deep in Belgae country (Morini Region), the Roman Legion and Auxilia move south to join their comrades
in the Atrebates Region. The Belgic Tribes maintain control of the Region.
With Caesar now in a central location, the Region occupied by him and all other adjacent Regions may execute a SCOUT Special Ability.

Falling Sky - Scouting in Treveri
The first Region to get Scouted is the Treveri Region. For each Roman Auxilia that is revealed, the Roman player may reveal 2 Belgic
Warbands and he does so.
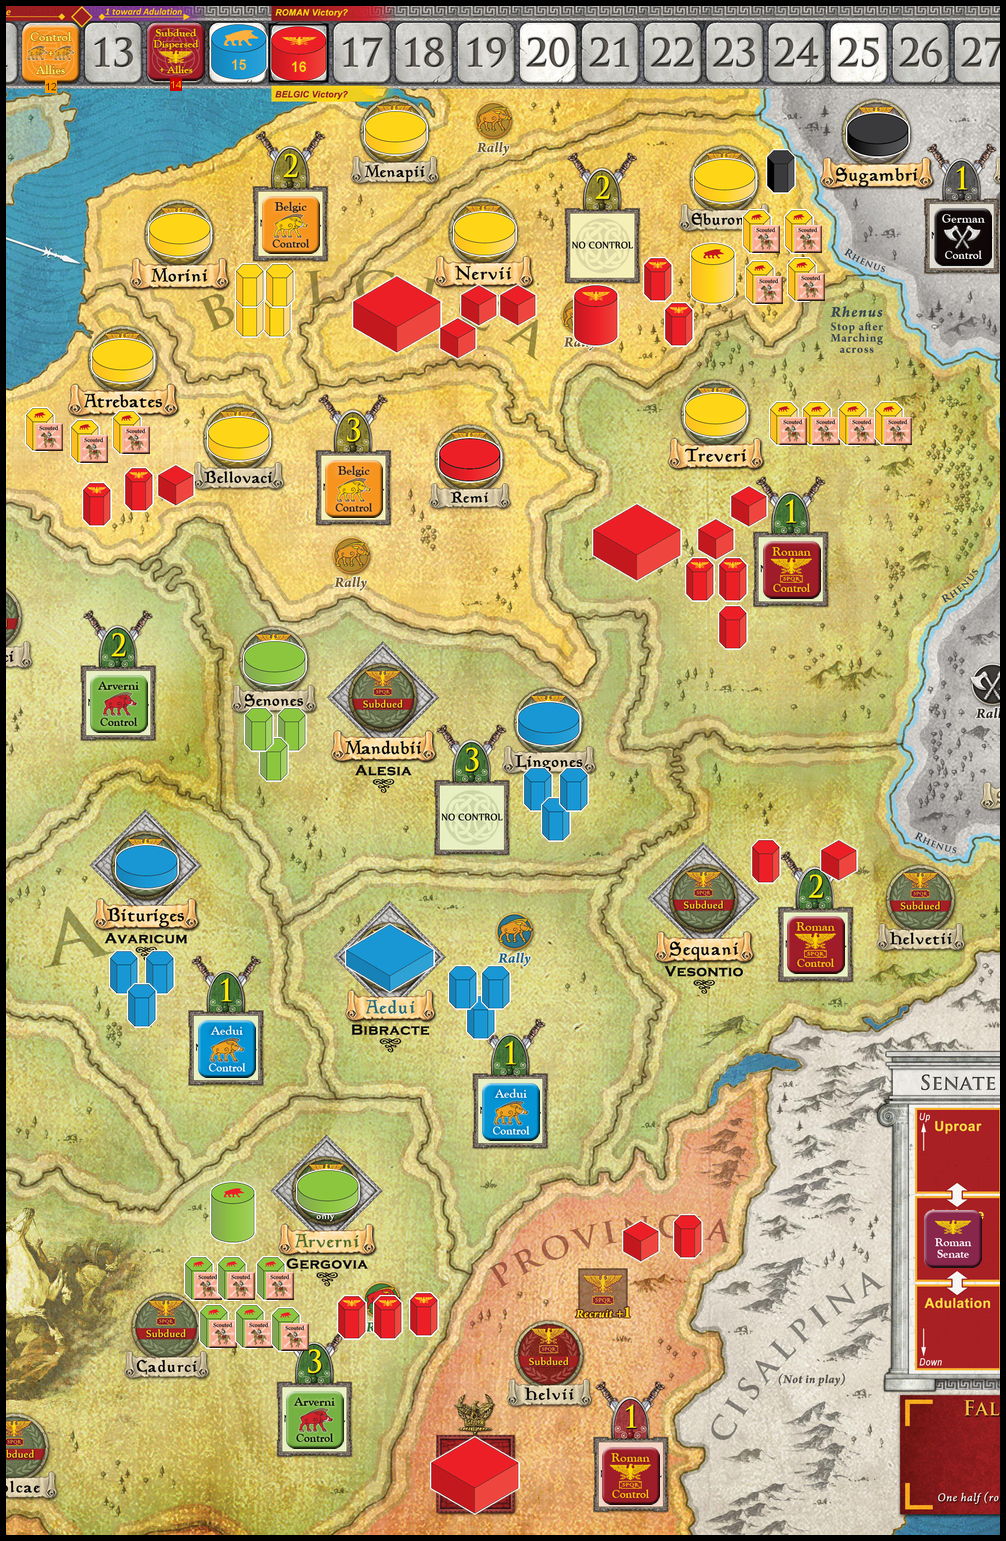
Falling Sky - Scouting in Nervii
The next Region to be Scounted is the Treveri Region. Two Roman Auxilia are sufficient to reveal/Scout all 4 Belgae Warbands there.
Falling Sky - Scouting in Atrebates
The last Region to be Scounted is the Atrebates Region. The 2 Roman Auxilia there are more than enough to reveal/Scout all 3 Belgae Warbands.
Finally, the Roman player spends the 4 Resource points that is owed for the two March Commands he executed, which will leave him with 16.
The stage is now set for the Romans to dominate the Belgic Tribes and beat them back into submission. Let's see why this series of Commands
and Special Abilities make up the "Perfect" Roman opening.
Why It's a Perfect Opening
Falling Sky - Perfect Opening
I know what you're saying: "Nobody got killed. How can it be a perfect Roman kickoff if nobody got killed?" It is true that no Gallic
units have been eliminated yet. But the stage is set for a Roman victory in 53 BC. Let's review what has been accomplished.
- As it stands now, the Romans cannot be AMBUSHED anywhere on the map. All enemy Warbands otherwise in position to Ambush/Battle are "revealed" and Scouted to boot.
- Belgic Tribes leader Ambiorix cannot utilize either Rampage or Ambush. This neutralizes every advantage the Belgae normally have in combat.
- A clear Roman Line of Supply has been opened between Provincia and every Roman force on the map except for the 3 units in the Atrebates Region.
- Battle security - The Romans in the Atrebates Region can defeat the Belgae there, if attacked.
- Battle security - The Romans in the Treveri Region will crush the Belgae there, if attacked.
- Battle security - Caesar and his Legions in the Nervii Region will destroy Ambiorix and his Belgic Warbands there if attacked.
- The next Faction to play will be restricted to either a Limited Command (only one Command in one Region) or to playing the card's Event.
- If the Belgae are next up, they'll almost have to use their Limited Command on a MARCH to get their leader Ambiorix safely out of the kill zone, losing
Control of the Nervii Region in the process, and allowing the Romans to tighten the noose on the Belgic Tribes.
- Arverni Leader Vercingetorix and his 6 Warbands in Arverni can kill 2 Roman Auxilia there and chase the 3rd back into Provincia. But that doesn't buy them any
more than they started the scenario with, and therefore would be a wasted turn.
- Another Arverni option would be for Vercingetorix to lead all 6 of his Warbands (he'll need them all) to take control of the Provincia Region and eliminate a Roman Legion in
the process. But he would have to give up control of the Arverni home Region, so it's an even trade. And it will only take a single March for Caesar and his other Legions
to be back in Provincia looking for revenge....
The only wildcard for the Romans, relative to the Belgae, is literally a "wild" card, i.e. the Event that may be available to the Belgae. That is the only thing that could make
my entire "Perfect Opening Move" strategy unworkable. It's the Event cards that make the game so unpredictable and varied. While some find that disconcerting (and you know who you are),
I find that it works perfectly in any game covering this period.
Closing Thoughts
But what if the Romans don't go first? But what if availability of a devastating event forces them to take action to prevent the play of that
event by another faction? What if the Arverni go on a "Devastation" rampage and shut down the Roman ability to manuever quickly?
What if the Aedui choose not to remain the "faithful ally" and launch a fifth column attack of their own?
What if? What if? What if? That's the bane of all players of GMT's COIN series. And one of the main reasons that people keep
buying COIN games as fast as GMT can print them. And so there are many "what ifs" that accompany the perfect opening moves that
I've laid out here, but I think it's a solid tactical kick-off maneuver for the Romans nonetheless.
I'm going to try to see if I can come up with Perfect Opening Moves for each Faction represented in the game, if that's at all
possible. I think the Aedui are going to be difficult...
This "Perfect Opening" will be put to the test again in the very next game where I'm the Romans and have the first move. And in the meantime,
I hope you'll come up with some perfect moves of your own. Or counter moves to mine.
Feel free to email me (see below) or share an article of your own.