(November 98) 1.2 Adds Morale Check Modifiers for clarification.
1.1 Background: (Back to Table of Contents)
The American Revolution in the South was the first American civil war. Patriot and Tory fought each other with a ferocity unrivaled anywhere except the Indian frontier. And in each of the four battles simulated - on one side or the other - were legions: unique, combined arms units built around cavalry. At Waxhaws and Cowpens, Banastre Tarleton's "British" Legion was composed entirely of Pennsylvania and New York Loyalists, eager to avenge the loss of their estates up north. At Hobkirk's Hill, the core of (George's cousin) William Washington's Legion helped pull the linchpin out of the British position in the south. And at Quinby Bridge, Henry "Light Horse Harry" Lee's Legion was the regular backbone for Thomas Sumter's and Francis "Swampfox" Marion's partisans. American Legions simulates four crucial contests for control of the South in 1781, where, unlike the Revolutionary War in the north (where cavalry encounters were rare), the saber-wielding dragoons were of ten the decisive arm in these southern battles.
'American Legions' is the name for four games, all using these same system rules, on the battles of Waxhaws, Cowpens, Hobkirk's Hill and Quinby Bridge.
1.2 Glossary (Back to Table of Contents)
Companies: All combat units in American Legions are companies (approximately 50 men). Skirmisher and royal artillery companies represent as few as 9 or (in the case of some artillery batteries) as many as fifty men.
Regiments: A grouping of companies under one commander. (Note that some of the regiments in American Legions contain companies from more than one historical regiment.) Regiments are either battle-worthy (i.e. capable of combat) or routed.
Brigades: A group of regiments commanded directly by one leader.
Regimental Morale: The ability of a regiment to stand the stress of combat without becoming routed. (Regimental Morales are shown in separate boxes on the map.)
2.0 GAME EQUIPMENT (Back to Table of Contents)
2.1 Game Scale (Back to Table of Contents)
Each hex is 100 yards. One turn equals ten minutes.
2.2 Playing Pieces (Back to Table of Contents)
Each playing piece represents a body of troops or an officer who led them.


2.3 Abbreviations (Back to Table of Contents)
Lt: Light Infantry
BRITISH
Phil.: First Philadelphia Company of Dragoons
Fusil.: Fusiliers
Hlndrs: Highlanders
P.o.W: Prince of Wales Loyal American Volunteers
Ryl Art: Royal Artillery
AMERICAN
Cont: Continental
De: Delaware
Drgns: Dragoons
Ga.: Georgia
Leg.: Legion
Md: Maryland
NC: North Carolina
SC: South Carolina
Va.: Virginia
2.4 General Set Up: (Back to Table of Contents)
Set up hexes for regiments are printed on the map. If there is only one hex shown on the map for a regiment, then the regimental leader and all the companies of that regiment are stacked in that hex. If there is more than one hex shown for a specific regiment, the player can allocate leaders and companies between the hexes as he sees fit (within stacking limits). Brigade leaders may be set up in any hex containing companies from any of his brigade's regiments.
3.0 SEQUENCE OF PLAY (Back to Table of Contents)
BRITISH PLAYER TURN
(The British player turn is always first in each game turn, although the first turn may start at a point other than the British Command Phase. If this is the case, all preceding phases are skipped for the first turn only.)
British Command Phase
In the American player turn, the sequence is reversed (the American command phase is first, etc.) and American companies get full movement in their movement phase (and routed regiments move their full movement allowance in the command phase.) (See the Phase Track on the map).
4.0 COMMAND AND MORALE (Back to Table of Contents)
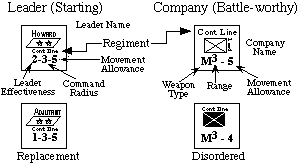
A leader is necessary for issuing orders to a regiment and rallying regiments and companies. (Players should note that all rules apply to regimental leaders also apply to brigade leaders. The only difference is that a brigade leader commands more than one regiment. From here on, regimental and brigade leaders will be referred to simply as "leaders.") High ranking leaders also positively affect their regiment's morale level. Army commanders can increase the leadership effectiveness of leaders, or they can relieve a leader. A leader affects only his own regiment(s).
4.1 Company and Regimental Conditions (Back to Table of Contents)
Companies may be in or out of command, battle-worthy (on their facing side) disordered (on their reverse side), or on the regimental track (as either available for rallying or permanently eliminated). Regiments may be battle-worthy, routed, or permanently eliminated.
4.11 Company's Command Status (Back to Table of Contents)
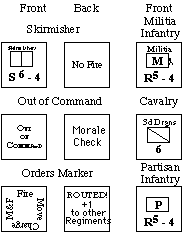
Any company which is outside it's leader's command radius at the beginning of a command phase is "out of command." (Place an "out of command" marker on the company(s)). A company which is "out of command" is flipped to its disordered side, cannot move (except to retreat as a result of regimental rout), and cannot initiate any kind of combat.
4.12 Disorder (Back to Table of Contents)
Companies become disordered as a result of combat, or because their regiment failed a morale check. Disordered companies have their combat strength (for both attack and defense) halved for fire and shock combat, and their movement allowance reduced by one (1). A disordered company which suffers another disorder result is removed from the map and placed (face-up) on the first available space on the Regiment track.
![]() Regiment Track diagram
Regiment Track diagram
Companies are permanently eliminated (placed on the regiment track face-down) when they suffer a "K" result . A regiment/brigade is permanently eliminated when all of its companies have been removed from the map (whether through K results or multiple D results). When a regiment/brigade is eliminated, remove its leader from the map.
4.14 Regimental Rout (Back to Table of Contents)
Regiments are either battle-worthy (capable of combat) or routed (i.e., running away). A regiment may become routed as a result of failing a morale check caused by combat or when changing orders in a Command Phase.
A leader must end every movement phase stacked with at least one company from his regiment/brigade.
4.3 Army Commanders (Back to Table of Contents)
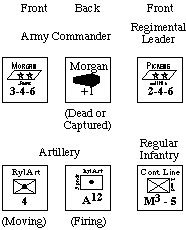
Army Commanders are the overall commanders of their respective armies.
4.31 Supporting Regimental/Brigade Commanders (Back to Table of Contents)
An army commander increases the effectiveness rating of any leader he is stacked with by one.
4.32 Relieving Regiment/Brigade Leaders (Back to Table of Contents)
An army commander may relieve a leader and "take over" his regiment/brigade. To do so, the army commander must be stacked with the leader to be relieved. The leader is removed from the map, and the Army commander becomes the leader for all intents and purposes for the rest of the game.
4.33 Alone in Hex (Back to Table of Contents)
If a company ever enters a hex containing the enemy army commander, the army commander is captured and placed (face down) in the Army Commander box on the map.
4.4 Effect of Combat on Leaders (Back to Table of Contents)
The first time in a Mutual Fire Phase that a six (6) is rolled against a hex containing a starting leader, roll again to see if he is killed. (Subsequent "6" rolls in the same Mutual Fire Phase are ignored.) On a 1-3, the leader is killed. If the leader is on his starting side, the counter is flipped to its Adjutant side. Any later casualties cause the Adjutant to be replaced by a Captain (on a separate counter). When there is more than one leader in the hex, the owning player chooses which will be affected. Further results have no effect on Captains. In shock combat, if all the companies in hex containing a leader (or leaders) are removed from the map because of a shock combat result, roll a die for each leader in the hex. On a 1-3, the leader is killed, and replaced as above. Surviving leaders are placed on the nearest surviving company in their regiment/brigade (or army, depending upon the type of leader).
4.41 Army Commander Casualties (Back to Table of Contents)
If the army commander is ever killed or captured, the counter is removed from the map and placed face-down in the Army Commander box on the map. (The +1 on the back serves as a reminder that loss of the army commander results in a permanent +1 modifier to all morale checks for his side.) Even if the Army commander was serving as a leader when he was removed, the +1 modifier is still applied for the rest of the game.
4.5 Morale Check (Back to Table of Contents)
Whenever a regiment is rallied or issued new orders, or whenever a player attempts to rally or re-order companies, or in the event that "D" or "K" results are inflicted on companies in the regiment the player performs a morale check. He compares the sum of two dice plus any applicable morale modifiers (called the "modified morale check") to the sum of the Regimental Morale (shown in the regiment box on the map) plus the Leader's effectiveness rating (the "modified regimental morale"). If the modified morale check is less than or equal to the modified regimental morale, the check is passed and the attempted action is successful. If the reverse is true, the result depends upon the action attempted and the degree by which the regiment's modified morale is exceeded.
One or more disordered companies in regiment +1
For each friendly regiment (other than the one making the morale check) which is routed or permanently eliminated (except fo the 17th Dragoons) +1
If battleworthy enemy infantry are withing one hex of any company of the regiment +1
If battleworthy enemy cavalry are withing two hexes of any company of the regiment +1
For each of the regiments companies on the regiment track +1
If the army commander has been killed or captured +1
4.51 Combat Morale Checks (Back to Table of Contents)MORALE TABLE Morale Check Roll of (2) dice + Morale Modifiers less than or = to Regimental Morale + Leader Effectiveness Rating
Cause of Morale Unrouted Regiment Attempt To Attempt To Check suffers 1 or more 'D' Change Orders Rally Regiment or 'K' results in a Fire or Shock Combat Phase When Morale End of Fire or Shock Command Phase Command Phase Check occurs Combat Phase Result if Passes No further effect Change Orders Regiment is Rallied Morale Check (companies remain disordered) Result if Fails Regiment suffers an Orders Unchanged Regiment remains Morale Check by extra 'D' result in Regiment suffers ROUTED 1-4 addition to combat a 'D' result (owning (owning player chooses player chooses company) company) Result if Fails Regiment ROUTS (all Regiment ROUTS (all Regiment remains Morale Check by battleworthy companies battleworthy companies ROUTED (and suffers 5 or more become Disordered become Disordered an extra 'D' result)
Cause of Morale Attempt to Rally Attempt To Re-Order Check Company (roll for Company (roll for each invidually) each individually) When Morale Command Phase Command Phase Check occurs Result if Passes Company is returned Company is flipped Morale Check to map in battleworthy to its battleworthy condition, in hex of side the Regimental Leader Result if Fails Company remains on Company remains Morale Check by the Regiment Track Disordered 1-4 Result if Fails Company remains on Company remains Morale Check by the Regiment Track Disordered 5 or more
At the end of a Mutual Fire or Shock Combat Phase, make a morale check for any regiment which suffered at least "K" or "D" result. (Regardless of how many results were scored, each regiment makes only one morale check.)
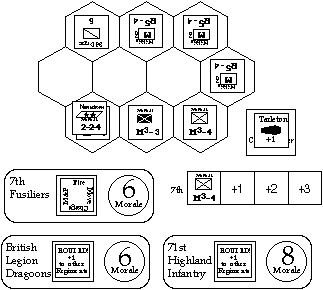 Morale example
Example: The center company of the 7th Fusilier regiment is disordered
in the Mutual Fire Phase. The (D) result requires a morale check at the
end of the phase. The regiment's basic morale is (6) (shown in the
regiment box at left) + Newmarsh's leader effectiveness (which is (2))
for a modified regimental morale of eight (8). The British player rolls
a five on two dice and adds the following morale modifiers:

+1 for the disordered company
+1 because the company on the right is next to a battle-worthy militia
   unit
+1 because of the American dragoons two hexes away (at the top left)
+1 for the Fusilier company on the Regiment Track
+1 because Tarleton (the British Army Commander) is dead
+2 because the Legion Dragoons and 71st Highlanders are both routed
--
7 (the total of the modifiers) is added to the roll, yielding a result
  of (12)

Twelve is four over the Fusilier's modified morale of (8) - one short
of the difference which would cause them to rout. The British player
can either flip one of the other two Fusilier companies to its
disordered side, or remove the disordered company and place it
(face-up) on the Regiment Track in the +1 spot.
4.52 One Company Regiments (Back to Table of Contents)
The rout or elimination of single company regiments never counts as a modifier to a morale check.
4.6 Orders (Back to Table of Contents)
Orders are a simplified version of the close order maneuvers that 18th century armies were drilled in. All companies in a regiment are issued the same order.
4.61 Issuing Orders (Back to Table of Contents)
In the first friendly Command Phase of the game, players may assign orders to their regiments without making a morale check. Place an order marker with the desired order showing at the top of the counter. If a player ever wants to change a regiment's current orders, or issue new orders after a regiment is rallied, the player must make a single morale check.
4.62 Types of Orders (Back to Table of Contents)
While a player is never obligated to issue orders, none of the companies may do anything unless the regiment has been issued an order. The orders that a player has to choose from are:
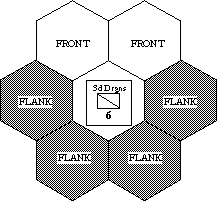
Most of the infantry units of the Revolution fought in lines which concentrated firepower in a single direction. Thus, each company has a front and flanks. A company must always be placed so that it faces the corner of two hexsides.
 Facing diagram
 Change Facing example
5.1 Changing Facing (Back to Table of Contents)
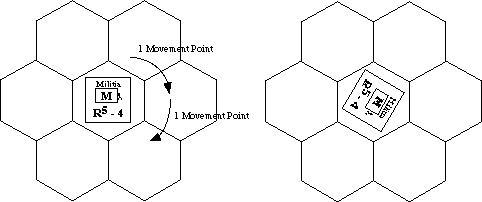
A company or stack may change facing to any hex corner anytime during a friendly movement phase at a cost of one movement point per hex corner changed. Alternatively, infantry and cavalry companies may execute a 180 degree turn at a cost of one movement point.
5.2 Effects of Facing (Back to Table of Contents)
A company may only move, fire or shock attack through its two frontal hexsides. As a company moves, it must enter a frontal hex. A company may never move directly into its flank or rear (i.e. it may not "side-step" or "back-up" into a hex).
5.3 Uniformity of Facing in a Hex (Back to Table of Contents)
All companies occupying the same hex at the end of the movement phase must face in the same direction. If a company has enough movement points to enter a hex with another friendly company, but not enough to both enter and change its facing to that of the company already there, it may not move into the hex.
5.4 Leaders, Commanders, and Routed Companies (Back to Table of Contents)
These units have no facing. They may be moved in any direction or combination of directions without paying movement points to change facing.
6.0 MOVEMENT (Back to Table of Contents)
6.1 Movement Limitations (Back to Table of Contents)
A player may move all, some, or none of his companies which have orders that allow movement during either of his movement phases . A company with a MOVE or MOVE & FIRE order may not be moved farther than its movement allowance permits, but it may be moved less. Units spend movement points to move from hex to hex or change facing. Unused movement points may not be accumulated from turn to turn or transferred from one company to another. The friendly movement ends when the player has moved all his eligible units that he wishes to move to the limit of their movement allowances.
6.2 Stacking (Back to Table of Contents)
No more than four (4) companies may be in a hex at the end of any movement phase. If there are more companies in a hex at the end of any movement phase than the stacking rule allows, the excess is permanently eliminated with the opponent deciding what is to be eliminated.
Because they move in the command phase, routed companies may move into a hex with battle-worthy friendly companies in violation of stacking. However, because overstacking is calculated at the end of a movement phase, unrouted companies have a chance to move out of the hex before the end of the movement phase, thereby relieving the stacking problem. If routed and unrouted companies are still overstacked at the end of the movement phase, the overstacking penalty is applied as per 6.2.
6.3 Moving through Friendly Stacks (Back to Table of Contents)
Friendly companies may enter a hex with other friendly companies freely (exception: cavalry cannot enter a hex with infantry and vice-versa). However, if a friendly company (or stack of companies) both enters and leaves a hex with other friendly companies in it in the same movement phase, than both the moving companies, and companies which are being moved through, are disordered at the instant the moving company leaves the hex.
6.31 Routed Companies Moving Through Friendly Stacks (Back to Table of Contents)
Unlike overstacking, the penalty for moving through friendly companies applies at all times. Thus, if a routed company moves through an unrouted company during the command phase, the unrouted company is disordered at the instant the routed company leaves the hex.
6.4 Effect of Enemy Companies (Back to Table of Contents)
No friendly company may ever enter a hex occupied by an enemy company.
7.0 COMBAT (Back to Table of Contents)
There are two kinds of combat in American Legions: Fire and Shock. Fire combat represents musket, rifle and artillery fire, while shock combat shows the effect of bayonet and cavalry charges.
7.1 Combat Strength (Back to Table of Contents)
All companies have a basic strength of one (1) for both fire and shock combat. This can be modified by range or disorder, but no company is ever reduced below a strength of 1/2.
7.2 Excess Results (Back to Table of Contents)
Each company may suffer only one result, any excess are lost.
(Example: if the result (either fire or shock) is KDDD and there are
only two infantry companies in the target hex, one company would be
permanently eliminated while the other would be disordered. The
remaining two "D" results would be wasted.)
7.3 Fire Combat (Back to Table of Contents)
7.31 When Fire Combat Occurs (Back to Table of Contents)
Fire combat occurs during the mutual fire phase of each player's turn. The side whose Player Turn it is fires first. A player may fire with a maximum of one regiment in any single attack. A company may only fire once in each player turn. However, a target hex may be fired on any number of times in a Mutual Fire Phase, by any number of companies or combinations of companies. Fire combat is completely voluntary; regiments with FIRE or MOVE AND FIRE orders are never required to shoot.
7.32 Line Of Sight (Back to Table of Contents)
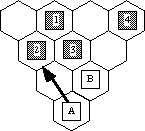
To fire, a company must have a clear line of sight to the enemy. A company may only see out of its frontal hexsides. A Line of Sight is then determined by tracing a straight line from the center of the attacking unit's hex to the center of the defending unit's hex. If the line passes through any company (enemy or friendly) other than the firing or target unit the line of sight is blocked. If it passes along the side of a hex which contains a company, it is also blocked. If the line of sight passes through two hexsides with contour lines facing different directions, the line of sight is blocked. (It may pass through any number of contour lines which point in the same direction.)
 Line of Sight example
Company A can only  fire at enemy company 2. The line of sight to
companies 3 and 4 are blocked by friendly company B, while the line
of sight to company 1 is blocked by enemy companies 2 and 3.
7.33 How To Conduct Fire Combat (Back to Table of Contents)
Count up the number of companies firing at a single target hex. Cross index the type of companies firing with the range in hexes to determine the range effect. Modify the total by multiplying by the range effect. Certain conditions affect the final column on which fire combat is resolved. These conditions shift the final column to the right or left depending upon the status of the attacker or defender. A fire attack cannot be made at less than a modified strength of one (1). Now cross index the modified total with a die roll on the fire combat table and apply the results.
       FIRE COMBAT TABLE            RANGE EFFECT TABLE:-
                                               1 hex  2-5 hexes  6+ hexes
    Number of Companies Firing      Musket      x1     x1/2       -
    1   2   3   4   5   6+          Rifle       x1     x1/2       -
                                    Howitzer    x2     x1         x1/2
1                       D           6 Pounder   x3     x2         x1
2                   D   D           Skirmisher  x1     x1         x1
3               D   D   DD
4           D   D   DD  3D          COLUMN SHIFTS TO FIRE COMBAT:-
5       D   D   DD  3D  4D          All firing are rifle-armed: 1 right
6   D   DD  DD  3D  4D  K3D         Firing through target flank: 1 right


Attacks at greater than 6 are treated as six
Disodered units are halved
Skirmishers are permanently eliminated by a "D" result and cannot fire
in combination with any other company (including skirmishers)
Cavalry and routed companies cannot initiate fire combat
 Fire Combat example
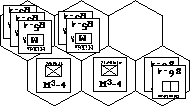
Example: The American player chooses to fire the Militia regiment first.
He splits the stack of  three Militia into two attacks (a (1) company
attack and a (2) company one) on the 7th Fusilier company. Remembering
to shift (1) column to the right (all the firing companies are
rifle-armed), he attacks with the single company (on the two column) and
rolls a (6). This causes (2) disordered results. Only one is applicable
because there's only one company in the target hex, and the 7th Fusilier
company is flipped to its disordered side. Now he fires with the
remaining two Militia companies, rolling a (4) and inflicting another
disordered result on the 7th Fusilier company. The 7th Fusilier company
is removed from the map and placed on 7th's regiment track. While he
would like to fire his two Skirmishers into the flank of the 71st
Highlander company, the American player has to continue firing with the
remaining Militia before he starts firing another regiment, or give up
firing any more Militia in this Mutual Fire Phase.
7.4 Shock Combat (Back to Table of Contents)
The eighteenth century was the last period in military history when shock combat - a body of troops charging with the bayonet or the saber - decided the majority of battles. During the shock combat phase, any unit whose regiment has CHARGE orders that is adjacent to an enemy unit in one of its front hexes MUST conduct shock combat.
7.41 How To Conduct Shock Combat (Back to Table of Contents)
Each attack is resolved separately. Total the current strengths of all attacking and defending companies. All units in a hex MUST participate in an attack. Divide the defender into the attacker and reduce this to an odds ratio (for example: 4 companies attacking 2 companies. Four is divided by two equaling two or, in other words, the attacker outnumbers the defender by two to one). This yields the raw odds. Certain conditions will shift the raw odds right or left depending upon the status of the attacker and defender.
SHOCK COMBAT TABLE

    1-3    1-2    1-1    2-1    3-1    4-1    5-1
1   KDD    KDD    KD.D   D.D    D.D    D.D    D
2   KDD    KD     DD.D   D.D    D.D    D      D
3   KDD    DD.D   D.D    D.D    D.DD   D.DD   D.KDD
4   KD     DD.D   D.D    D.DD   DD     KD     KD
5   KD.D   D.D    D.D    D.KD   KD     D.KDD  KDD
6   DD.D   DD.DD  D.DD   KDD    KDD    KKD    KKKD

Results in plain type affect the attacker, in bold the defender.

COLUMN SHIFTS TO SHOCK COMBAT:-
Cavalry Attacking Infantry or Artillery: 1 to right
Attacking Target through Flank hexside: 1 to right
Infantry Attacking Target in Structure hex: 1 to left
Infantry Attacking Cavalry: 1 to left

Skirmishers are permanently eliminated if in front hex of charging
Enemy Company at end of Shock Phase
Rifle and Disordered Companies are halved for Attack and Defense
Cavalry cannot Initiate against Structure hexes
Skirmishers, Artillery and Routed Companies may not Initiate
7.42 Combining Regiments In A Shock Attack
(Back to Table of Contents)Companies from different regiments may combine their strengths in shock combat.
7.43 Rifle-armed Companies and Shock Combat (Back to Table of Contents)
Rifle companies were more accurate in fire, but less effective in shock combat since bayonets could not be attached. Rifle companies attack and defend against shock combat at half strength.
7.44 Structure Hexes (Back to Table of Contents)
Cavalry cannot initiate shock combat against enemy companies in a structure hex. Infantry initiating shock combat against enemy companies in a structure hex shift the raw odds one column to the left.
8.0 ARTILLERY (Back to Table of Contents)
Artillery companies represent a single gun and its crew. There are two kinds of artillery in American Legions: Regular artillery and Attached Guns. Unlike the infantry and cavalry companies in the game, no artillery counter has a disordered side, although there are markers for disordered Attached Guns.
8.1 Moving (Back to Table of Contents)
To move, artillery must be on its moving side. Artillery which intends to move is flipped to its moving side at the beginning of a Command Phase. An artillery unit cannot do a 180 degree turn for 1 movement point like cavalry or infantry, it must turn through hex corners at the cost of 1 movement point per corner.
8.2 Fire combat (Back to Table of Contents)
Artillery on its firing side may fire in combination with any other friendly regiment. (Each artillery "company" may only fire once in each Mutual Fire Phase, but one or more may fire in conjunction with a regiment.) Artillery must adhere to line of sight rules, although artillery may fire over friendly and enemy companies at enemy companies on a higher or lower elevation. (See Artillery Fire example.)
8.3 Shock Combat (Back to Table of Contents)
Artillery companies are halved when defending against shock combat, and may not initiate shock combat.
8.4 Regular Artillery (Back to Table of Contents)
Regular artillery companies never roll morale checks, may move and initiate combat normally if outside the command radius of a leader, and are only affected by "K" results (they always take orders, and they fight to the last man). If stacked with infantry, the infantry takes any combat results first.
8.5 Attached Guns (Back to Table of Contents)
Attached Guns are crewed by infantry from the regiment to which they are attached. While Attached Guns need no orders to move, change status or fire, they must remain within the command radius of their leader to avoid the effects of being "out of command", are affected by "D" results (i.e. they fire at half value while disordered and their movement factor is reduced by 1), and any combat result against them causes a morale check against the regiment. (Like regular artillery, infantry stacked with attached guns takes any combat results first.) If they suffer a second "D" result while disordered, they are placed on the regiment track like any other company, and may be brought back the same way.
Example: Artillery Company #1 can't fire at the militia because it is on
the same level as the militia and the 17th Dragoons block the line of
sight. It may, however, fire at the skirmisher because the skirmisher is
two contour levels above artillery company #1, allowing it to "fire over
the heads" of the 17th Dragoons and 71st Highlanders company.  The
infantry company can also fire on the skirmisher because countour lines
facing the same direction never block the line of sight by themselves.
Artillery #2 cannot fire at the cavalry company because contour lines
facing opposite directions do block. (In other words, you can fire up a
hill, but not through it.)