Koniggratz 1866

Some new scenarios for SPI's 'Rifle and Saber': part 1

Rob Gibson

In the early Summer of 1866, Prussia found herself at war with her
Imperial neighbour Austria and most of the other large German States.
Her war leaders elected to make the maximum effort against Austria and
in a lightning advance forced the tardy Austrians and their Saxon allies
back on the Imperial fortress of Koniggratz. The Austrians elected to
defend the rim of the saucer-like plateau to the west of the fortress.
Faced originally with attack from the west by the Prussian First and
Elbe Armies, the Austrians were then attacked from the right flank by
the Prussian Second Army. The timing was (accidentally) perfect: the
Prussian attack on the right centre had pulled in most of the Austrian
reserves and there were insufficient forces to face both ways at once.
The Prussian infantry and artillery blasted the way to the top of the
rim and the Austrians broke and fled. Their cavalry, previously
uncommitted, made a brave attempt to halt the Prussians; however, they
were not facing a beaten foe, but a well-armed and confident one. The
outcome was inevitable: the last battle had been fought and the
Austrians sued for peace with the Prussian army a few miles from Vienna.
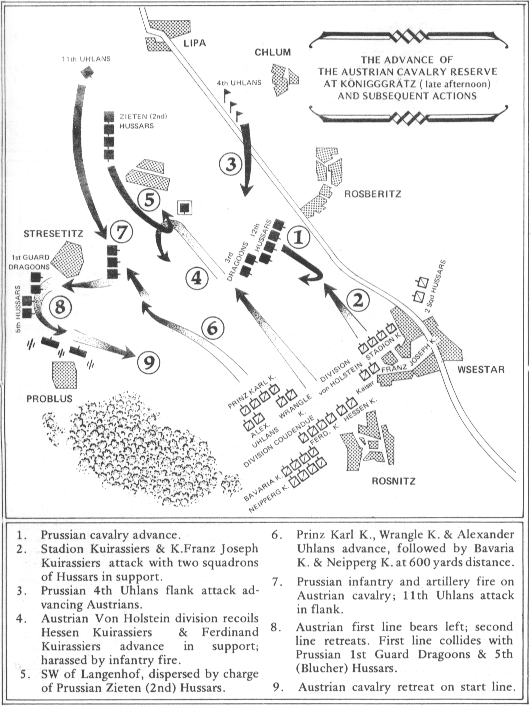
The battle of Koniggratz was in essence a series of actions co-ordinated
towards a total aim, like the great Napoleonic battles e.g. Austerlitz,
Wagram, Eylau and depended upon the success of the separate actions.
There are a number of these actions which can be separated out as
tactical scenarios for the simulation game 'Rifle and Saber'.

The first of these is given here and more will follow later. The
fascination, for myself, lies in the half-way position between the
Napoleonic era and the bloodbaths of the First World War. The battle
incorporates breechloading artillery and rifles along with rifled
muzzle-loaders, cavalry with titles from the Napoleonic age together
with explosive rifle bullets.

Scenario:
Cavalry action at Rosberitz 4pm, 3rd July 1866.

Map and counters: use the standard 'Rifle and Saber' map and counters.

Deployment:
Austrians (red) deploy first, move first.
(a) 3 MZ, in V6; 9MZ, in trenches (use markers) within 2 hexes SE of V6.
(b) 4 MA (unlimbered) on NE end of H21.
(c) 4 CY, at NE edge of V4.
(d) 2 CY, within 3 hexes of V4 along road to V11.
(e) 1 CY, 2 hexes in rear of (d) above.
(f) 4CY, lxMR within 3 hexes SE of V11.
(g) 4 CY, 2xMR, 2 hexes in rear of (f) above.

Note: 'MR' counters for this scenario are equivalent to 'CY' counters in
every respect.

Prussians (blue)
1. Initial Deployment
(a) 3 CY, at least 4 hexes NE of V6.
(b) 1 EB, in trench, 7 hexes NNE of V6.
(c) 3 EB, in V5.
(d) 4 Trench Markers NNE of V5 in line due East.
    10 EB, 1 BA(unlimbered), one hex in front of trenches.
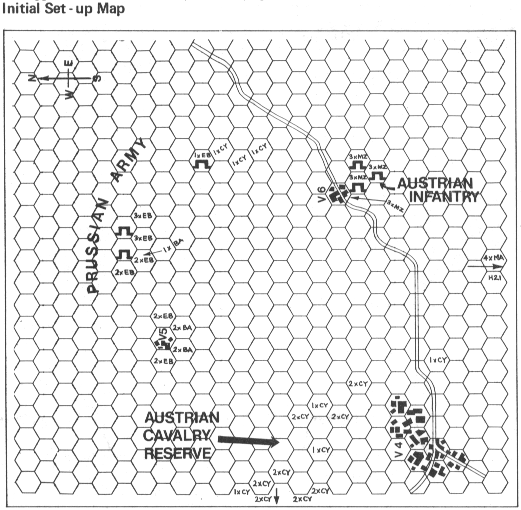
2. Reinforcements
Game Turn 1
(e) 2 CY, enter East edge due E of V6.
(f) 5 CY, enter NE corner of map.
(g) 8 EB, 1 BAH (limbered), enter on road East of V6.
(h) 8 EB, 4 BA (limbered), enter SE of corner.

Game Turn 2
(i) 3 CY, enter E edge 5 hexes N of road hex.

Game Turn 3
(j) 4 EB, 3 BAH (limbered) due N of V6 on the map edge.

Morale:
Austrians: Normal
Prussians: high

Game Length: 10 Game Turns.

Victory Conditions:
Austrians: must prevent Prussians reaching R3 before Game Turn 10,
regardless of losses.
Prussians: move at least 6 CY units across R3 by Game Turn 5
(substantial victory) or by Game Turn 10 (marginal victory).

Note: In fact, the Prussians failed to break th rough the Austrian
rearguard in sufficient time to pursue the fleeing main body - but a
simulation should aim at improving on history, hence the tougher victory
conditions.

Special Rule:
For combat between Prussian EB units and Austrian MA units only,
increase the odds by one column for EB units firing i.e. 2 to 1
becomes 3 to 1, to account for the effect of explosive ammunition.