

Target Iran is a solitaire war game designed by Joseph Miranda for Modern War Magazine. It is a strategic/operational level simulation that postulates a military strike on Iran by a U.S.-led Coalition to once and for all terminate that nation's nuclear program. The player makes all decisions for the Coalition side, including the actual composition of the Coalition, and physically moves all game pieces. The game "system" makes decisions for, and controls the actions and reactions of, the Iranian side.
There are many decisions that have to be made by the solitaire player early in the game that will have consequences (or rewards) in later game turns. I believe the correct approach in the planning stage of this game is to "play the odds" to position yourself in the most advantageous position possible for the start of the kinetic stage of the game.
This article discusses a set of strategies that can be employed during the "Strategic Stage" to optimize a player's chances of "beating the system" and scoring a victory.
There are two "Stages" in the game: the Strategic Stage and the Operational Stage.
| Stage | Max # of Turns | Permissable Actions |
|---|---|---|
| Strategic | 7 | HyperWar actions: Reconnaissance, Subversion, CyberWar. No direct military action allowed. |
| Operational | 12 | Direct Military Action: Air, naval and ground forces employed, in addition to continued HyperWar actvity. |
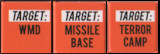
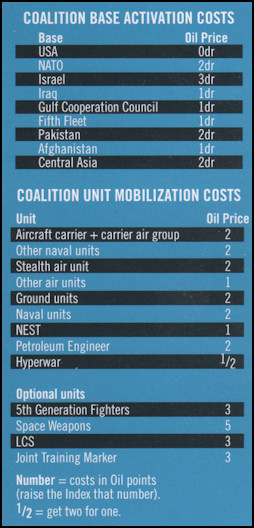
The Strategic Stage must be used for gathering intelligence on the location and disposition of Iranian military forces and high value targets which include WMD, missile launchers, and terrorist traning camps. The player must also build and deploy the military forces deemed necessary to complete the mission. All direct military actions must be launched from various Coalition bases around the world. These bases must be Activated before military forces can deploy there. This activation occurs only during the Strategic Stage. Once the Operational Stage begins, no additional military forces can be procured or deployed, and no more bases can be acivated. As the rulebook says, "you go to war with the army you have" (hat tip to D.R.)
The basic currency of the game is the "Oil Price". Coalition actions and force deployments will cause the Oil Price to rise by a fixed or variable amount, depending on the event. For example, purchasing a stealth aircraft causes the Oil Price to rise by +2 (fixed), but Activating the 5th Fleet Base causes an increase equal to the roll of one six-sided die. Conversely, Coalition HyperWar and military successes may cause the Oil Price to decline. The Oil Price starts the game at 87. It is checked at the end of each turn (both Strategic and Operational turns) and, if it is above 150, the game ends in a disastrous loss for the Coalition (i.e. you). Barring that, there are varying levels of victory or defeat linked to the Oil Price at the end of the last Operational Stage turn.
After fumbling through a few games without any clear idea of how or why I was winning or losing, the lightbulb over my head finally went incandescent and I jotted down some ideas for improving my chances of winning. Sure enough, my fortunes improved considerably much to the chagrin of my hypothetical enemy (how I know it was "chagrinned" is a topic for another article, probably in "Psychology Today" magazine). In order to get started on the path to victory, the first order of business must be to assess and establish your objectives.
The one and only objective in this game is to drive the Oil Price down as low as possible to secure the win. I established $60 as my target price because that is the maximum allowable Oil Price that falls under the Strategic Victory category. Not as grandiose as a Global Dominance Victory, but far more respectable than the wimpy Operational Victory (or the lackluster "Stabilization/Draw" or, heaven forbid, some level of defeat). Having established the level of victory I'm comfortable with, how will I acquire the necessary victory points? Here's the plan:
| Target/Event | Oil Points | Notes |
|---|---|---|
| WMD Targets | -30 | Must destroy three WMD targets, netting me a -10 reduction in the Oil Price for each one. |
| C2 Target | -3 | Must destroy one C2 target. |
| Missile Base Target | -7 | Must destroy one Missile Base target. |
| Port or Airfield City | -20 | Must occupy two Port or Airfield Cities with Rebel unit(s) at the end of the game |
| Clear the Persian Gulf | -20 | Completely clear the Persian Gulf of Iranian units by the end of the game. |
(Note: There are a total of 6 WMD targets, 4 C2 targets and 3 Missile Base targets in the countermix)
Accomplishing all the objectives listed above will reduce the Oil Price by a total of -$80. That covers the -$27 I need to get from the starting price of $87 down to $60 (my target price) and leaves a -$53 cushion to cover the cost of base activations, military unit mobilizations and to absorb the inevitable Oil Price increases that will surely occur during the game.
It's one thing to draw up a list of objectives, but quite another to actually achieve those objectives. Which brings us to a discussion of resources and timing.

How much time will you have during the Strategic Stage to plan and provision your mission? You don't want to spend precious resources to Mobilize military units until you know the location of your targets, but you can't wait forever to make mobilization decisions. One of the clever mechanisms in the game system is the "Alpha Condition". Every Strategic Turn, a die roll is made on the Iranian Strategic Reaction Table. If a "6" is rolled then a number of Iranian Hyperwar units, equal to the Strategic Turn number, are randomly pulled. If two of the randomly selected Hyperwar units are "Crisis" markers, the player is forced to begin the Operational (kinetic) Stage, and will no longer have the opportunity to purchase any more combat units.
So what are the odds of an "Alpha Condition" being triggered on any given Strategic Turn? Well, we know that three things have to happen:
We know from high school statistics that the odds of rolling a 6 on a 6-sided die are 1 in 6 (or 1/6 = 0.1666666666666). But calculating the probability of subsequently pulling two "Crisis" markers is a bit more complicated. Given that there are 13 Hyperwar markers in total, and 3 of them are "Crisis" markers ("Crisis A", "Crisis B", and "Crisis C"), the odds of triggering an "Alpha Condition" are listed in the table below.
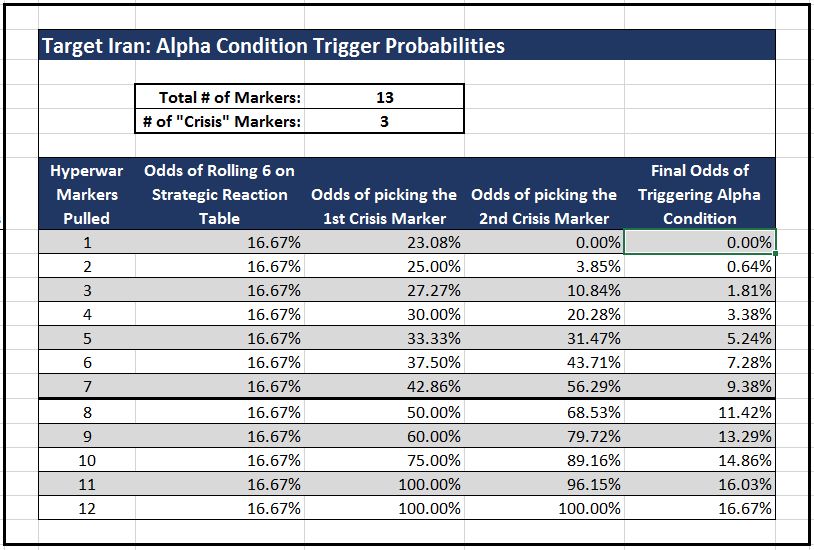
Remember that each turn a number of Iranian Hyperwar units, equal to the current Strategic turn, are pulled. So each turn the chances of pulling two "Crisis" markers increases. However another game rule reduces the number of Hyperwar units pulled by -1 for each C2 target eliminated. In order to present a "worst-case scenario", I'm going to totally ignore that rule and assume the full number of Hyperwar units will be pulled each turn.
There are only 7 Strategic Turns (maximum) in a game, but I'm listing the probabilities all the way out to a non-existent turn 12 just to prove the math works. (email me if you're completely bored and want more details). As you can see, by the time Strategic turn 7 rolls around (the last possible Strategic turn), the odds of rolling a 6 then pulling two "Crisis" markers is still only 9.38%. I decided that my personal risk tolerance for this situation is about 5%. Therefore I will simply ignore the possibility of an "Alpha Condition" being triggered up until Strategic turn 5. My rudimentary probability calcs tell me that I will be safe about 95% of the time, and the other 5% of the time I'll be screwed. But that's an acceptable win/loss ratio for me and so I'll proceed. This leaves me free to do nothing but Intelligence, Surveillance & Recon (ISR), and the occasional Subversion action during Strategic turns 1 through 4.
This works well from a resources perspective because it ensures that I will not spend a single Oil Point until I have some confidence the expenditure will directly contribute to winning the game. For example, I'm not going to waste Oil Points activating the Afghanistan base unless I know that Iranian East Zone is overflowing with juicy targets which may require several trips down the Attack Route. The United States base is too far away to make more than a single run to the East Zone, so in that case activating the Afghanistan base might be a necessity.
Before Strategic Turn 5, Oil Points should only be spent on certain Hyperwar units (described in more detail below). Don't spend any Oil Points mobilizing combat units or activating bases until Game Turn 5. So how exactly should you proceed on the first 4 Strategic turns? This brings us to a discussion of intelligence gathering and Hyperwar unit tasking.
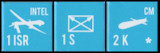
Buy all 6 U.S. ISR units on Strategic Turn 1 (total cost of +3 to the Oil Price). If an ISR is eliminated, buy it back right away on the next Strategic Turn. During the Coalition Hyperwar Attack Step aggressively recon Iranian cities and Attack Routes. Conduct ISR missions in the following order:
The East Zone should be recon'd first because it has the most cities (5) of any zone, and is inaccessible to the 5th Fleet base (which is the only base we'll certainly be activating). If it turns out to be a target-rich zone (3 or more), the Afghanistan base may have to be activated. You'll want to know about this potential cost as soon as possible. On the other hand, if it only contains one of the objective assessment targets, it can probably be handled by a Cruise Missile.
Similarly, the West Zone targets should be Revealed next because it too is inaccessible to the 5th Fleet base. Numerous target discoveries there (again, 3 or more) may necessitate activation of the Iraq base.
I'm assigning lower priority to the Central Zone because I intend to have military units from the U.S. base work in conjunction with Cruise Missile strikes to take out all targets there. So there's no danger of having to activate additional bases. Thus, less early warning is required.
The Persian Gulf is the last of the zones to be recon'd because targets in the Persian Gulf Zone can be revealed "the hard way", by landing U.S. combat units in the port cities. They don't absolutely have to be recon'd beforehand. It's risky going in to a city blind, but it's do-able and I acknowledge and accept the risk (I'm pretty casual with the lives of cardboard units). So, if anything must remain Concealed, let it be those in the Persian Gulf Zone.
If all goes extremely well and all Iranian units in all zones have been revealed, focus the ISR efforts on (1) the Persian Gulf Attack Route, then (2) the U.S. Attack Route, starting from the lowest numbered Vector Nodes (i.e. those closest to the Coalition bases). Any early warning of the types of units facing the Coalition navy in the Persian Gulf will help tremendously.
Based on the odds of an ISR successfully revealing Iranian units in cities (66.667%), you will most likely be able to completely reveal all targets in the East, West and Central Zones by the end of Strategic turn 4. If you've revealed all in these zones, but still don't see the required targets, as specified in your "Objective Assessment", above, then you'll know they must be in the Persian Gulf Zone and can mobilize sufficient military forces in the Fifth Fleet base to complete the mission there.
| Event | Odds/Results |
|---|---|
| Odds of each ISR successfully "revealing" Iranian units/targets. | 66.667% |
| Cities likely to be revealed by ISR missions each Strategic turn. | 4 |
| Total percentage of cities revealed by ISR missions after 4 Strategic turns. | 94.12% (16 out of 17) |
The Subversion Hyperwar unit placement should initially be focused on the Persian Gulf port/airfield city of Bandar-e-Abbas. After a Rebel has been successfully placed there, the next target port/airfield city should be Bushehr. The objectives assessment requires that we occupy at least two port/airfield cities with Rebel units at the end of the game. Placing Rebels in any other cities, in excess of these two would be nice, providing even more cushion in the Oil Price. But Bandar-e-Abbas and Bushehr are most critical since they are closer to the Fifth Fleet base, making it easier to militarily support Rebels.
Getting Rebel units in place is a slightly more difficult proposition, from a probability point of view, if you spread your Subversion units around and attempt to place Rebels in a bunch of cities. You must first concentrate your efforts on Bandar-e-Abbas to secure the best odds of getting the required city locked in. Then move on to Bushehr and do the same. Once you secure placement of Rebel units in both Bushehr and Bandar-e-Abbas, you'll want to spend the rest of the game attempting to place Rebel units in Teheran. It's not a requirement for the victory plan, but it's worth a solid reduction in Oil Price of -20. Think of it as a lottery ticket. if you win, it's fantastic. If you lose, you're no worse off than before because you've already got the mandatory ones locked in.
| Event | Odds/Results |
|---|---|
| Odds of successful Subversion roll and Rebel placement (any one city; one die roll). | 16.667% |
| Odds of successful Subversion roll and Rebel placement with 6 rolls (using 1 - (5 / 6) ^ n formula). | 66.51% |
Any Rebel units placed in Persian Gulf Zone cities will need to be supported by standard military units if they are to have a good chance of surviving till the end of the game. Which takes us to a discussion of base activation and military unit mobilization.
You should not activate any bases on Strategic turns 1 through 4. Hyperwar units don't use bases, so that effort can continue apace without any basing requirements. The U.S. base is always considered activated without cost. The only other base you'll definitely need to activate before the Strategic Stage is over is the Fifth Fleet base. Military units mobilized there will be responsible for securing at least 40 of the planned Oil points required by our objectives assessment, above (i.e. occupation of port cities and clearing the Persian Gulf), so you will likely have to go "heavy" there.
In addition to the Oil point cost savings, not activating any bases outside the U.S. also shuts down the "Iranian Hyperwar Targeting" process. The first part of that process is to determine the base to be targeted by Iranian Hyperwar. If there are no bases currently activated, then the result is always "no effect".(*** see "Play Balance" note, below) Even later in the game, when the Fifth Fleet base has been acivated, the odds of Iran successfully Hyperwar targeting any U.S. base are small. A quick look at how the odds dramatically increase when Israel is activated argues convincingly for never activating Israel. (If you want to explore that hypothetical situation, play the Israelis Only variant scenario)
| Event | Odds |
|---|---|
| Odds of successful Iranian Hyperwar Targeting when U.S. the only activated base. | 0.00% |
| Odds of successful Iranian Hyperwar Targeting when U.S. and Fifth Fleet bases activated. | 11.111% |
| Odds of successful Iranian Hyperwar Targeting when U.S., Fifth Fleet and Israel bases activated. | 55.556% |
Strategic Turn 5 is when all the procurement action happens. You must identify all the required targets and mobilize sufficient military units to take them out. Targets in the East, West and Central Zones must be eliminated by military units based in the U.S. and/or Cruise Missiles. Even though Cruise Missiles are technically Hyperwar units, they may not be employed in the Strategic Stage of the game and therefore function more like military units.
At the end of Strategic Turn 5, unless you've had some terribly bad luck with revealing target units, you should declare a Bravo Condition, which is a voluntary shift to kinetic operations. Although you can wait until Strategic Turn 7 before moving to the Operational Stage, it's wise to make the transition as early as possible since every roll on the Iranian Strategic Reaction Table is another opportunity for bad things to happen, which the Coalition is unable to respond to effectively (i.e. militarily).
The bulk of your military purchases will be for the Persian Gulf Zone. Those units will be tasked with removing all Iranian units from the zone by the end of the Operational Stage. One indispensable unit is the U.S. Minesweeper. Without this unit, Minefields cannot be eliminated and the Straits of Hormuz Blocked action cannot be un-done. The balance of units to be mobilized depends on a lot on what was revealed during the Strategic Stage, but the following guidelines should hold up well:
Fifth Fleet Base - Total: 25 Oil Points
U.S. Base - Total: 6 Oil Points
Hyperwar - Total: 5 Oil Points
Grand Total: 36 Oil Points
The Cruise Missiles should all be launched during the Coalition Hyperwar Attack Step of Strategic Turn 5. They should be tasked with taking out as many of the objective assessment targets as possible, first in the East, West and Central Zones, then expanding to the Persian Gulf Zone if possible.
The CyberWar units should be tasked with Crashing Iranian C-2 units, as this will reduce the number of Hyperwar attacks the Iranians can launch during the Operational Stage.
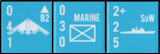
The Fifth Fleet Marine and Airborne infantry units, transported by sea and air, respectively, will be tasked with securing the cities of Bandar-e-Abbas and Bushehr. They must clear the city of enemy units, prevent against the resurgence of enemy units (due to rolls on the Iranian Operational Reaction Table), and help protect the Rebel units that should be in place in both of these cities.
The carrier aircraft, along with the TAC air units and the Wild Weasel, should be more than enough to keep the Persian Gulf skies clear of enemy air units, and help with the elimination of enemy ground units.
Finally, the B2 Stealth Bomber (B2) is there as insurance, should any enemy ground units or targets somehow survive the onslaught.
The TAC and SAC units flying out of the U.S. will not reach Iranian targets until Operational Turn 11, and therefore will have only one shot at targets on the ground. The objective is to have the TAC units protect the SAC bombers, and have the SAC bombers take out two of items from the objectives assessment in the East, West or Central Zones, that were not destroyed by the Cruise Missiles. If no such targets exist, they can be employed to help clean out the Persian Gulf Zone.
| Event | Odds |
|---|---|
| Odds of Cruise Missile strike destroying an Iranian Target marker. | 50.00% |
| Odds of a B2 Stealth Bomber (B2) destroying an Iranian Target marker. | 93.75% |
| Odds of a Strategic Bomber (SAC) destroying an Iranian Target marker. | 98.44% |
If B2/SAC Bombers have such a high kill probability, why use Cruise Missiles at all?
A deeper discussion of the tactics that can be employed during the Operational Stage really requires an article of its own and will not be addressed here. But, let me just say that you must be adaptable to changing circumstances. If the situation develops such that you know you will not be able to eliminate a Missile Base Target, you'll have to improvise another way of reducing the Oil Price by -7.
While the strategy outlined in this article is designed to have the Coalition ready to go Operational after Strategic Turn 5, you can play out the full 7 Strategic Turns before you must proceed to the Operational Stage. However, I feel that every Strategic Turn that goes by is another chance for the game system to take another swipe at you on the "Iranian Strategic Reaction Table". Besides, once you've shaped the battle space to your advantage, what is there to wait for? Talks at the U.N.? Just keep in mind that those 2 extra Strategic Turns may be available to you if they are needed, assuming that you don't run afoul of the 7.28% chance of an "Alpha Condition" being triggered on Strategic Turn 6 (see the "Alpha Condition Trigger Probabilities Table", above).
Another interesting possibility the game design allows for is the "Charlie Condition", where there is no Operational (kinetic) Stage at all. If, upon reaching the end of Strategic Turn 7 and no "Alpha Condition has been triggered, the player may just call the Operational Stage off and calculate the victory level immeditately. I have not fully explored this possibility, but I suppose you could squeeze out an Operational Victory by pushing the Oil Price to $80 or less during the Strategic Stage, although that seems difficult to do at first glance. Again, it would have to be looked at more closely before any conclusion can be reached.
| Strategic Turn | Actions |
|---|---|
| 1 | Buy all 6 ISR Hyperwar units and recon the cities in the East Zone, West Zone and Central Zone, in that order. |
| 2 | Buy back any eliminated ISRs and recon again with all of them. |
| 3 | Buy all 6 Subversion Hyperwar units and place all 6 in Bandar-e-Abbas. Convert to Rebel unit(s) if successful. Buy back any eliminated ISR units and continue recon patterns. |
| 4 | Buy back any eliminated Hyperwar units. Place Subversion units in Bandar-e-Abbas again if necessary, or proceed to Bushehr. Recon again with all ISRs. |
| 5 | Continue buy-back and redeploy of Hyperwar units. Purchase all 6 Cruise Missiles. Purchase 4 CyberWar units. Activate the Fifth Fleet base and mobilize military units as necessary. If no "Alpha Condition" has yet occurred, declare a "Bravo Condition" and trigger the start of the Operational Stage. |
Target: Iran is a really enjoyable solitaire game. If you're like me you'll find yourself spending waaaaayyyy too much time playing around with it, analyzing situations, trying different strategies, etc.. But one thing has become apparent in the short time that I've owned and played this game: the Iranians, as represented by the game system, don't have much chance of not getting clobbered. There are some oddities in the game, such as the previously mentioned Iranian Hyperwar Attack Targeting failures because no Coalition bases are activated, that were just crying out to be "adjusted".
But fear not because other people have also been experiencing the same bias in the game and have been putting their minds to work on developing solutions. There are a number of great suggestions for improving play balance (with the blessing of the designer) to be found on the game's forum on ConSimWorld.
The game system is outstanding, in my opinion. It's easy to learn, accessible to non-wargamers, engaging and fun. It merely needs some rules adjustments to really make it shine. I'm not sure if the original play balance problems were the result of insufficient play-testing or some other cause. And I really don't even want to hazard a guess. But I'm confident that these play balance issues are fixable, because the ConSimWorld crowd have already fixed some of them. I'm also confident we'll see other designs using this same basic system, because it's too good to just walk away from. It's a testament to the appeal of the game that there are so many players who are even interested in wanting to "adust the oddities".
Finally, it must be said that the designer, Joseph Miranda is totally engaged in supporting his game. I've never waited an unreasonable amount of time for a response from him regarding the rules, and he's taken the criticisms well.
I'm looking forward to the next set of rules modifications, so I can get right back to work devising strategies to defeat the new, improved game system.

