In the waning days of 1953, the French colonial expeditionary force in Vietnam challenged the local insurgents, then called "Viet Minh", to stand toe to toe in a set piece battle in the north western Vietnamese village of Dien Bien Phu. It was a remote location in a largely mountainous area of Vietnam remarkable for the fact that it was one of only a handful of locations clear and flat enough to accommodate a base and airstrip. The surrounding terrain made it impossible to supply by land, at least the quantity of supply that would be required by a modern army, and so had to be supplied exclusively by air.
About a month earlier, the Viet Minh had attacked the French in a similarly situated location called Na San, and were bloodily repulsed. What were the lessons learned from this battle? The Viet Minh learned that they required better preparation and coordination for such an assault, and a more cautious approach rather than fanatical "human wave" attacks. The French learned that they were correct in their supposition that a numerically inferior force, properly positioned in a ring of strong points and supplied by a dedicated air armada, could win the day. Neither side ever considered for a moment that maybe the whole situation was, in fact, a desperate gamble that would cost the loser dearly, and was probably not worth fighting in that place at that time. But the Viet Minh accepted the challenge and the die was cast.
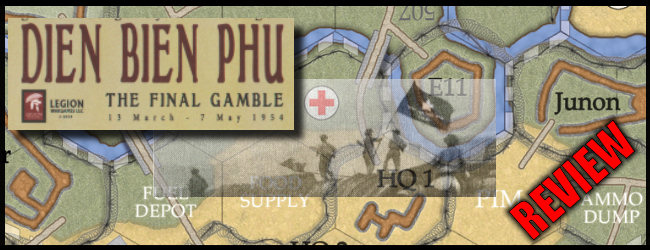
Dien Bien Phu: The Final Gamble, designed by Kim Kanger and published by Legion Wargames is a two player board game that simulates the final climactic two months of the Viet Minh assault on Dien Bien Phu, with one player controlling the French expeditionary force and the other player controlling the Viet Minh. The victory conditions are quite simple: either the French player will surrender and lose the game, or will not surrender and win the game. So it is definitely a "cage fight to the bitter end", as stated in the rule book, which is fine by me as I'm not partial to games with nebulous victory conditions.
This article will provide an overview of some of the clever mechanics in the game, and take a closer look at the combat sequence. Most of all, it will hopefully give you a feel for the game and help you decide if this is the type of war game you'd enjoy playing.
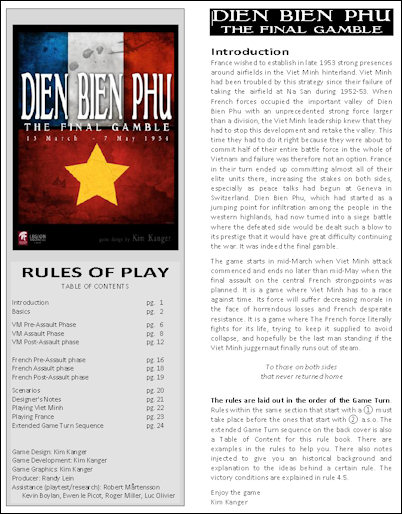
I normally don't make much fuss about game components, rule books, or box cover art because it's almost a given these days that all these bits will be up to snuff (at least). So, unless there is something horrendously ugly or misprinted on the game map or unit counters, there's really nothing to say. But, for Dien Bien Phu, I feel compelled to take a moment to shower some praise on Legion Wargames for the quality of the rules.
These may be the tightest set of rules that I've ever seen. I've been playing the game with some regularity for about a month, both solo and competitively, and I have come up with exactly two questions that I did not feel were adequately explained in the rule book. Turns out that one of the questions was actually answered in the rule book; I just didn't see it. And the other question was covered in one (of the very few) errata items. That's it.
I know that a good rule book does not necessarily make a good game, but it certainly clears a big impediment to enjoying a game. There's nothing worse than sitting down to play a game and having to spend half your gaming session wrestling with the rules. So, either the designer had such a clear vision for the game that the rules just wrote themselves, or the publisher and playtesters went the extra mile to ensure a properly finished product. Either way, thanks to all involved for allowing me more time to actually play the game and less time flipping through the rules.
I'm also impressed by the sequential organization of the rule book. It begins with a few pages of "Basics" where the map features, unit counter attributes, and important concepts such as Line of Communication (LoC) are defined. Most of the rest of the rule book is organized to follow along with the phases of the Game Turn, in the order in which things happen i.e. Viet Minh Pre-Assault Phase, Assault Phase and Post-Assault Phase, etc. You don't have to look at five different places in the rule book to figure out how to execute one phase or sub-phases; just look at that section of the rule book and follow along.
One of my gaming buddies complained that the game turn organization might be a bit too constraining. At first, I kind of agreed with him. The rules prescribe a rigid game turn order and the rules for one phase do not make reference to inter-relationships with happenings in another phase. So you may initially feel that you're not making a lot of tactical choices, but rather just following a script. Once you get the feel for the flow of a game turn, you'll find that you have considerable flexibility (particularly the French player). As you learn the game, you'll make better decisions based on your understanding of the pitfalls (and opportunities) that lie ahead.
The last rulebook section defines the scenario setups and, finally, there are Designer's Notes and some strategy tips for players of either side. The last sentence in the Viet Minh strategy tip section is "Play wisely and you will prevail". And the last sentence in the corresponding French section is "Don't ever give up." Pretty deep, huh? Fortunately, the rest of the information in each section is much more helpful, especially for newbies.
There are so many clever mechanisms in this game that I don't know where to start. So I'll list a few of the most important ones:
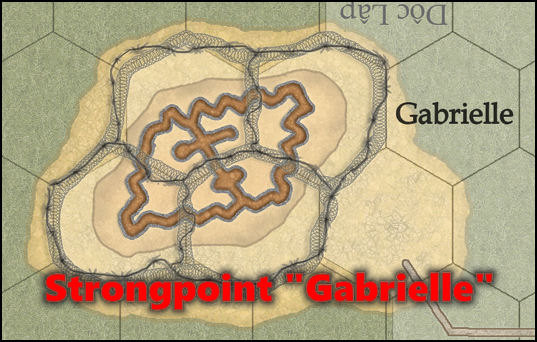
The basic tactical situation in this game is that the French are surrounded by the Viet Minh, but are in well-fortified positions, have pre-sighted artillery support, good interior lines (at first) allowing for superior mobility, and have a decent stockpile of basic supplies. The fortified positions, or Strongpoints, are built mostly on hills around the perimeter of the battle area. There is a central redoubt that functions as the French center of gravity, and is the ultimate objective of the Viet Minh units that begin their assault from the north, south and south-east map edges.
One of the key concepts in this game is the simulation of the tactic the Viet Minh adopted to more cautiously and efficiently take down French strongpoints; lots and lots of digging! The plan was to approach the French entrenchments by digging their own entrenchments that moved gradually closer and closer to the French positions until they were close enough to minimize the amount of time they had to spend exposed to French defensive fire. This type of trench warfare was nothing new, of course, and would be quite familiar to any veteran of World War I. But from a game design point of view, how do you simulate mobile trench warfare without using a ton of "Trench" markers and cluttering up the map? Designer Kim Kanger devised the concept of Trench Zones and Dig Zones.
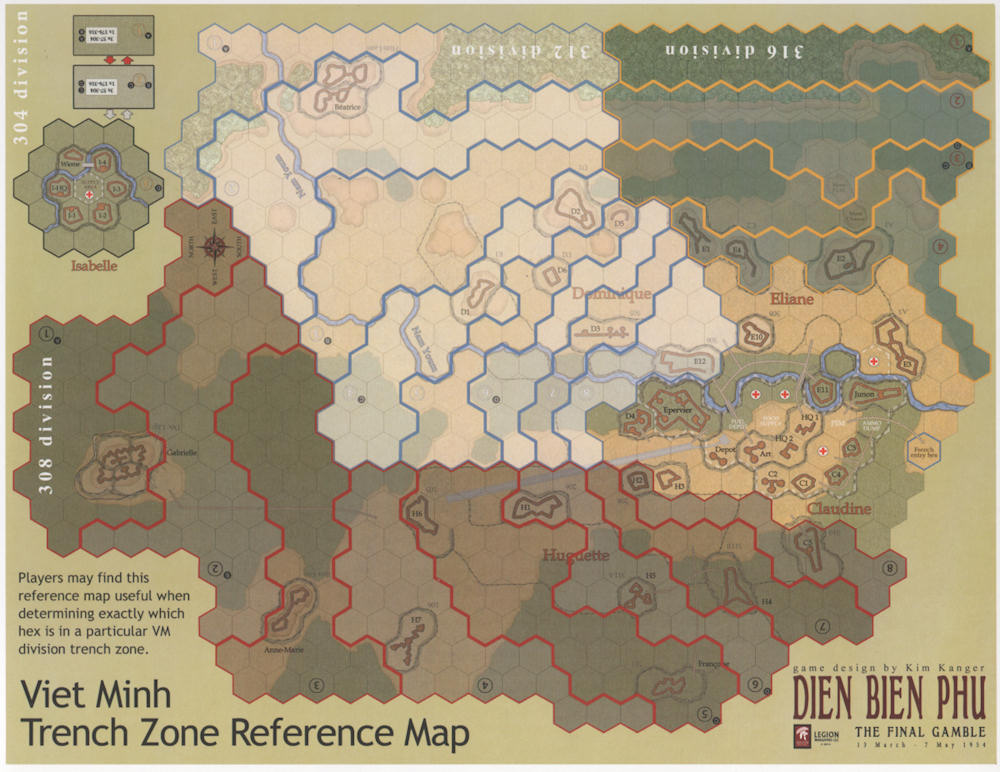
The main map is divided into three Division Sectors, one each for the 308th, 312th and 316th Viet Minh divisions. The 304th division starts the game in a separate box that represents a part of the battle area some distance south of the main map, and is therefore handled separately (so the scale of the entire map did not have to be compressed). Each main map Division Sector is subdivided into sub zones that begin along the perimeter of the map and gradually progress toward the main French Supply Area which is the inner core of the French defensive works. At any given time, each of these sub-zones will be in one of three states: Trench Zone, Dig Zone or Unentrenched.
Each Viet Minh division begins the "campaign" scenario in the #1 sub-zone of its respective Divisional Sector, which is considered to be a "Trench Zone", meaning that all trenches have been completed, and all units in this Trench Zone are entitled to the protection of the entrenchments there. The 316th Division Sector has 4 sub-zones and the 312th and 308th have 8 sub-zones each. Viet Minh progress is heavily dependent upon clearing French strongpoints which are usually built upon hills. Players keep track of Strongpoints captured (and re-captured) throughout the game. When the number of remaining French controlled Strongpoints becomes low, the French will be increasingly likely to Surrender, thus ending the game in a Viet Minh victory.
At the end of each Game Turn, the Viet Minh player may advance one (only) of his Trench markers forward from its current position to the next highest numbered sub-zone. If there are no French controlled Strongpoints in the new sub-zone, a Trench Zone marker may be placed. If there are any French controlled Strongpoints, the marker is still advanced, but it is placed on its Dig Zone side. This indicates that the Viet Minh are still, literally, digging. A Dig Zone affords some measure of protection for the Viet Minh and inflicts some restrictions on the French. But, ultimately, a Dig Zone must be upgraded to a completed Trench Zone before the Viet Minh may continue to "tighten the noose" around the French center.
The Viet Minh know that they only have a finite amount of time to sufficiently demoralize the French that they surrender. Much of this depends on their ability to take control of Strongpoints and move Trench Zones forward. This leads to a lot of intense action among the Strongpoints. The French player may decide to try to hold on to each and every Strongpoint as long as possible, hoping to demoralize the Viet Minh (more about this below), rendering them less combat effective. France may choose not to extract beleaguered units when eligible to do so, or may launch strong counterattacks to keep a Strongpoint French occupied and supplied. It's one of the attractions of the game system that the French player has such operational latitude.
In a standard World War I game, loss of an entrenchment or fortified position is normally not fatal, because there would likely be another fortified defensive line to retreat to. In Dien Bien Phu, this is not the case at all. Loss of each and every Strongpoint is critical because of the compressed area of operations and the fact that the Viet Minh Trench Zones can never be "unentrenched", and so the Viet Minh noose grows tighter. The French do not have to "stand and die" at every Strongpoint, but they must do so at some of them.
The "Trench/Dig Zone" mechanic is a very clever device that works extremely well at this scale. The only (minor) negative I can point to is that you have to refer to a separate Viet Minh Trench Zone Reference Map in order to get a clear picture of Trench/Dig zone boundaries. These lines are present on the main map, but follow irregular contours and are very faint and hard to see. It appears that a decision was made to preserve the esthetics of the main map, rather than marring it with a gaggle of additional blue, red and yellow boundary lines, and I can understand and appreciate that. But it took a bit of time before I was comfortable with the Reference Map.
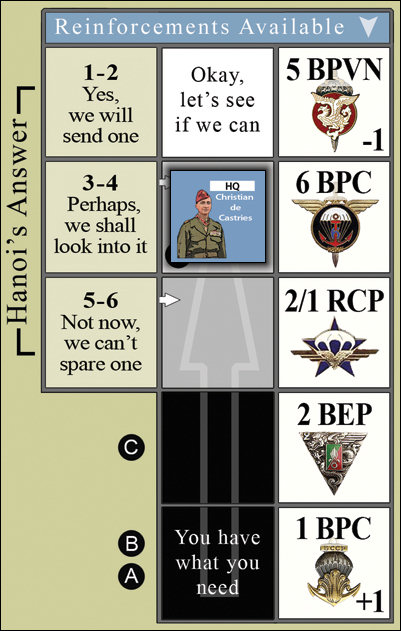
While they are three separate things, the Reinforcements, Weather and Airdrop charts work hand in hand to create my favorite game mechanic; allowing the French player some control over decisions that would normally be made by a theater commander. I'll look briefly at each in turn.
The Reinforcements Available table itself holds all of the reinforcements that could possibly be sent by the French theater HQ commander (Christian de Castries). Each time the French suffer an infantry unit loss, the de Castries marker is moved up a notch. When it reaches the top of the table, a die roll is made to see if any reinforcements will actually be sent to Dien Bien Phu. Then the de Castries marker is moved down again, and the process begins anew. Granted, the player does not have control over this, except maybe by satisfying a combat casualty result by eliminating a reduced infantry unit instead of taking a step loss on a full strength unit, thus triggering a move up for the de Castries marker. But ultimately the receipt (or not) of reinforcements is subject to the vagaries of the die roll. However, once HQ approves the deployment of reinforcements, the player has some control over the timing of their arrival (see below).
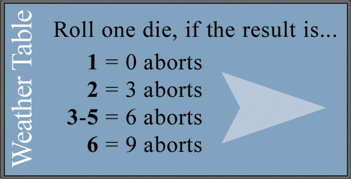
The Weather chart is totally controlled by the luck of the dice, but has a huge impact on French ability to deliver reinforcements and supplies to Dien Bien Phu (see below).
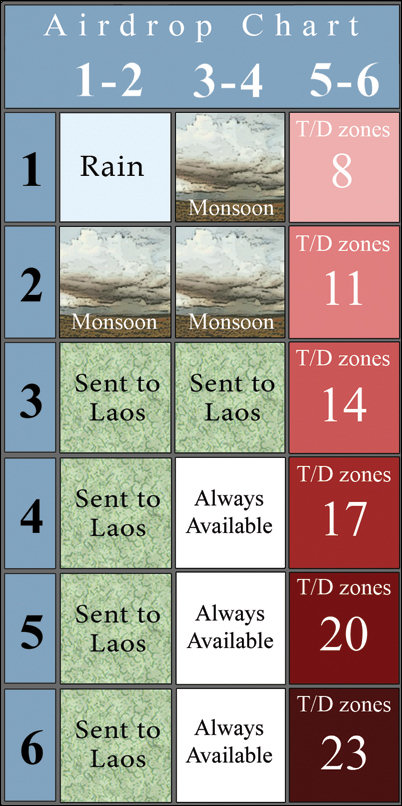
The Airdrop Chart is where the action takes place. In addition to combat units, France needs to deliver other critical supplies to the Dien Bien Phu force:
Each one of these supply categories has a "Track" where the current levels are recorded. As artillery is fired, the Ammunition Track is reduced. As wounded soldiers are treated and healed, the Medicine Track is adjusted, etc. Some of the tracks are reduced at predictable rates (e.g. "Food & Bullets" is reduced by 3 each turn), but others depend on actual usage (e.g. the more wounded troops you have, the more Medicine you'll likely be using). The French player knows what his current supply levels are and, more importantly, knows what his next turn needs are likely to be based on his plans (i.e. a pending assault to relieve troops on an isolated Strongpoint, etc.).

What's so cool about this game feature is that the French player is totally in control of what gets loaded on the re-supply planes! The Airdrop chart functions as a flight manifest. At the start of the game, there are 18 slots available, each of which can be filled by one supply item (Medicine, Ammunition, Fuel & Spares, or Food & Bullets) or two combat unit reinforcements. If the die roll on the Reinforcements Table (see above) has gone well, there will be combat units available if the French player feels that is a priority. Otherwise he's free to load up all available Fuel & Bullets units, or Medicine units.
As the game progresses and Viet Minh Trench Zones grow closer, or the weather turns foul (Rain or Monsoon), the number of available slots in the flight manifest is reduced. The roll on the Weather Chart (see above) determines the number of flight manifest items that have to be removed (i.e. have no chance of actually being delivered). So you can see that the French player's skill in the role of Quartermaster also has a huge impact on the game. I hate static reinforcement charts. A reinforcement/resupply mechanic such as this is definitely the way to go because it introduces uncertainty and increases game replay value, while simultaneously giving players more direct control over the outcome of the game.
In a manner similar to the French Reinforcements and Air Drop mechanisms, the Division Morale track allows the Viet Minh player to make decisions slightly above the pay grade of an assault commander. Unlike the French, whose units each have their own Morale number, the Viet Minh track Morale at the division level.That is to say that every unit in a division has the same morale (but retains its own Combat strength).

In a campaign game, all Viet Minh divisions start at Morale Level 5, which represents peak disposition. If its Morale level ever falls significantly below 2, the entire Division becomes combat ineffective (i.e. full stop). Viet Minh Morale can be reduced in two ways:
However, there is only one way to raise a division's Morale level: rest. Near the start of the Game Turn, the Viet Minh player must declare each division's posture. They'll either be assaulting or resting. If they rest, their Morale will move up a notch but, obviously, this will give a much needed breather to the French. So the Viet Minh commander must "play wisely" when determining how far to push their troops.
Rather than enlarge the scale of the map to encompass important but outlying areas, such as Laos and the hinterlands between the main Dien Bien Phu battle area and the Strongpoint known as Isabelle (which was south of the main map area), the designer chose to create "boxes" that facilitate movement and combat in these areas, as well as movement to and from the main map area.
The areas that fall outside the main battle map area include:
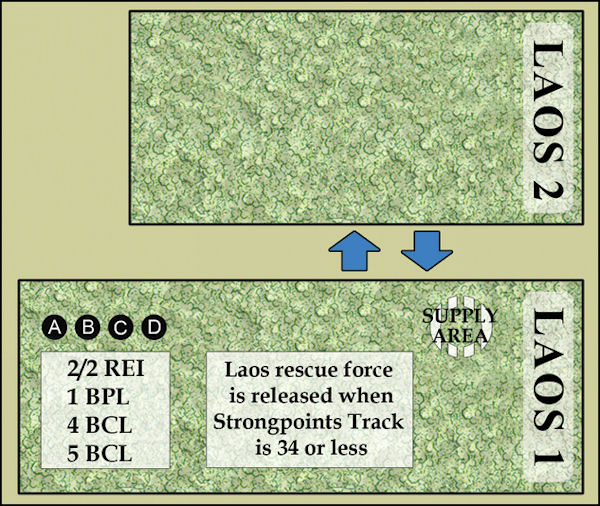
Units that wish to move between these boxes need to check the colored arrows that join them. Red arrows indicate that only Viet Minh units traverse the boxes in the direction(s) indicated by the arrow. Blue arrows mean that only French units can travel them. Gray arrows indicate paths usable by either side. So, in order for a French reinforcement unit coming from the Laos 1 Box to get into the action on the main Dien Bien Phu map using box movement would require four game turns:
I believe the external movement boxes are a much better solution than expanding the scale of the map, which would leave tons of "dead space" in between the main battle area and the outliers. It also adds a strategic game element that must be managed, again putting the player more in the role of a theater commander.
Combat, in Dien Bien Phu, is a bit different than most other war games. It's really a multi-stage process rather than a single roll of the die.
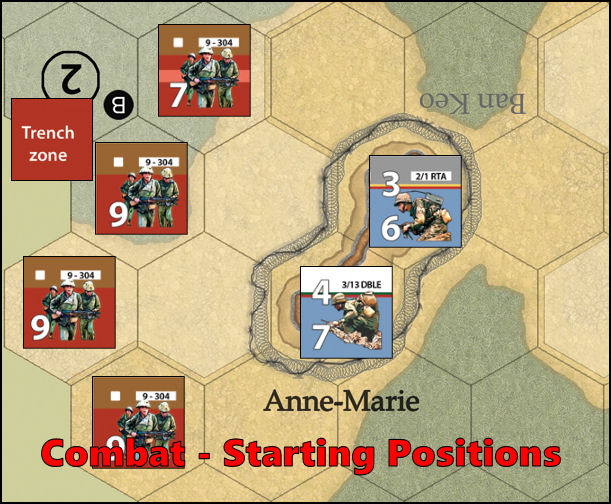
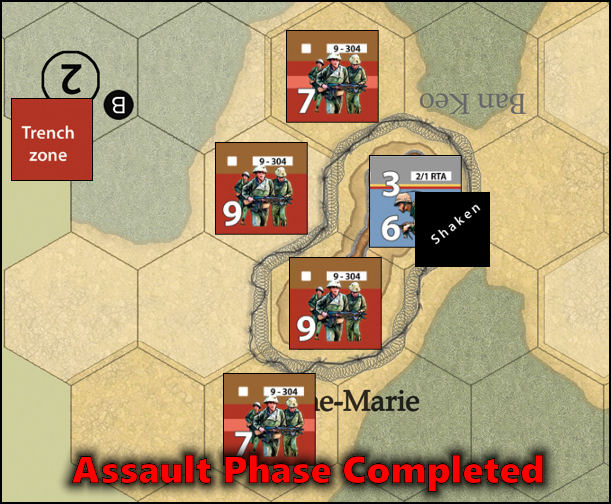
As an example, let's consider a Viet Minh attack on a French Strongpoint. Four Viet Minh units from the 304th Division (one with a step loss) wish to assault two French units in the Strongpoint designated "Anne-Marie". There are several steps that make up a complete combat action. I'll review each one below.
FYI: The 3/13 DBLE unit is an element of the 3rd Battalion of the 13th Legion Demi-Brigade (which was historically present at the "Beatrice" strongpoint), and the 2/1 RTA unit is part of the 2nd Battalion of the 1st Algerian Rifle Regiment (historically present at the "Isabelle" strongpoint). Both were randomly chosen for this combat example so, please, no complaints.
The Viet Minh may assign artillery units to support the attack by placing available artillery markers on top of the intended targets, and expending one ammunition point for each marker on the Ammunition Track. Notice that the Viet Minh have wisely not positioned themselves directly adjacent to any French target units to avoid being caught in the blast radius, because a barrage attacks the hex in which it's placed, and all 6 surrounding hexes. There are two consequences of a Viet Minh Artillery Barrage:

The Viet Minh Barrage is resolved as follows:
First Barrage Resolved: White die = 3, Black die = 4. There are two French units in the barrage zone. Since the white die roll of 3 is greater than that, there are no French casualties (i.e. step losses). However, morale of the French 2/1 RTA unit is 3, which is less than the black die roll of 4, so that unit suffers a "Shaken" result.
Second Barrage Resolved: White die = 1, Black die = 2. Same two French units in the barrage zone. The low white die roll inflicts a step loss on the defenders. Since the white die roll is an odd number, the Viet Minh get to choose the unit that suffers the step loss. Of course, the stronger French 3/13 DBLE unit is chosen and flips to its reduced side. The black die roll is lower than both defender's morale number, so there is no additional "Shaken" result.
The Viet Minh artillery Barrage Markers are removed and we move on to the next relevant step. Now that the barrage is over, the Viet Minh player can move in for the kill.

The Viet Minh Commando Raid is a quick sub-phase that allows the Viet Minh player to perform one of two options:
(1) Try to use the single Commando unit to inflict a step loss on a French unit by rolling a D6 value that is 3 higher
than the target French unit's morale number. Considering the French units have 3 and 4 morale, this is a probably not
the best option for the current example. I believe this usage of the Commando should be reserved for when there are
weakened French stragglers that have drifted from the herd and can be picked off piecemeal.
(2) Make a breach in a defending strongpoint's "perimeter wire". All wire hexsides of the hex where the Commando
unit is placed are considered "breached", which eliminates their defensive utility (and effects the Defensive Fire
segments, which we'll describe below).
Our Viet Minh player is feeling lucky today and targets the 2/1 RTA unit, which is the only unit he could possibly score a step loss against if he rolls a 6. He does not roll a 6 and so the example continues without being affected by the Commando. Bad move in a real game; good move in my example since it keeps things simple :-)
During this phase, all Viet Minh units spend up to 5 Movement Points. For our example all Viet Minh simply need to move adjacent to the French defenders in preparation for the assault, and do so.
All of the remaining sub-phases in this example constitute the Viet Minh Assault Phase.
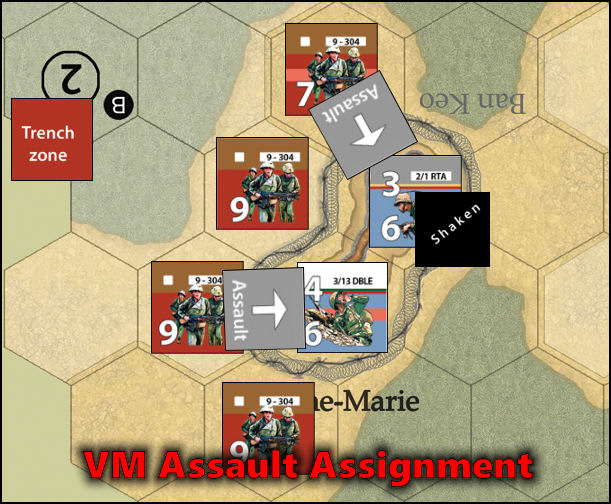
This phase, as alluded to earlier, is merely an opportunity for the Viet Minh to rest one or more of their divisions in order to improve their division Morale level. In this example, the 304th Viet Minh division, with a Morale Level of 4, needs no such respite and so will place Assault Markers. Each defender can only be directly assaulted by one Viet Minh attacker. All other Viet Minh, if in position, are considered supporting units. The Viet Minh assign assaulting units by placing Assault Markers as desired.
Never ones to sit back cowering in anticipation of an enemy assault, the French Expeditionary units have sharp teeth in this game and fight back ferociously. The Viet Minh will have to survive pre-sighted French artillery barrages and withering defensive small arms fire before they can even get into range to do damage to the defenders.
The French player may now place his Barrage Markers on Viet Minh units. If the Barrage Marker is placed on a Viet Minh unit that has an Assault Marker on it, it is considered a Support Barrage. If it is placed on enemy units that do not have Assault Markers on them, but are in position to support an assault, it is called a Reaction Barrage. Reaction Barrages are resolved as separate attacks on Viet Minh units and can inflict step losses in a manner similar to the Viet Minh barrages earlier. However, Support Barrages do not affect Viet Minh units directly, but rather cause modifications to the upcoming French defensive fire die rolls. France places four Barrage markers, one on each of the adjacent Viet Minh units.

The Reaction Barrages (those against the two Viet Minh units without Assault Markers) are resolved immediately. The French player rolls a die, modifies it according to the list below, and inflicts a step loss on the target unit if the modified roll is 5 or 6. There are several die roll modifiers but only one is relevant here; +1 If the Viet Minh unit is NOT Entrenched. The graphic shows the #2 and #3 Trench Zone boundaries as a green line. Notice that two of the Viet Minh units are on the Trench Zone #2 side of the boundary and two of them are not. (You can refer to the Trench Zone Reference Map to get a better sense of the Trench Zone boundaries). So the supporting unit to the left of French 2/1 RTA is entrenched because it's in a completed Trench Zone and the other supporting unit is not.
First Barrage Resolved: Against the 9-304 Viet Minh unit, inside the #2 Trench Zone, with no modifiers. Die roll = 2, and there is no effect. Note that if this barrage had been successful it would have inflicted a step loss on the Viet Minh target.
Second Barrage Resolved: Against the other Viet Minh unit, including the +1 modifier because it is not entrenched. Die roll = 4 + 1 = 5, which is sufficient to inflict a step loss! The unit is flipped to its reduced side, which shows a degraded combat strength of 7.
The two resolved Barrage Markers are removed.

Within the boundaries of this example, there is no French Reaction Movement. However, if four (or less) French units had been within range to help, the French player could have move them adjacent to the assaulted French units or even directly in the assaulted hex with the existing defenders. Just another example of French ability to resist determined Viet Minh assaults.
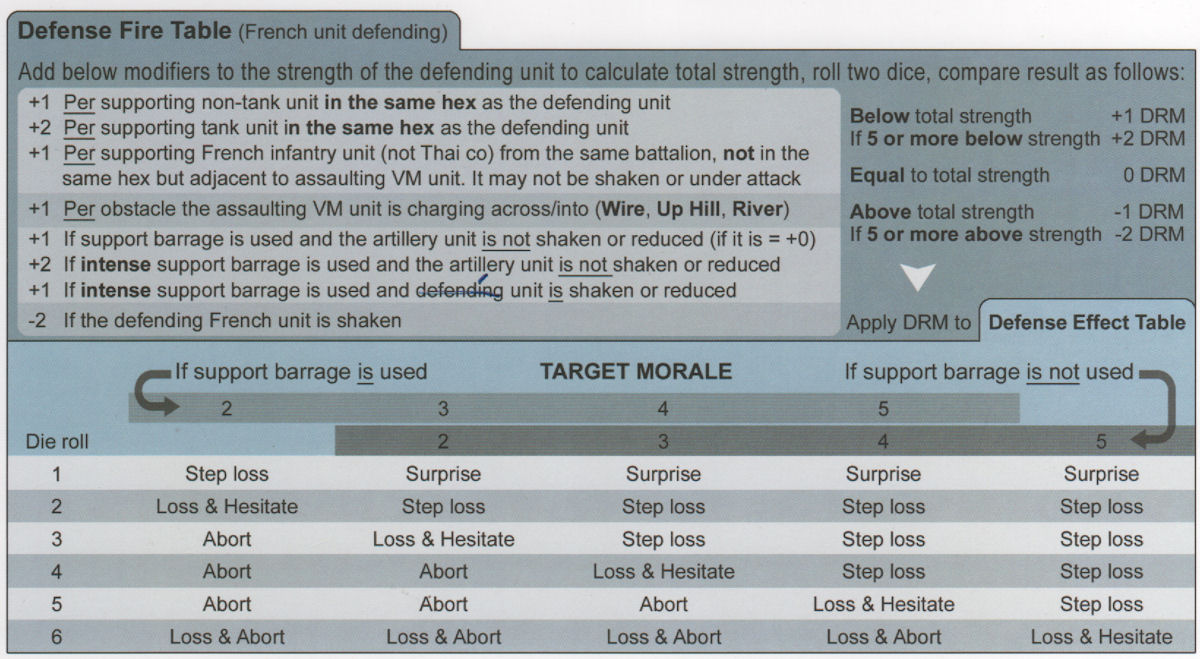
As a final test of Viet Minh morale and coherence, the French get to blaze away one last time at their attackers before the Viet Minh can resolve their assault. Here's where the combat process starts getting a bit long-winded. First the French player must roll on the top section of the Defense Fire Table, applying all the modifiers there, simply to arrive at a modifier for the main Defense Effect Table.
We'll resolve the top combat situation (the firing defender is the 2/1 RTA French unit). In this example, the first French dice roll, on the top section of the French Defense Fire Table, will result in a net modifier of +1, as follows:
This +1 modifier is added to the Combat Strength of the firing French unit (6 in this case) for a total strength of 7. Next the French player rolls two dice and compares the dice total to the total strength of 7. If the sum of the dice are below the total combat strength, the firing unit will receive a positive modifier (+1 or +2) on his Defense Effects Table die roll. Otherwise, he'll receive zero or a negative modifier. So, the higher the "total" (modified) French combat strength, the better the modifier will likely be. Continuing our example, the French roll a total of 6 (1 + 5) which is below the total strength of 7, netting him a +1 modifier on the next die roll.
Next we move on to the Defense Effect Table. The column to be used is determined by two factors: 1) The morale of the target unit (in this case, the Viet Minh unit being fired upon) and 2) whether or not the French fired a Support Barrage against the Viet Minh initiator of the assault.
For our example, a Support Barrage is indicated so the top column header will be used, and the assaulting Viet Minh 304th Division has a Morale of 4 so that column will be used.
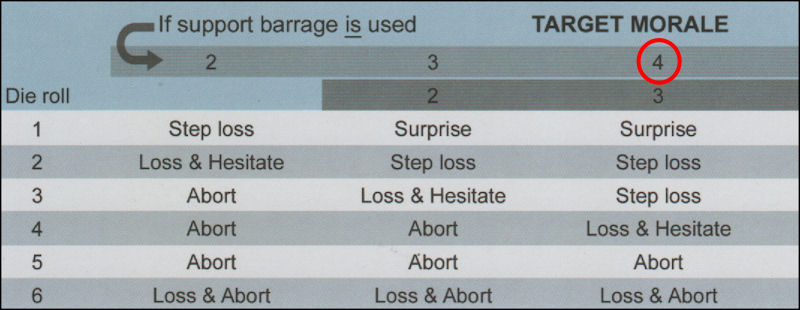
First Defense Fire Resolution: The French player rolls a 4 which, when combined with the +1 modifier results in a 5. Looking at the correct column on the Defense Effect Table, cross-referencing the 6 die roll, the result is Abort. This indicates that the attacking Viet Minh unit "takes cover" instead and there is no Assault. Change the Assault Marker to an Abort Marker and move on to the next Defense Fire situation.
For the second Defense Fire situation, involving the French 3/13 DBLE (Foreign Legion) unit, we start again at the top of the French Defense Fire Table and apply modifiers. In this combat also the Viet Minh unit is charging up hill and must cross defensive Wire (+2), a Support Barrage is indicated (+1). But in this combat, the French unit is not "Shaken" so there is no negative modifier. The final modifier to the French combat strength is +3 which is added to the French unit's combat strength of 6 for a "total" strength of 9. The sum of two dice is 9 which equals the French "total" strength and so there will be no modifier applied to the Defense Effect Table roll.
Again we move on to the Defense Effect Table. Once again the "4" column of the chart will be used because the entire 304th Viet Minh Division has a 4 Morale Level. The French did fire a Support Barrage so that header row will be used.
The French roll a "1" on the Defense Effect Table which indicates a result of Surprise. The current Assault Marker is replaced with a Surprise Marker and the turn now proceeds to the actual Assault... finally.

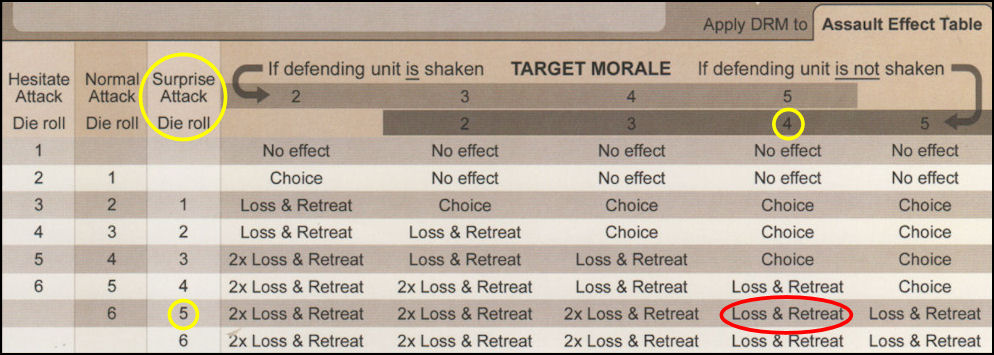
Finally, we arrive at the actual Assault Segment where the Viet Minh (that survive) get to carry out the attack they planned way back at the beginning of the Assault Phase! But one assault has been aborted, so we're left with only one remaining assault, which has been modified to a "Surprise" assault. We'll have to refer to the Viet Minh Combat Tables on the player aid chart, specifically the Assault Fire Table.
Similar to the French defensive fire process, the assault fire is split into two steps: 1) one roll to arrive at a final assault modifier and 2) a final roll on the Assault Effects Table where the combat is actually resolved.
The Viet Minh 9-304 unit now charges into the French positions! The first combat strength modifier will be a net of 0, which includes a -2 because the defending French unit is entrenched (in the "Anne Marie" Strongpoint), and a +2 because the assaulting Viet Minh unit has two other units from the same regiment (not "Shaken" or "Aborted") next to the defending French unit. So the sum of the Viet Minh "total" strength is 9.
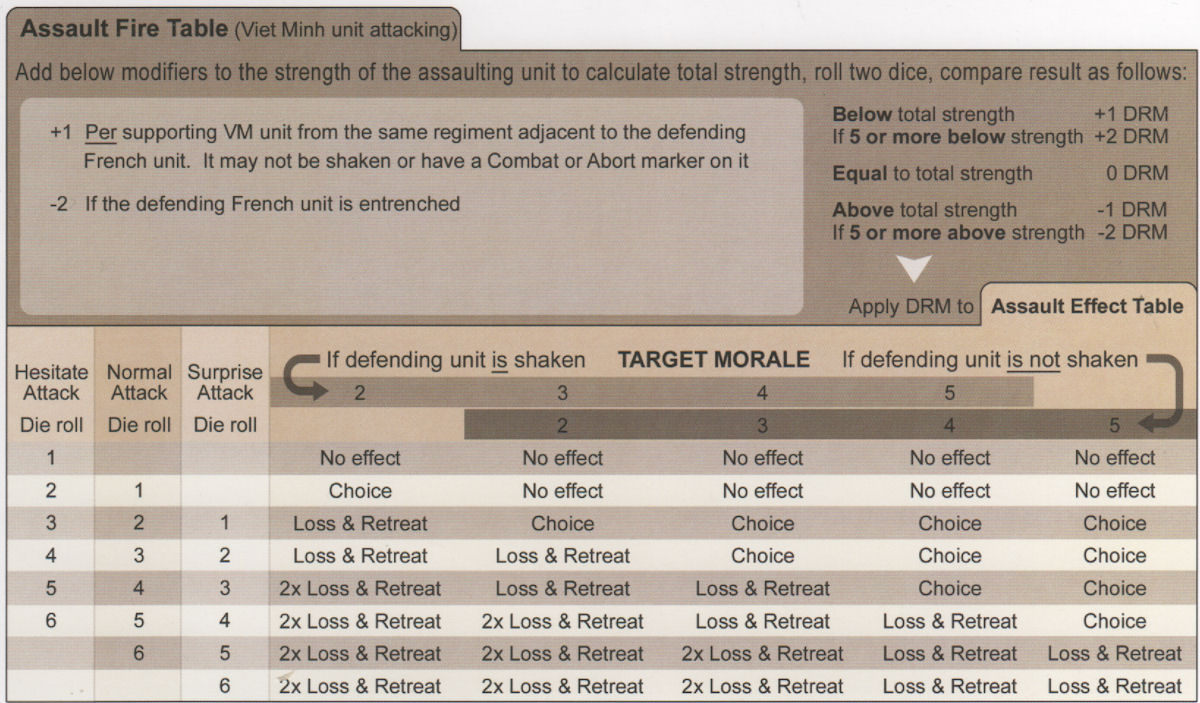
The Viet Minh roll two dice for a sum of 3 (1 + 2)! This value is 5 or more below the unit's "total" strength of 9, netting a healthy +2 modifier on the Assault Effect Table!
Moving down to the Assault Effect Table, we now have three things to identify:
The final die roll on the Assault Effect Table is "3", modified +2 to "5". Looking in the correct column and row, we find that the final result is Loss & Retreat, which directs the defending French unit(s) to take one step loss and retreat one hex. Because this French unit was already on its reduced side, it will have to be eliminated instead.
The victorious Viet Minh assaulting unit moves up to occupy the vacated hex, further tightening the noose around the remaining French 2/1 RTA unit. But the victory was not without cost. The Viet Minh suffered a step loss and had an attack aborted, meaning that they'll have to do it all over again next turn. In addition, since the Anne-Marie Strongpoint was not cleared completely of French units, the Viets may not claim the points for a captured Strongpoint.
As you can see, the combat process is more involved than a simple "calc odds, roll die, apply losses" approach. However, it may be one of the strengths of the game because of the sequencing of events (ex: allowing the defender to fire defensively before any assaults are resolved), causing somewhat realistic combat results, since history teaches us that launching an assault against entrenched positions is murder.
The French Assault process is similar, but does not allow for a Viet Minh reaction move, and the defensive barrage is resolved in a slightly different manner. But it's a lengthy process as well.
Do I wish the Assault Phase sequences could be streamlined a bit? Yes. But I hesitate to make too much of a fuss about it without having an alternative to suggest (which I don't). But I'm all ears for suggestions.
After having played the game long enough to get used to the combat system I'd have to say that, while the individual combat steps may be a bit of a bore, overall the Assault Phases are very exciting in this game! As the French player, you don't know where the Viet Minh will strike hardest, dedicating their best troops and artillery to take down a French Strongpoint. And as the Viet Minh player, you don't know where the French will evacuate without much of a fight, or dig in their heels and use concentrated barrages, withering defensive fire, and their superior maneuverability to reinforce threatened sectors.
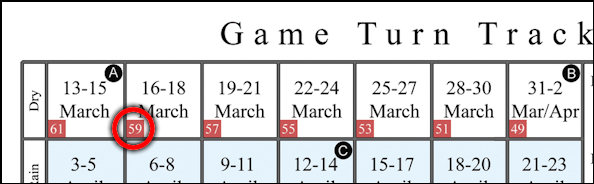
Let's address this issue right up front. This is potentially a long-playing game. You can realistically expect to spend about an hour per Game Turn while learning and there are potentially 21 Game Turns (for the full "campaign" game... and who wants to play anything else?). If the length of the game's playing time is a problem for you, consider the following:
I personally have no problem with the playing time because I have the space to leave a game set up indefinitely, and can complete it at my leisure. But I know that's not the case with everyone, so it had to be mentioned. Other than the game length and the fact that the Assault Phases could probably be streamlined, I really have nothing but good things to say about the game.
Although I need to have many more games under my belt before making a statement like this with any real conviction, I believe the game system meets two important objectives:
(* When I say "cocky", I'm referring to the belief that a) the Viet Minh could not get a significant amount of artillery into the surrounding mountains; b) that, if they did, air power and counter battery fire would shut it down instantly; c) that the outpost could be sufficiently provisioned by air alone. So "cocky", in game terms, would refer to a French player not managing his limited resources well, launching ill-advised counterattacks, and pinning his hopes on reinforcements that might not get there in time.)
This is super important to me. I don't like a historical game that's so constrained by special rules that I'm channeled into an inevitable historical result. I also don't like a game that, no matter how hard I try, I simply cannot reproduce the historical result. Now, you can avoid this issue by playing only fictional games or "battles that were never fought" contests for which there is no history to cause bias. But I prefer to play a well-crafted game that's enough of a simulation to recreate historical results given historical behaviors. So far, all indications are that Kim Kanger's Dien Bien Phu meets that standard.
I'm enjoying the game and intend to play it at every opportunity. Everyone I know that has played it regards it as an excellent game as well. I think Legion Wargames has really "knocked it out of the park" with this one. Not having had much experience with Legion Wargames titles (I've only played one before), I was pleasantly surprised by the quality of Dien Bien Phu. I'm now looking forward to trying some of their other games.