Combat Leader, designed by Gary Graber and published by Minden Games is an introductory, 2-player tactical warfare board game. The first installment of this series covers tactical combat on the Eastern Front during World War II. Each map hex represents about 17 yards, and the unit counters are individual (named) soldiers. It is a very easy game to learn, but is not a beer & pretzels game; there's a bit of depth to it particularly when all the optional rules are used.
This article is going to discuss the Fire Combat system (also called "ranged combat" in some other games) and provide a detailed example of how it works. If you own the game, you can set up the pieces and play along. If not, I'll be providing enough graphics that you should be able to follow along just fine. I'll provide a very brief overview of the numbers and indicators on the combat units, and a few other points about the map terrain that you'll need to know in order to conduct the Fire Combat, but it is assumed that you have some familiarity with the game.
The situation in the example will cover part of a German squad firing on several Soviet soldiers holed up in a building.
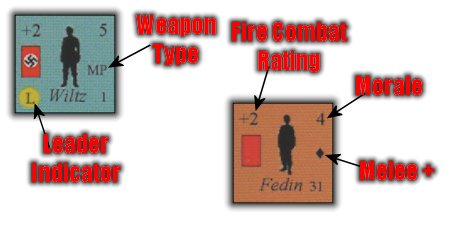
Each soldier unit counter contains a name and unique numeric ID along the bottom. But there are 5 other important pieces of information that may appear on a soldier:
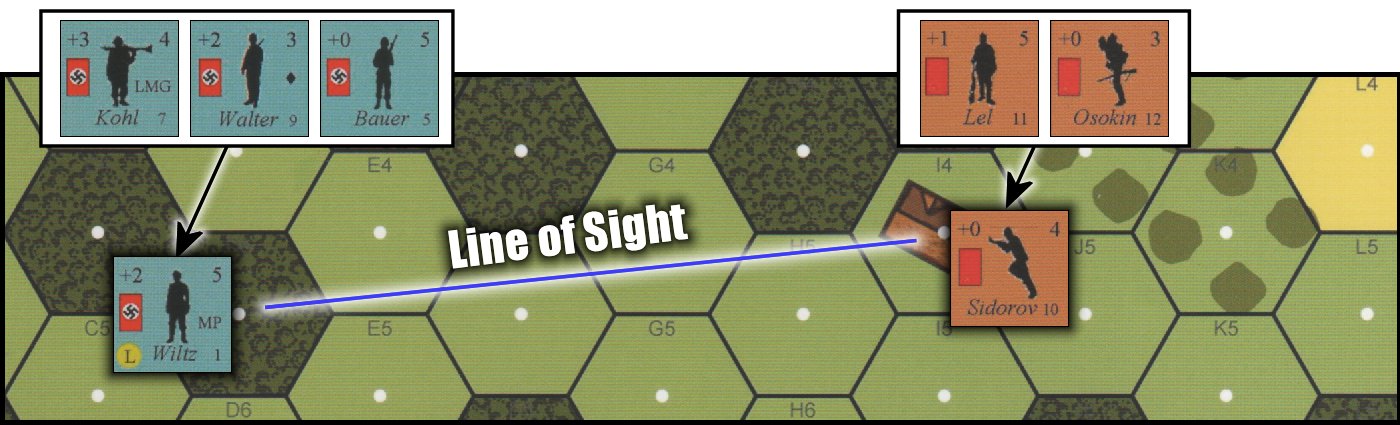
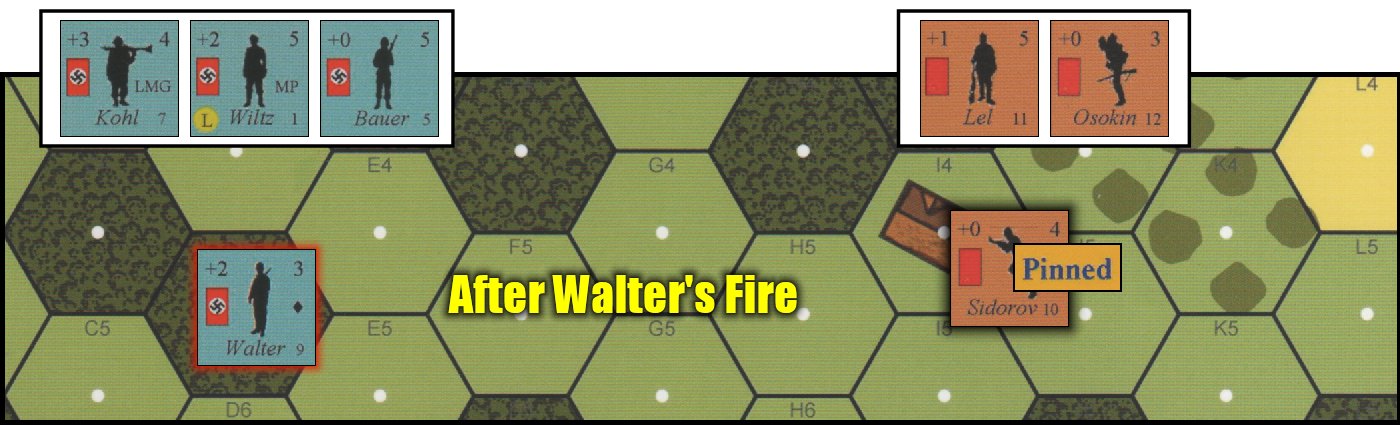
Consider the following situation: there are four German soldiers in Forest hex D5 on Map 1, and three Russian soldiers in a Building in hex I4. It is the German player turn and he decides to Activate hex D5, which effectively activates all soldier units in that hex. Rather than moving the units, he uses the activation to have them perform Fire Combat (e.g. ranged fire), directing the fire at the Russians in hex I4.
Determine if there is a clear Line of Sight (LOS) between the firing hex and the target hex by tracing a straight line from the center point of each hex. In this case, there is no blocking terrain so the firing may proceed. There are four Clear terrain hexes between the firer and the target which count a 1 range point each. A Woods hex would accrue 2 range points. In this example, the target hex itself contains a building but that still only counts for 1 range point. So, the total "range", for Rifle and Machine Pistol (MP) firing purposes, is therefore "5".
For Light Machine Guns (LMG) only, each Clear hex counts only a 1/2 range point. So, for the German LMG, the total range will be "2.5".
Pinned units may not fire. Units whose weapons cannot reach the calculated range of "5" may not fire either. There are no Pinned German units, and German Leader Wiltz is carrying a machine pistol (MP) which has a maximum range of "5" and so therefore is still (barely) eligible. See ranges for all weapons in the table below. Remember that units that don't have an "MP" or "LMG" indicator are considered standard rifles (G98 Rifle for Germans and 1891/30 Rifle for Russians).
So all German units are eligible to fire.
| Weapon Ranges (in hexes) | |||
|---|---|---|---|
| Weapon | Short Range | Medium Range | Long Range |
| German G98 Rifle | 1-2 | 3-4 | 5-7 |
| German MP38 | 1-2 | 3 | 4-5 |
| German MG 34 LMG | 1-3 | 4-6 | 7-9 |
| Russian 1891/30 Rifle | 1-2 | 3-4 | 5-6 |
| Russian PPSh-41 MP | 1-2 | 3 | 4-5 |
| Russian DP 1928 LMG | 1-3 | 4-5 | 6-7 |
This process is a bit different from other games I've played. Instead of dice, you use a deck of playing cards. Each firing unit pulls a card from the deck and checks the Fire Accuracy Table, adding modifiers as described on the table. If a result other than "-" (blank) is pulled, there is a possibility the target may suffer casualties.
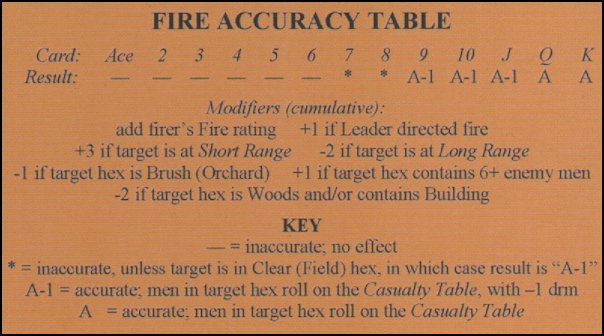
For example, if an Ace is pulled, and there is a +3 modifier, the final result would be "4" column. Or if a Jack is pulled and the net modifier is -2, the final result would be the "9" column.
(Generally speaking, I like the use of playing cards instead of die rolls, because it allows for a wider range of results but with a different probability distribution than using, say, a 13-sided die (if one existed). But, on the Fire Accuracy Table, there are only four possible results: "A", "A-1", "*" and "-", so I think it probably would have been better to use a modified die roll here. But it doesn't detract from the combat process, so there's no harm done).
| Fire Accuracy Resolution | |||
|---|---|---|---|
| Firing Unit | Card Pulled | Modifiers | Result |
Wiltz (MP)
|
 |
Wiltz's Fire Rating (+2) Target is at Long Range (-2) Target Hex Contains Building (-2) Net Modifier = -2 |
4 - 2 = 2 Final Result: --- (No Effect) |
Bauer (Rifle)
|
 |
Bauer's Fire Rating (+0) Leader Directed Fire (+1) Target is at Long Range (-2) Target Hex Contains Building (-2) Net Modifier = -3 |
5 - 3 = 2 Final Result: --- (No Effect) |
Walter (Rifle)
|
 |
Walter's Fire Rating (+2) Leader Directed Fire (+1) Target is at Long Range (-2) Target Hex Contains Building (-2) Net Modifier = -1 |
K - 1 = Q Final Result: A (Accurate; must roll on Casualty Table) |
Kohl (LMG)
|
 |
Kohl's Fire Rating (+3) Leader Directed Fire (+1) Target is at Short Range (+3) (remember the range for the LMG is only 2.5) Target Hex Contains Building (-2) Net Modifier = +5 |
5 + 5 = 10 Final Result: A-1 (Accurate; roll on Casualty Table with -1 Modifier) |
So, Walter and Kohl will potentially inflict Russian casualties, while Bauer and Wiltz have missed completely. A few things to note:
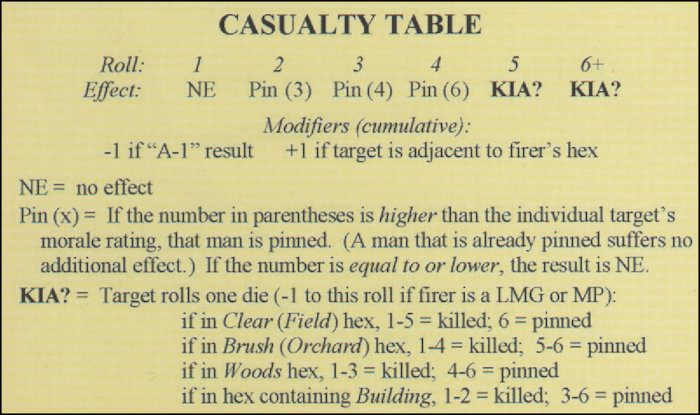
After determining that a target unit was "hit", using the Fire Accuracy Table, a final roll is made on the Casualty Table to determine the actual damage done. Possible results include "KIA?", "Pin" or NE (No Effect).
When the target hex contains multiple units, you must determine how many of them could be affected by the fire. If the firing unit has a Rifle, a maximum of 2 target units can be affected. If firing with a Machine Pistol (MP), up to 6 target units can be affected, and a firing LMG can affect *all* target units. When a choice must be made, the "affected" target units should be selected randomly (I just roll a die).
Continuing with our example, let's resolve Russian casualties due to accurate German fire. First we'll resolve Walter's fire. He carries a standard rifle and therefore can only affect 2 target units. The two Russian target units, randomly chosen, are Sidorov and Osokin.
| Walter's Fire Combat Resolution | |||||
|---|---|---|---|---|---|
| Firer | Target Unit | Die Roll Modifiers | Die Roll | Casualty Result | Description |
| Walter | Sidorov | None | 4 | Pin (6) | Because Sidorov's Morale # (4) is less than 6, Sidorov is Pinned. |
| Walter | Osokin | None | 2 | Pin (3) | The die roll of 2 is not higher than Osokin's Morale # (3) so Osokin is unaffected. |
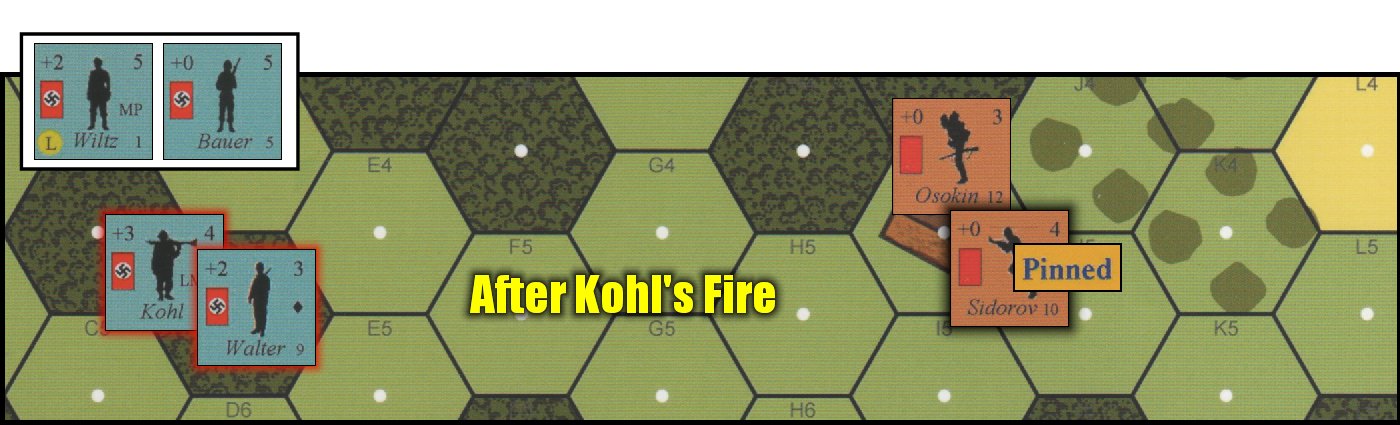
Now we'll resolve Kohl's fire. Kohl carries the Light Machine Gun for the Germans and therefore will target every unit in the target hex. His Fire Accuracy table result was "A-1" so every die roll will have a -1 modifier.
| Kohl's Fire Combat Resolution | |||||
|---|---|---|---|---|---|
| Firer | Target Unit | Die Roll Modifiers | Die Roll | Casualty Result | Description |
| Kohl | Sidorov | -1 | 3 | Pin (3) | Not greater than Sidorov's Morale, so no effect. Sidorov remains Pinned. |
| Kohl | Osokin | -1 | 1 | NE | Osokin escapes injury once again! |
| Kohl | Lel | -1 | 6 | KIA? | A result of KIA? requires a second die roll. The German player rolls a "1", which results in a "Killed" result when the target is in a hex containing a Building (see the Casualty Table, above). Lel is eliminated! |
I hope this article has given you a good sense of how Fire Combat is done in Minden Games's title, Combat Leader. There are other aspects of the game that I did not discuss, such as Melee Combat, Fake (dummy) units, Rally, Phase Reversal, and seven or eight Advanced Rules (which give the game some depth). Melee Combat could have its own "How-To" article, but that will have to wait for another time.
The game is very fast-moving and fun and is basically what it advertises itself to be: an introductory World War II tactical game. If you're looking for that "lunch hour" game that's quick, but fun and challenging, then give Combat Leader a look.