
IMPORTANT: for a copy of the game print this page with image loading turned on
for the rules. Print the map, counters and charts found in the
Game Components section below. Cut out
the individual counters.
Table of Contents
Note that versions of Battle for Moscow areavailable for PBEM (Play by Electronic Mail) wargaming.
Recommended PDF Package
GIF Package
Counter Manifest (for reference purposes) - Key: Full/Half strength: unit ids (type)
You also need a six-sided die.
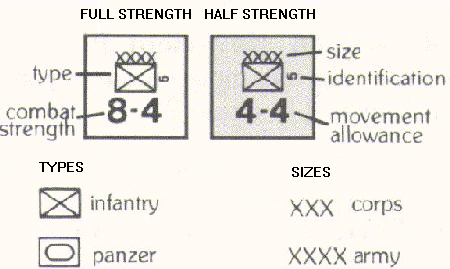
The Counters represent Soviet and German military units. Soviet units are orange/red and German units are green. The diagram below explains the information on the pair of counters for one unit.

Unit type is either infantry (foot soldiers) or panzer (armored); only the Germans have panzers.
Combat strength measures a unit's value in battle; higher numbers are stronger.
Movement allowance determines how far the unit can move.
Unit size and identification are purely for historical interest and have nothing to do with play.
All units have two counters: a full-strength counter and a half-strength counter with about half the combat strength of the full-strength side. See the counter manifest above. Losses in combat can reduce a full-strength unit to a half-strength unit. Replacements can turn a half-strength unit into a full-strength unit.
The map is divided into hexagons (we call them hexes for short) which define units' positions just like the squares of a chessboard. Hexes have been numbered using an XXYY coordinate scheme. The map also shows important terrain such as forests, cities, fortifications, rivers, and railroads; the terrain key on the charts explains each terrain type.
Each turn is divided into eight parts or phases performed in the exact order given below. All actions in one phase must be finished before the next phase can begin. The first four phases are the German player's turn; the last four are the Soviet player's turn.
Soviet Player's Turn
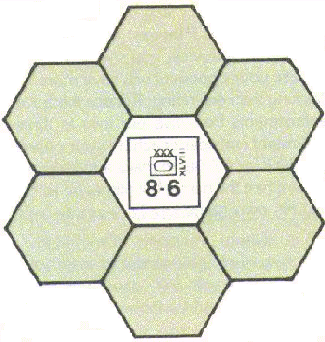
Movement: A unit entering an enemy zone of control must immediately end its movement phase.
Combat: Units cannot end their retreat in an enemy zone of control (they are eliminated if they do).
Replacements: Zones of control affect how a path can be traced to allow replacements.
 Zone of Control diagram
Rail Movement: In the rail movement phase, any Soviet units which start the phase on a rail line may move. They must move only along the rail line. A forest hex counts as only one hex for movement in this phase.
Restrictions: A unit can never enter a hex containing an enemy unit. A unit can enter a hex containing a friendly unit, but there can only be one unit in a hex at the end of the phase.
Zone of Control: A unit which enters an enemy zone of control must immediately end its movement for the phase.
 Movement Example
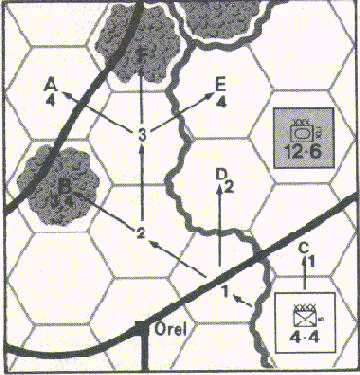
The above example shows different ways the Soviet 5th Army could move. The numbers show the number of hexes it has moved. With a movement allowance of four, the unit can move four hexes, as in path A. In path B the third hex the unit enters is a forest hex, which counts as two hexes moved, and the unit must stop. In path C the unit enters an enemy zone of control in its first hex and must stop. In path D the unit enters an enemy zone of control in its second hex and must stop. In path E, the unit ends its move ment in an enemy zone of control in its fourth hex and must stop because its move ment allowance is used up. Path F is not possible: the unit would have to move 5 hexes (counting 2 for the forest hex).
Battles are resolved one at a time in any order the attacking player wants. For each battle this sequence is followed:-
Maximum and Minimum Odds: In step 2, if the odds are above 6:1, reduce them to 6:1. After step 3, if the odds are below 1 :1 the attack has no effect on either side.
Terrain Effects: If the defending unit is in a forest hex, is in Moscow, or is a Soviet unit in a fortification, reduce the odds by one level (4:1 becomes 3:1, 3:1 becomes 2:1, and so on). If all the attacking units are across a river from the defending unit, reduce the odds by one level. (If both these conditions apply, reduce the odds by two levels.)

Combat Results: There are six different results on the combat results table.
NE (No Effect): Nothing happens.
DR (Defender Retreat): The defending unit is moved two hexes by the attack ing player. The unit must end up two hexes away from its starting hex and may not enter an enemy zone of control. If there is no retreat path which satisfies these conditions, the unit is eliminated. The unit also must end its retreat in a hex not already occupied by a friendly unit, and must retreat further than two hexes if necessary to reach an empty hex.
DRL (Defender Retreat and Loss): The defending unit must first take a loss; then, if it still survives, it must retreat as described in DR. If a full-strength unit takes a loss, replace it with its half-strength counter. If a half-strength unit takes a loss, it is eliminated.
AL (Attacker Loss): One attacking unit (of the attacker's choice) takes a loss, as described for DRL above (but it doesn't retreat).
DE (Defender Eliminated): The defending unit is entirely eliminated whether full-strength or half-strength.
EX (Exchange): First, the defending unit takes a loss as in DRL above. Then the attacking player must lose at least the same amount of strength from attacking units. In both cases, if a full-strength unit is reduced to half-strength, the amount of the loss is the original strength minus the the reduced strength. For example, if a panzer with a strength of 9 takes a loss (and is replaced by its strength-4 counter), the loss is 5. Finally, the defending unit, if it survives, must retreat as for DR above. (Note that the defending unit may be eliminated in its retreat, but the attacking player is not required to match this loss).
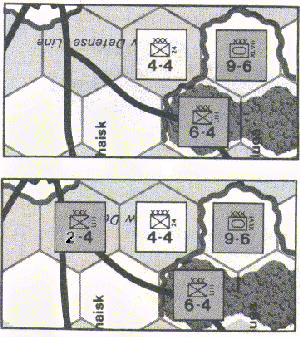
The second attack is just like the first except for the addition of a strength-2 German infantry unit, but that makes a big difference. The odds are now 17 to 4, or 4:1; they are still reduced one level for fortifications, but no longer for the river, making the final odds 3:1; finally, the Soviet unit would be eliminated if forced to retreat, since it is surrounded by enemy zones of control.
 Combat example
You can't use two replacements at once to create a new full-strength unit. Creating a new full-strength unit from nothing would take two turns of replacements.
New Soviet units appear on the east edge of the map (in any empty hex) or in any empty, friendly-owned city in communication with the east edge (at most one per city). Existing Soviet units, to be restored, must also be in communication with the east edge. Friendly-owned means that your units were the last units in the city; all cities are owned by the Soviets at the beginning of the game except for those that start occupied by a German unit. In communication means being able to trace a path of any length, without entering a hex containing an enemy unit or enemy zone of control, to the east edge of the map. Exception: the Soviets can bring in or restore a unit in Moscow even if it isn't in communication.
German replacements work the same way, except that communication is traced to the west edge and Moscow has no special properties .
If replacements are not used, they may not be saved for later turns.
Game Balance: If a handicap is needed for players of unequal experience, change the replacements. To benefit the Germans, change the Soviet replacements to four or even three. To benefit the Soviets, give the Germans their replacement only on turns 2, 4, and 6.
The German player should then set up one German unit on each black cross, all at full strength. The exact setup is important since it helps to determine what the German can do on turn 1.
After setting up the game, the German player begins his panzer movement phase. Since all German units begin the game at full strength, the German player receives no replacements on turn 1 and skips his replacement phase.
IMPORTANT: once you have mastered the above rules try the extra rules given in "What happens next: continuing play in Battle for Moscow".
Please report any problems with this page (bfm/game.html).