
"Tarleton's Quarter!", designed by Mike Joslyn and published in Against the Odds Magazine, is an operational level game of the American Revolution in the southern colonies of Virginia, North Carolina, South Carolina and Georgia. It's a two player game of low-to-moderate complexity that covers the period from the British landing in Georgia in 1778 to the surrender of Cornwallis at Yorktown in October 1781, with each game turn representing single month of real time.
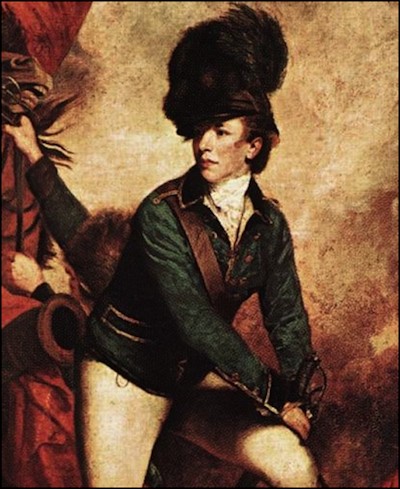
The game's name refers to Banastre Tarleton, a 23 year old British captain and leader of the "British Legion", a mixed force of cavalry and light infantry. One of the most successful cavalry officers of his day (from the British perspective), he acquired a reputation for ruthlessness after an incident at the Battle of Waxhaws in South Carolina, where he allegedly massacred rebel militia who were attempting to surrender. His name became synonymous with savagery, and "Tarleton's Quarter!" became a rebel war cry that put the British on notice that there would be none granted by either side...
Operating under the assumption (mistaken, as it turned out) that the southern colonists were itching to take up arms in support of the Crown, the government of Britain made a decision to pivot the main pacification effort toward the rebels of the American south. They believed that the greater proportion of loyalists in the south, combined with the sparse population, would make for an easier victory, and would set the example for the northern colonies to follow.
After a series of victories over out-matched rebel militia in Savannah and establishing a chain of forts and outposts from Savannah north/west to Augusta and Ninety-Six, the British began making plans for the conquest of the next major population center: Charlestown, South Carolina.
The game of "Tarleton's Quarter!" (yes, the quotation marks are part of the official game name) begins at roughly this point in the war.
Rather than writing a long, winding narrative, describing the game from top to bottom, I'm going to focus on the aspects of the design that give "Tarleton's Quarter!" it's distinct flavor... and write a long, winding narrative about those aspects!
I'll then provide a description of the Combat sequence and the Victory conditions to wrap up the article.
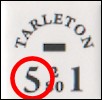
All troops Strength Points (SP) must be activated by a commanding Leader before they may move and/or initiate combat. In order to move troops the player must roll less than or equal to the Leader's Audacity Rating (circled in red on the graphic) on one six sided die. If the roll fails, the Leader and troops are done for the turn and may not attempt another move.
Which means that a Leader with an Audacity Rating of "3", for example, only has a 50/50 chance of being able to activate each turn. It's not uncommon to have a force stuck in one area for an extended period of time, so you must plan accordingly.
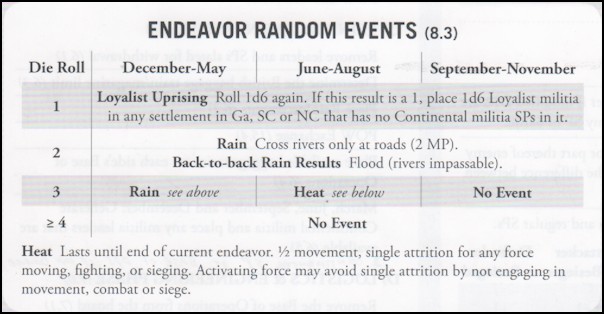
The activation die roll can trigger weather events, such as Rain, Flood, or Heat conditions, that may impact subsequent movement (more about this in the "Weather" discussion, below).
The other important Leadership rating, located on the lower right of the Leader counter, is the Tactical Ability rating. Whereas the Audacity Rating measures a leader's ability to move his troops and get them into battles, the Tactical Ability measures the performance of the Leader once engaged in battle. It also indicates a Leader's ability to avoid battle (i.e. Retreat Before Combat) when prudent. It represents steadiness, good judgment and sound tactical ability versus rashness and impetuousness.

As it has always been in modern warfare, supply is a constant concern for both British and Continental troops. Every month, each unit must check its supply status. Units must be able to trace supply to a friendly Magazine or be in the same area with a friendly Baggage Train. If they cannot do either, forces must Forage.
Units may trace supply from a Magazine that is up to two areas away, but this supply path may only across a river subject to weather conditions. The force must be in the same area with the Baggage Train in order to draw supply from it. Finally, if no Magazine or Baggage Train is available, the force will Forage.
To Forage, you simply compare the total number of SPs in an area to the area's Supply Level. If the ratio is 1-1 or better, the unit suffers a single attrition die roll (will lose 1 SP on a roll of 1-3). As the ratio gets worse, additional attrition rolls will have to be made up to a maxium of 3 rolls. So a force could potentially lose 3 SPs if not properly supplied.
If a Magazine or Baggage Train is accessible, a force will not suffer any attrition losses, so a competent commander will ensure he has sufficient supply on-hand before venturing away from the comforts of the Magazine.

There are two types of disease, depending on which month it is: Small Pox is the prevailing disease from October through March, and Malaria/Yellow Fever from April through September. These diseases are abstractions for the various illnesses that affected revolutionary era armies in the field (as well as those actual diseases themselves).
Malaria/Yellow Fever affects every force that is currently in a Swamp area, possibly causing a loss of 1 SP for each area, as well as sidelining a Leader (i.e. the leader gets sick). Smallpox is more geographically limited, affecting only the single area with the largest concentration of forces on the map. But Smallpox can eliminate as many as 3 SPs from the force, as well as having twice as great a chance of causing a Leader to become ill (and Smallpox may actually kill a Leader).
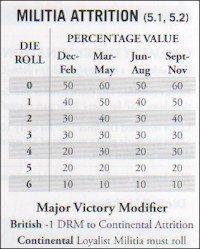
Every month a certain percentage of Continental militia enlistments will expire. This is handled in the game via the Militia Attrition table which may cause from 10% to 60% militia reduction each turn, depending on the time of year and a die roll!
Another interesting game process interaction involves the current Major Victory condition. The player that has won the last "major" battle (involving 5 or more SPs on each side) is granted several advantages while that condition exists. If the British have the "Major Victory" advantage, the Continental's die roll suffers a negative modifier which will increase the percentage of militiamen who return home after their enlistment is up (simulates the unwillingness of the men to re-up when the war appears to be going badly for them). If the Continentals are the current "Major Winner" advantage holders, then the Loyalist militia must roll for attrition on this table (whereas normally they do not have to suffer this particular attrition).
Four times a year new Militia can be generated (recruited) in each colony, but the monthly enlistment expiration attrition, combined with supply and disease losses, really takes a toll on Militia forces. It's important that you learn how to use your Militia in a timely and efficient method or they'll be useless to you.

Bad weather can delay or severely curtail troop movements. Each time a player attempts to activate a Leader, the activation die roll may also cause a weather event. Any time a "2" is rolled, it causes a "Rain" event. If a Rain event is already in force, it will trigger a "Flood" event. A roll of "3" during the months of December to May will also cause a "Rain" or "Flood" event.
"Rain" increases the movement point cost to cross an River boundary and "Flood" totally prohibits the crossing of a River boundary. This is doubly inconvenient for the British who already are prevented from moving into any Swamp area except along roads.
Because it rained about 1 out of every 3 days in the southern American colonies during this time period, expect to find your mobility often drastically reduced, and factor this into your plans.

After each battle is resolved, half (rounded up) of the loser's casualties are taken prisoner. In addition, Leaders may be taken prisoner under certain circumstances as well. Prisoners, however, can be exchanged each turn.
Exchanging prisoner SPs can provide a nice boost to each player's forces, especially when reinforcements are in short supply. But Leader exchange is far more important. Without enough leaders to activate them, your forces will sit idle on the map!
In keeping with the deep interconnectedness of the various game processes in "Tarleton's Quarter!", prisoners also suffer attrition, each side losing 1 SP per turn. Another reason to try to exchange your prisoners as soon as possible!

Now let's tie this all together: imagine you control 2 Leaders and a force of 6 Continental regulars and 10 North Carolina militia in a South Carolina Swamp area in May 1780 without access to a Magazine or Baggage Train. The area's Supply Level is "6".
The Continental Militia Attrition die roll results is 50%. Because it's May and the force is in a Swamp area, you roll for Malaria/Yellow Fever Attrition and suffer 1 SP loss and a Leader loss. Now you're left with 5 Continental regulars and 5 North Carolina Militia that must draw normal Supply. If the force were located in North Carolina, the NC militia would be automatically in supply, but it's in South Carolina so you must compare the full size of the force (now 10 SP) to the Supply Level of the area ("6"), which is greater than 1-1 but less than 2-1 so you have to make two attrition rolls and end up losing 2 more SPs (1 Continental regular; 1 NC Militia).
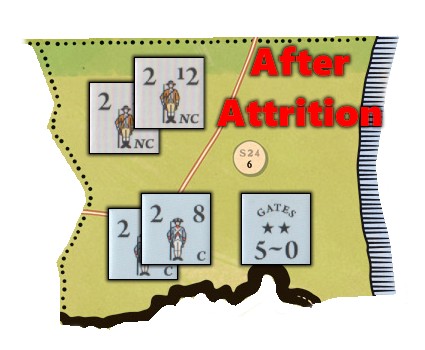
Your force which started with 2 Leaders and 16 SPs now has only 1 Leader and 8 SPs. A full 50% reduction in combat strength and leadership over the course of 1 month!
Even though Gates has got a pretty good Audacity Rating (5), the loss of the other leader (Caswell) to sickness, has reduced your potential mobility. You no longer have the option of marching off in two different directions. And, if Gates's activation die roll fails, the entire force is stuck in place for the rest of the month/turn.
The attrition rules in this game are brutal. A consistent effort is required to manage and position your troops most efficiently based on the current time of year, supply situation, force concentrations, enemy proximity, etc.
All of the processes described above may result in the diminution of two capabilities: mobility and combat strength. An army that cannot move when required or cannot maintain combat effectiveness will certainly lose the war. But these processes are all interrelated in various ways.
>>> A failed Leader activation die roll affects the mobility of a force. (Force and Leader may not move)
>>> A successful Leader activation die roll may cause a negative change in Weather which will affect mobility (can't cross rivers if "Flood"; can cross river only at Road during "Rain"; half movement during "Heat"), and may degrade combat strength ("Heat" may cause loss of 1 SP)
>>> Disease Attrition results in loss of combat strength and may result in the loss (temporary or permanent) of Leaders... which will result in loss of mobility.
>>> Loss of combat strength due to the various attrition processes will eventually result in battle losses and prisoners... who are subject to attrition while incarcerated... further eroding the overall combat strength of the army.
>>> Dispersing troops over a larger geographical area to reduce the impact of Disease Attrition will probably result in not being able to gather your forces in time for a major battle.
>>> The need to gather larger forces for important battles (especially for the Americans) will result in larger attrition losses and greater supply demands which, if not met, will diminish combat strength.
>>> Loss of combat strength for any reason may degrade a force's combat strength to the point where it can no longer initiate or maintain a Siege (more about Sieges below), causing a player to bring more troops into the area... creating a juicy target for attrition of all types.
As you can see, even doing your best to remedy a deficiency in one aspect may get you in trouble in another aspect. It's a pretty delicate balancing act that I think models the real world of late 1700's military campaigning quite effectively.
There are several phases in the Sequence of Play:
My examples will focus on the Endeavors Phase, where all of the Leader Activation and Movement and most of the Combat takes place. There are two types of Combat in "Tarleton's Quarter!": Siege Combat and Field Battles. I will be demonstrating two situations: 1) A British force moving into position for a siege, and 2) A Continental force initiating a field battle.
If a defending force occupies an area that is a City or contains a Fort and an attacking force enters the area, the defender may choose to withdraw all or part of the force into the fortifications of the City/Fort. There are only two Cities on the map: Savannah, Georgia and Charlestown, South Carolina. All other named locations are considered Settlements, and have no effect on combat at all. Cities can "entrench" up to 40 SPs while Forts can only handle a maximum of 15 SPs.
Only the British have the ability to build Forts. Once built, however, the Forts can be captured and used by the Americans.
The attacker must have at least 1-1 odds against the defender in order to be allowed to enter an area containing a City, and 2-1 odds to enter an area containing a Fort. Once the area is entered and the defender chooses to withdraw into the City/Fort rather than fighting a field battle, the attacker may now lay Siege.
Sieges in "Tarleton's Quarter!" are full-featured events, allowing for all the things you would expect from a system modeling siege warfare:
Consider the following example. It is March 1780. Leader General Cornwallis is currently in Georgetown settlement, in commmand of a force of 40 SPs of infantry and 5 SPs of Cavalry. He has an Audacity Rating of 4 and a Tactical Rating of 2 (the Tactical Rating is used during Combat as we'll see later). A second British force, under the leadership of General Phillips, boasts 20 SPs of infantry and 2 SPs of cavalry, and Philips' Audacity Rating is 3, and Tactical Rating 2.
Ideally, the British player would like to use his next Endeavor to attempt to activate General Cornwallis and march his force down into Charlestown to engage the rebel forces there. But due to the Flood weather condition, no units are allowed to cross rivers at all, even if there is a road crossing it.
The weather is particularly harsh on the British since they are unable to move into Swamp areas at all, unless they're following a road. During the frequent Flood conditions, when crossing of rivers is prohibited by all, the road-bound British have extremely limited mobility.
The Santee River extends west across the entire width of the game map, so Cornwallis is just stuck, completely unable to move south, for as long as the Flood condition lasts. Rolling for Leader activation may improve this weather condition, but the player does not want to bank on that happening.

So, the British players chooses the only other option remaining, and uses his Endeavor to attempt to activate General Phillips and his force of 22 SPs (20 infantry; 2 cavalry). Phillips will not have to cross any rivers in order to get into the Charlestown area, so a continuation of the Flood will not matter.
The die roll is equal to General Phillips' Audacity Rating (3) and is therefore successful. But a quick check on the Endeavor Random Events table indicates a Rain condition, which means that the Flooding continues for the duration of this endeavor. Phillips' total force strength is 22 which meets the requirement that a moving force must have at least 1-1 odds against an enemy force occupying a City in order to enter the area. The defender currently has 20 units, so the Brits barely meet the required troop strength requirement, and enter the area.
General Phillips leads his troops into the Charlestown area and immediately halts, awaiting the defender's decision to either fight a field battle or retreat into the fortifications of Charlestown... or some combination of the two. The American player opts to retreat the entire force into the city.
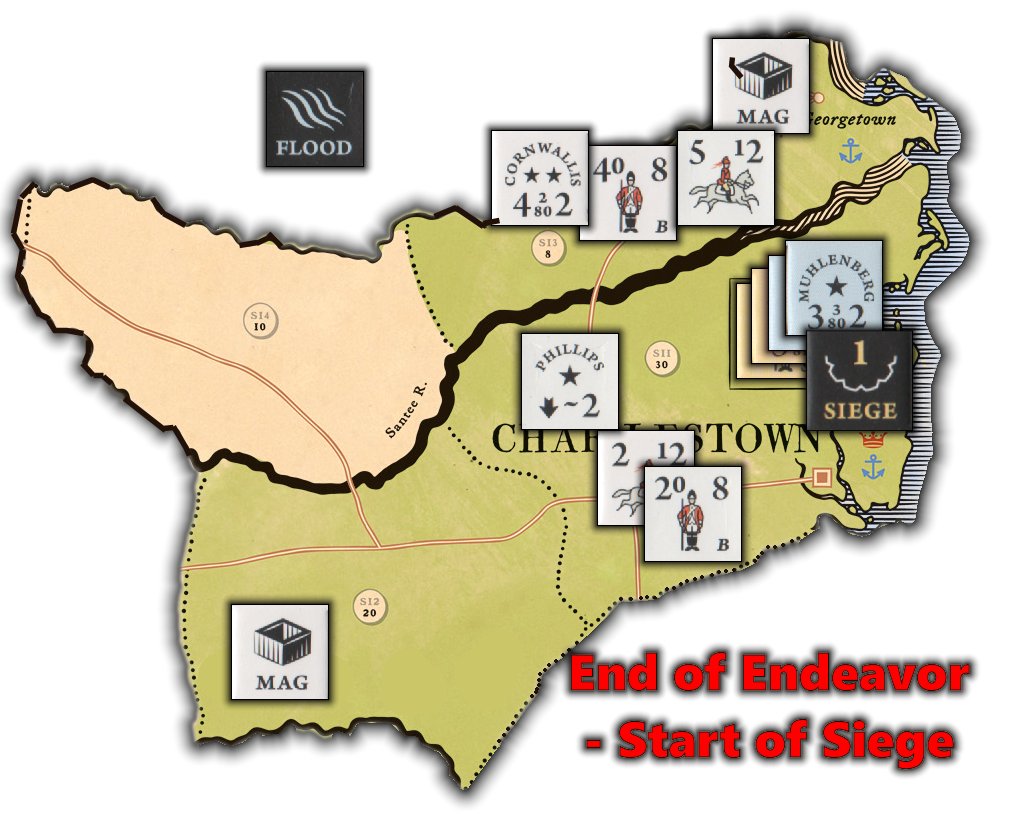
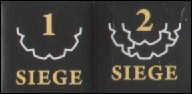
There is no field battle to fight so the British player immediately places the Siege 1 marker on top of the Amerian force in the city. Sieges, in "Tarleton's Quarter!" last for a fixed period of time. On the next month, if the American player does not surrender the city nor sally out to break the siege nor get some external relief, the Siege 1 marker will be upgraded to Siege 2. Finally, the following month, the Americans will be given one last chance to surrender or face Final Assault, which will result in only one force remaining in the area (depending on who wins the battle).
So, an uninterrupted Siege is basically a 3-turn process. But interesting things can, and do, happen. In the example shown here, the British are narrowly meeting the odds requirement, which must be maintained throughout the entire duration of the Siege. But, with each turn that progresses, the forces are still subjected to monthly attrition (with the exception that the besieged force does NOT suffer Smallpox attrition). If the British force is degraded more quickly than the besieged Americans, the siege could be broken the instant the British do not have sufficient SPs to meet the odds requirement. They would then have to bring up reinforcements and start the Siege all over again from square one.
A field battle occurs the instant enemy forces occupy the same area, there is no City or Fort into which the defender may retreat, and the defender does not wish to attempt Retreat Before Combat or has attempted and failed such a retreat.
Combat, in "Tarleton's Quarter!", is a very straightforward, and basically boils down to three rolls of the dice.
Because casualties are detemined via a separate process, you can win the battle but still end up losing more troops than the battle's loser! Of course, Leaders may also be killed in battle, so field battles should not be attempted without careful consideration, planning, and determination that the reward is worth the risk! Here's a quick example of a battle:
It's the start of the Endeavors Phase and, as always, the British are granted the first Endeavor. The British force in Hillsborough, led by General Cornwallis, consists of 20 British infantry and 5 British cavalry (led by the infamous Banastre Tarleton). They are a single force that can be moved all at once by activating Cornwallis, or Tarleton may lead a portion of the force (up to a 15 SP command limit) separately. The force is accompanied by an expendable Baggage Train which will provide supply when necessary.
The main American force is located in North Carolina area "N27" and consists of 10 North Carolina Militia, 7 Continental Regular infantry and 1 Continental cavalry, under the leadership of General Muhlenberg. The main supply Magazine is located in the Pittsylvania Court House settlement just across the colony border in Virginia and is garrisoned by 1 SP of Virginia Militia.
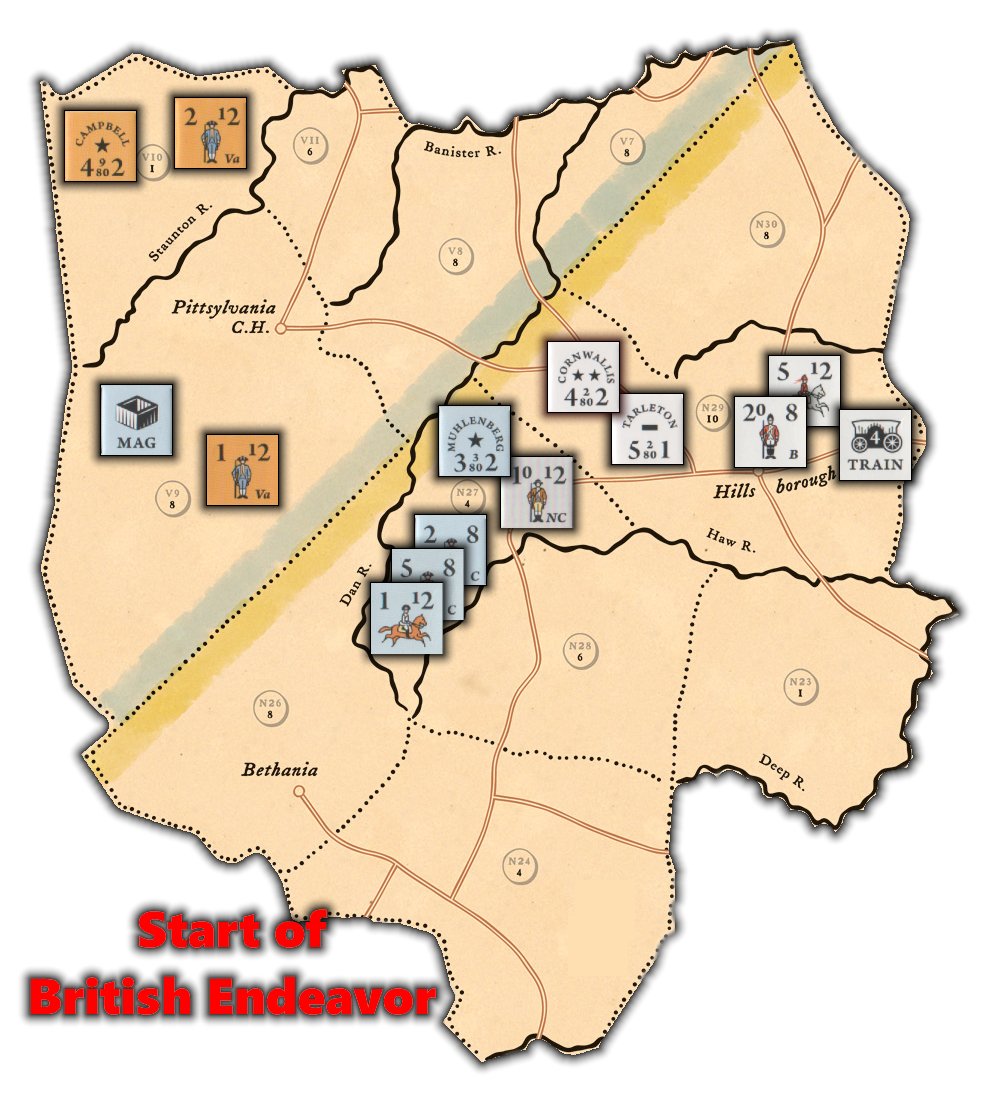
The British player would like to neutralize this rather large rebel force, but is hesitant to engage it in battle because the combat odds would be 1-1 and Continental General Muhlenberg has a Tactical Ability rating equal to Cornwallis's (2). It seems excessively risky so he opts for a longer term strategy of possibly weakening the rebel force first before bringing it to battle.
Accordingly, he sends Tarleton with the 5 cavalry SPs to make a raid on the Continental magazine and capture it. Faced with a supply crisis, Muhlenberg's force will either suffer a harsh attrition phase next turn, possibly losing several SPs. Or, will at least be alarmed enough by the situation to withdraw back into Virginia. Muhlenberg may even try to take a swipe at Tarleton, but that's a risk the British player is willing to take.
Tarleton rolls a "1" for his activation roll and is on his way. He circumvents the large rebel force, spends a total of 6 movement points to arrive in the Pittsylvania Court House area in Virginia.
There is a special game rule that allows Tarleton to Overrun an enemy force of 3 or less if he can muster 5-1 odds against it. Since that is exactly the situation between Tarleton and the Virginia Militia SP, the Overrun succeeds. The Virginia Militia is eliminated, the Continental Magazine is replaced with a British "Captured Baggage Train". Tarleton takes no losses at all and merely has to spend one additional movement point to complete the Overrun.
Note that Tarleton's cavalry force still has 5 of its 12 movement points remaining, and could continue moving, perhaps advancing north into a combat situation with Virginia Militia Leader Campbell. But Tarleton decides to stay put and guard the captured Baggage Train against the possibility of re-capture. The Tarleton counter is flipped over, indicating that he is not eligible for any more Endeavors this turn, and now the Americans may execute an Endeavor.
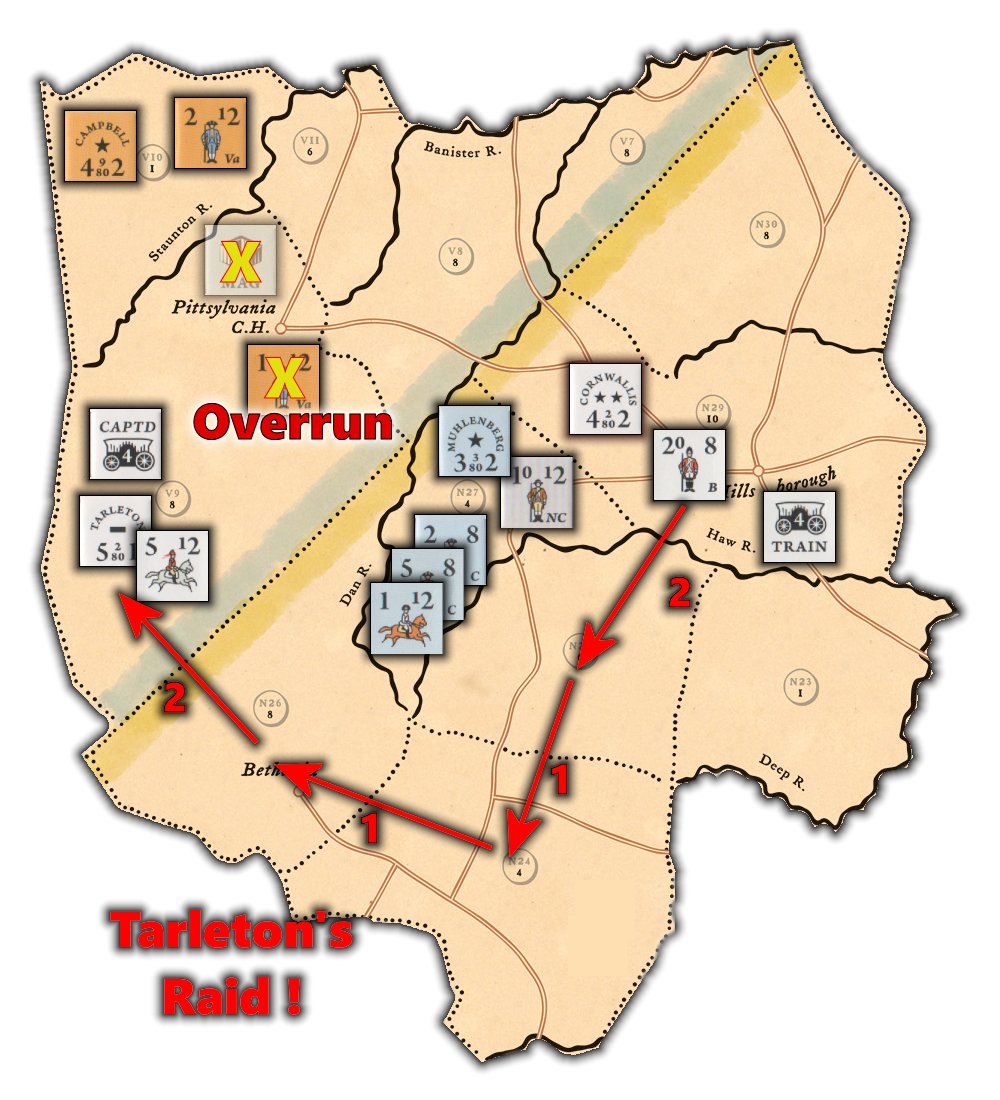
The Continental position is tenuous. They've just had their base of supply captured and are directly in front of a numerically superior enemy force. He may attempt to move back into Virginia and link up with the Virginia Militia there, but the supply problem will still exist, and will leave Cornwallis free to charge off in any direction unopposed. Another option would be to attack Tarleton, hoping to eliminate him as a threat, leave Cornwallis with no cavalry, and recapture the Baggage Train. But there is the possibility that Tarleton may successfully Retreat Before Combat (although he's not good at that), which will leave the Continentals in the same situation.
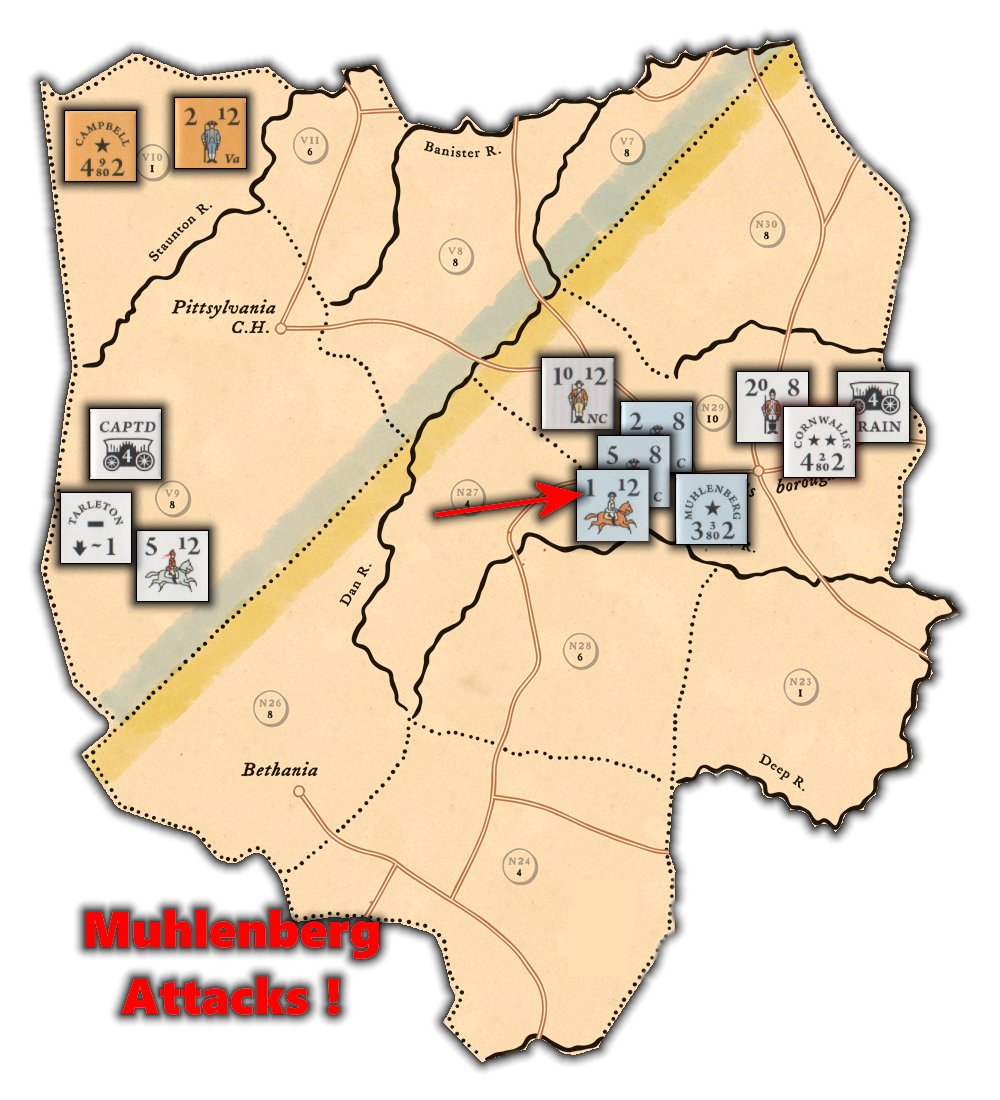
The Muhlenberg in our example, however, is a wild-man. He reasons that it's not Tarleton that's the real threat, nor is it the loss of supply. The real danger is Cornwallis's army and the potential loss of Virginia to it. So, he opts to go on the offensive and attack Cornwallis! While he is at a slight numerical disadvantage, this can be offset by his immediate cavalry superiority, that will only last as long as Tarleton is otherwise engaged. Even if the attack does not go well, Muhlenberg can take half his losses from North Carolina Militia, which are replaceable. Cornwallis must take his losses from precious British regulars that are not as easily replaced. So, Muhlenberg rolls for activation and succeeds. His force advances into Hillsborough to confront the British.
Note that the British could try to avoid the battle by attempting Retreat Before Combat, but that wouldn't be manly so they opt to stay and fight, confident in their ability to prevail.
Determine if the attacker achieves tactical Surprise. The American player (attacker) simply rolls a die and applies the following modifiers if applicable:
| +? | 1/2 of the Ranking Leader's Audacity Rating (round down) |
| +1 | British player elects to use the bayonet (only available if British are attacking) |
| +1 | All of the attacking units are militia under a Continental Militia Leader |
Only the first modifier will be used, granting Muhlenberg a +1. But it wasn't even necessary as Muhlenberg rolls a "6", achieving a Surpise bonus, which comes into play in the following steps.
Before proceeding we must calculate basic battle odds, comparing SP strengths. Muhlenberg has 18 SPs to Cornwallis's 20 SPs, which is less than a 1-1. The defending British will receive a positive modifier on their batle roll. Both players roll one die each and apply appropriate modifiers:
| +? | Favorable odds ratio modifier |
| +? | Leader's Tactical Rating |
| +2 | Attacker Surprise |
| +1 | Cavalry Advantage (force with more cavalry SPs) |
| -1 | Force is 50% or more militia |
Muhlenberg rolls another "6"! Next add +2 for Leader's Tactical Rating; +2 for Attacker Surprise; +1 for Cavalry Avantage; and -1 for having more than 50% militia. Total net modifiers = +4. Added to the 6 die roll nets Muhlenberg a total of 10.
Cornwallis rolls a "1"! (I swear, I'm actually making these rolls as I go along in order to keep the examples as real as possible... there's no anti-British bias going on here...) When totaled with a +1 for Combat Odds and +2 for Leader's Tactial Rating, the final British modified total is 4.
The higher number wins the battle so Muhlenberg and his Continentals are victorious! Next, we determine casualties. Both players once again roll one die each and apply the Casualty modifiers (some of which are the same as the battle modifiers):
| +? | Favorable odds ratio modifier |
| +2 | British attacker used bayonet and achieved surprise |
| -3 | British attacker used bayonet and failed to achieve surprise |
| +1 | Cavalry Advantage |
| +1 | Won the Battle |
| -1 | Leader's Audacity Rating > 3 |
| -1 | Force is 50% or more militia |
| -1 | Entered the combat area through a river boundary or by sea movement |
This time, Muhlenberg rolls a "3", ending his hot streak. Adjusting for Cavalry Avantage (+1), winning the battle (+1), and 50% or more militia (-1), the Continental total modified roll is 4.
Cornwallis can't catch a break in North Carolina, and his bad luck continues as he rolls a "2". Adjusting for Favorable Odds (+1), and Leader's Audacity Rating > 3 (-1), the British end up with a total of 2. Notice that Cornwallis's high Audacity Rating works against him in battle (rule book quote: "an audacious leader is more likely to charge into trouble").
The two totals are compared and the Americans once again come up with the higher total. Both sides now lose 1 SP for every 10 (or fraction of 10) SPs the opponent had in the battle. In addition, the player with the lower modified Casualty roll total must lose SPs equal to the difference between the high total and the low total.
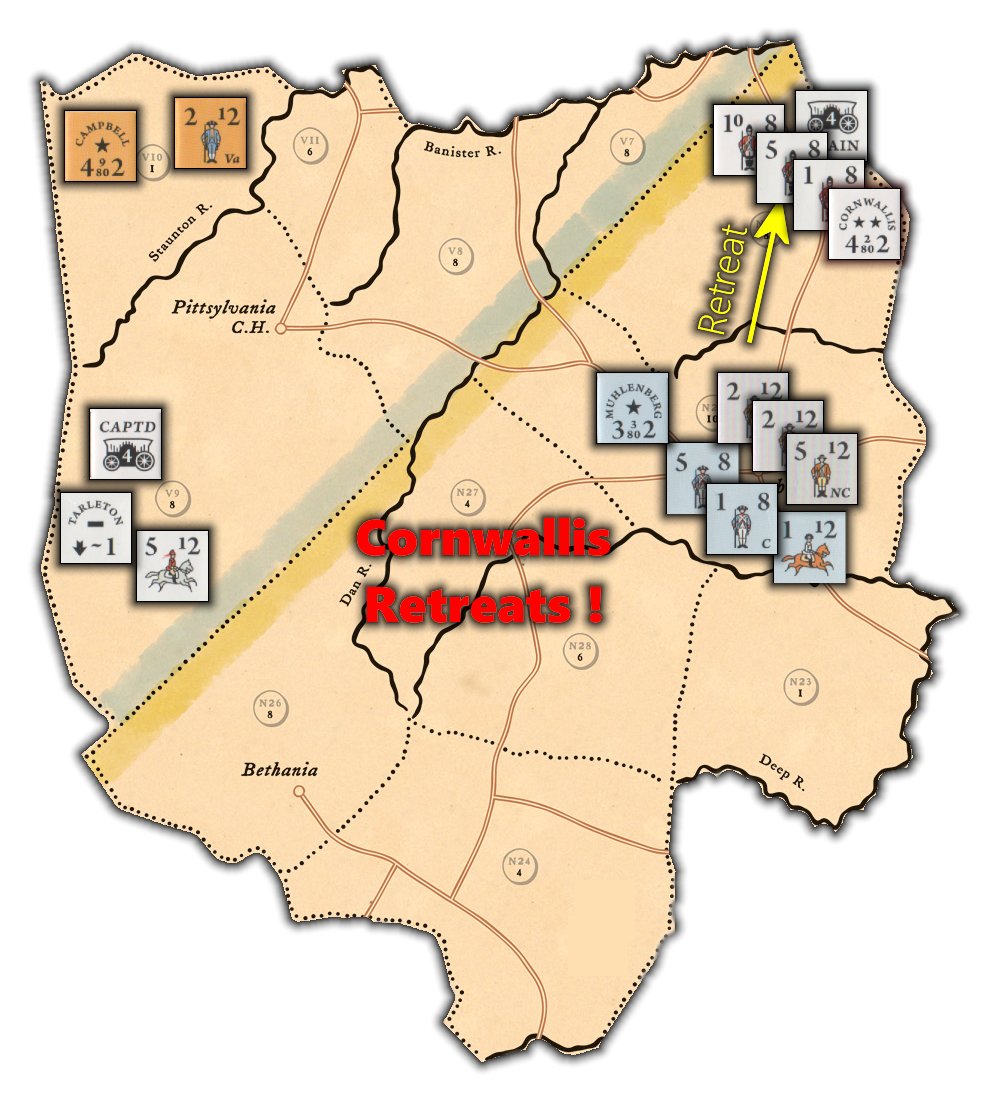
Bottom line: The British lose 4 SPs and the Americans lose 2 SPs. The Americans eliminate 1 SP of North Carolina Militia, and 1 SP of Continental regulars. The British lose 4 SPs of British Regulars, 2 of which are eliminated and the other two become Prisoners of War.
The final insult is that the British must retreat to an adjacent area, leaving the American rabble in command of the field. (the next graphic shows the final positions). And both sides now have 16 SPs so, should the Americans get the opportunity to attack again, it will be at 1-1 odds so they'll have one less disadvantage than in the first battle.
One of the unique aspects of the game design, the victory conditions require the British player to establish The King's Peace in at least two rebellious colonies by the end of the game (October 1781, in all scenarios). Or establish the King's Peace in three colonies to win the game immediately!
Establishing the King's Peace is a 3-step process:

Here's the really hard part: if any of those conditions change, the King's Peace is broken, and the British must go back to square one in that colony. For example, if a Continental force ends its movement in the colony after the King's Peace is established, it is "disestablished" immediately. The British player will then have to destroy (or drive out) the Continental force, and then use another Endeavor to re-establish the King's Peace.
It can be quite frustrating for the Brits, let me tell you. And failure to establish the King's Peace in two colonies by the end of the game is a British defeat.
The American player can win in two ways:
There are so many other aspects of the game that I'd love to talk about, but I have to end the article at some point, and I think I've covered enough of the salient points to provide a good sense of how the game looks and plays.
It's a fast moving game, with players alternating the execution of Endeavors, so you never really have any down-time. Most Endeavors are completed quickly and, once you get comfortable with it, the battles are resolved very quickly. It's not a quick game to play to conclusion, however. Depending on the scenario you choose, you'll be playing from 21 to 35 game turns. It's not a "monster game" by any means, but be prepared for a little numbness in your caboose if you attempt to finish a full campaign game in one sitting.
For a game that's more about maneuver and troop management than just battle, there's also quite a bit of strategic tension. One area that I didn't talk about was the periodic (but powerful) appearances of the French. As in the real war, the French deployments in the south were very short, but the first invasion in September 1779 can cost the British player the game if he's not careful about his troop deployments (there's a strategy article in this, so I won't say much more about it now).
In the early stages of the game, the British are on the hunt, looking for a decisive engagement. While for the American player, it's often more about avoiding battle than initiating it. Later in the game, if all goes well for the Continentals, the tide turns and the British find themselves hugging the coastal areas, staying near the ports from which they can be whisked out to sea when things get too hot. The Brits may find out the hard way that "It's Tough Down South"!
I'm a big fan of games covering the American Revolution and "Tarleton's Quarter!" is a welcome addition to my collection. I look forward to many more sessions although I have to say that it has been difficult to find opponents who want to play it. I think the subject matter may be an obstacle. I have to admit that when I first purchased the game I didn't really have high hopes for it. I just wanted to add another game to my Revolutionary War collection. But, having played it, I think it's highly underrated and I'm doing my best to get the word out that it's worth a try.
I just found out a few days ago (I'm so behind the times...) that Against the Odds Magazine have published a set of expansion rules for this game. I'll be giving them a try, I'm sure, and will report back if they're interesting enough to warrant it.
Finally, Against the Odds encourages everyone to vote for the games in their pipeline, and I'd like to encourage you to visit the site and vote for Almost a Miracle which is the northern companion game to Tarleton's Quarter! and shares the same game mechanics and scale. You'll also be able to combine the two games into a single campaign game!

