Overview
"No Safe Harbor: The Raid on Darwin" is a two-player war game that simulates the Japanese attack on Darwin, Australia
in February 1942. The game was designed by Paul Rohrbaugh and published by
LPS/Against the Odds. One player assumes the role of the Japanese attacker and the other plays the Australian/Allied defender.
The attack was Australia's "Pearl Harbor" in terms of shock and intensity even if not on the same scale as the Pearl Harbor attacks.
The game system reflects this in several ways, which will be discussed below. This article provides a brief review of "No Safe Harbor"
and highlights some of the game features.
The first order of business is to get the name straight! It's a ziplock game so there is no real "box cover", but the ziplock cover sheet
says the name of the game is "No Safe Harbor: The Raid on Darwin". So does the actual game map. But the rules booklet and the card with
the player aid charts, etc., both say "No Safe Harbor: The Attack on Darwin". I'm sticking with the name on the ziplock cover and
game map and will henceforth only refer to "No Safe Harbor: The Raid on Darwin" until I hear differently from the designer or
publisher. :-)
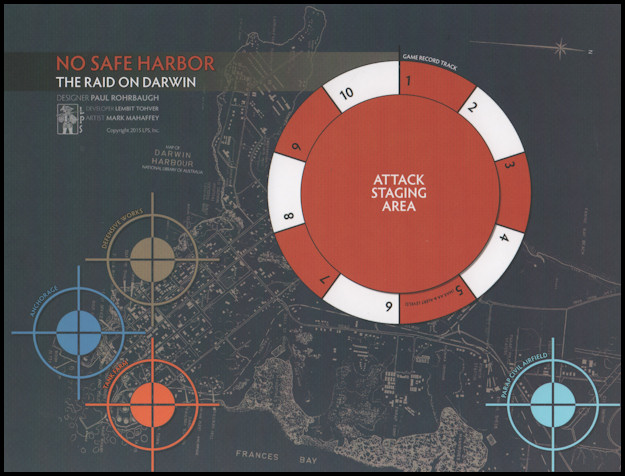
The game map is small; a basic 8.5" x 11" sheet that shows a stenciled map of Darwin Harbor, drawn from the National Library of Australia,
with important game targets highlighted with colored "bullseyes". The relevant targets, for purposes of this game, are the four "facilities" of the Anchorage,
Defensive Works, Tank Farm and Parap Civil Airfield. In addition, a colored "wheel" functions as the game record track, providing
numbered spaces around the wheel for tracking the current game turn, Anti-Aircraft (AA) Level, Alert Level, Victory Points, and
damage levels for each of the game targets. In the center of the wheel is an Attack Staging Area that functions as a holding area for
units awaiting entry on the map.
The unit counter density in "No Safe Harbor" is negligible, weighing in at a grand total of 36 counters
(including 4 blank ones, which I put to good use by the way). It's not a crowded map. Which is just fine by me.
The rule book measures a slim, trim 4 pages, but there is a 2 page "Player Aid" that really forms an essential part of
the game's rules so we'll really have to call it 6 pages.
If you can provide 2 six-sided dice and a deck of regular playing cards, within about 2 minutes you will be ready to play this game.
The deck is a specially prepared 33-card deck that has had all the red and black Ace, 3, 5, 7 and 9 (odd-numbered) cards removed, but a
single Joker is retained. That's it. You're ready for turn 1.
Each game turn represents part of an attack Wave, identified in the game as an Attack Group, consisting of a group of
Japanese planes that descend on Darwin, do as much damage as possible, then exit the map. "Damage", in game context, consists of sinking
Australian ships, and damaging the Anchorage, Defensive Works, Tank Farm, and Parap Civil Air Field. The Australian player's job is to shoot
down as many Japanese planes as possible, as quickly as possible. The intensity of the raid is reflected in these primal victory objectives.
It's simply kill or be killed.
Victory points are awarded according to the following schedule:

Australian VP Awards
- Eliminated Japanese Air Units
- Reduced Japanese Air Units (need two hits to kill an air unit; this represents a single hit)
- Eliminate Japanese mini-sub.
- Each Allied Naval Unit that escapes destruction
Japanese VP Awards
- Hits on the Anchorage
- Hits on the Parap Civil Airfield
- Hits on the Defensive Works
- Hits on the Tank Farm
- Each Naval Unit Sunk
The Game Turn
A full game lasts 6 game turns, broken down as follows:
- Game Turn 1 - First Wave, First Attack Group
- Game Turn 2 - First Wave, Second Attack Group
- Game Turn 3 - First Wave, Third Attack Group
- Game Turn 4 - Second Wave, First Attack Group
- Game Turn 5 - Second Wave, Second Attack Group
- Game Turn 6 - Second Wave, Second Attack Group
Each game turn directs a certain number of Japanese air units to be made available for that turn, and to be placed in the
"Attack Staging Area". Before the first game turn, 3 allied naval units, identified in the rules as the USS Peary (DD-226),
HMAS Swan (U-74), and HMAS Warnambool (J-202), are placed in the "Anchorage" facility. Additionally, certain
Allied Air Units may be made available for usage on the turn. Each turn then proceeds to the Activation Phase where a variable
number of Activations will be performed. Activations, in game terms, will be either move, fight, or repair activities.
This is where the modified deck of playing cards comes into play. A card will be drawn and one player or the other will be allowed
a certain choice of action(s) depending on the kind of card selected:
- Red Numbered Card (2, 4, 6, 8 or 10) - Japanese player can perform half the card's value in activations (e.g. a "10" card would allow 5 activations).
- Black Numbered Card (2, 4, 6, 8 or 10) - Allied player can perform half the card's value in activations.
- Red "Face" Card (J, Q, K) - Japanese player rolls for Random Events.
- Black "Face" Card (J, Q, K) - Allied player may perform Repair or move a Naval Unit.
This interesting card draw mechanism causes each Activation Phase to be considerably different in composition and duration. The Japanese
player could draw 10 red cards in a row, thus denying the Allied player a chance to respond. Conversely, the Allied player could have a
hot streak of black cards. In addition, the game turn ends if the single Joker is drawn, so neither player can count on having a set amount of
time to execute their plan or recover from a bad series of events.
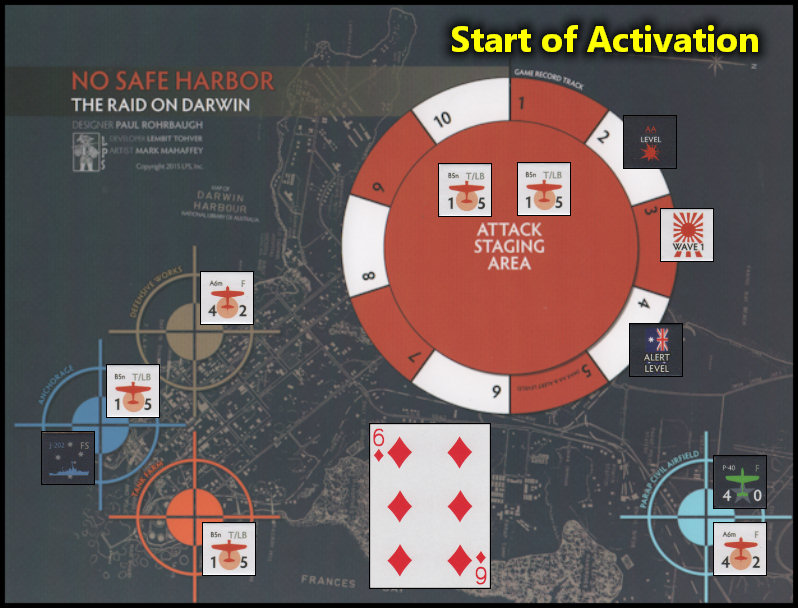
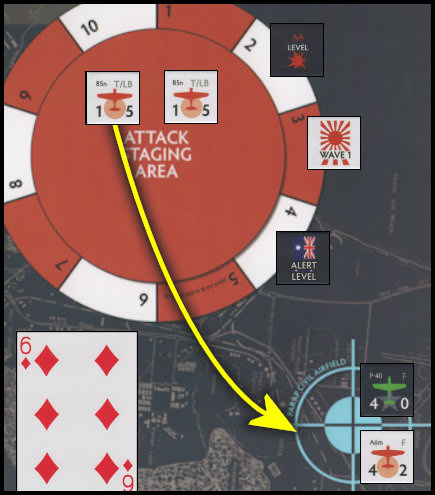
Let's take a look at a typical Japanese activation. In this example, we see that we're in the 3rd game turn (e.g. the 3rd
Attack Group of Wave 1). The current Allied AA Level is 2 and the Allied Alert Level is 4. (Note that normally there would be
additional markers on the "wheel", such as victory point markers and facility damage markers, but they're not being shown
to simplify the example).
The Japanese have Torpedo Bombers (TLB) currently over the Anchorage and the Tank Farm, and A6m fighters over the
Defensive Works and Parap Civil Airfield. The Allies have their one remaining naval unit in the Anchorage and
a P-40 fighter to challenge the Japanese fighter over the Parap Civil Airfield. Lastly, there are two more Japanese
Torpedo Bombers (TLB) that are still in the Attack Staging Area. The Japanese player has drawn the 6 of Diamonds and
is therefore eligible to perform 3 Activations (half of the 6).
Japanese Activations
There are a number of things the Japanese player could do with these activations. He could:
- Bomb the Anchorage facility or the Allied naval unit there. Because the Anchorage is garrisoned by a naval unit, the
Japanese aircraft will have to suffer AA fire *before* executing the torpedo bombing run.
- Bomb the Defensive Works facility with the A6m fighter aircraft there. The Defensive Works are also allowed to fire AA *before*
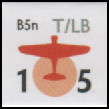
the attacker gets to release bombs. In addition, the fighter has less than 1/2 the bombing strength (2) that the TL/B
bombers have (5). They're really not meant to be used for bombing runs.
- Bomb the Tank Farm with the TL/B aircraft there. The Tank Farm does *not* have "first fire" AA capability.
- The A6m fighter over the Parap Civil Airfield facility can engage the Allied P-40 in a dogfight.
- Either of the TL/B bombers in the "Attack Staging Area" could move over any of the 4 facilities. They will not be
able to attack during this card draw's Activations, but they'll be in position for future attacks.
- Any Japanese aircraft that is currently over one of the 4 facilities may move to any other facility.
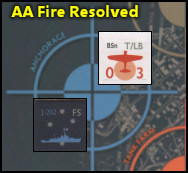
First Activation - In our example, the Japanese player is feeling aggressive and opts to use his first Activation to torpedo bomb the
Allied naval unit in the Anchorage. So the first order of business is to execute the "first fire" AA attack allowed
to the Allied player because the Anchorage is garrisoned by one or more naval units. The naval unit will get one
AA shot at the attacker (the max AA shots allowed for this "first fire" AA sequence). Generally speaking, lower die
rolls are better because the Allied player needs a modified roll of 4 or less (the current "Alert Level") in order
to score a hit. Let's look at the modifiers for AA attack rolls:
- +1 - Dive Bomb Attack (this is a torpedo attack so this doesn't apply).
- -1 - Torpedo Attack (since the torpedo bombers had to come in lower and slower, they were easier targets).
- +1 or +2 - Strafing fighters (the Japanese have no supporting "strafing" fighter, so this does not apply).
- -1 Random Event #6 (no Random Events in our example).
- +1 if no naval units present and the attack is made against the Anchorage (doesn't apply because there is a naval unit there).
Total die roll modifiers = -1 for the AA attack. The Allies roll a 5 for a final modified die roll of 4, which is equal to
the current "Alert Level" and thus causes a hit on the attacking aircraft, which is flipped over to reflect this damage.
The Japanese aircraft, although damaged, may still continue the bombing run against the naval unit, albeit at the reduced attack strength of 3.
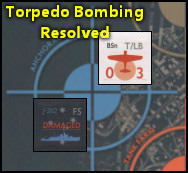
Let's take a look at the modifiers for Bomb/Torpedo Attack Resolution:
- -3 - Subtraction of the air unit's Bomb/Torpedo Attack strength.
- +4 - Addition of the Australian Alert Level.
- -1 - For Dive Bomber attacks (does not apply because this is a Torpedo attack).
- -2 - For Torpedo attacks.
Total die roll modifiers = -1 (-3 + 4 - 2) for the Torpedo attack. The Japanese roll a 1 for a final modified roll of 0 (zero).
This number is compared to the Attack strength of the attacking unit (which = 3), then cut in half (1.5) and rounded up (2).
If that number is greater than zero, then a hit is scored on the target naval unit. It is flipped over to indicate the new
damage status. If the ship sustains another hit, it will be considered sunk.
(Note: If the target had been a facility, there would have been 2 points of "damage" recorded for that facility)
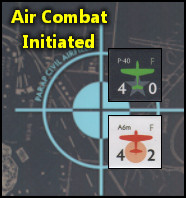
Second Activation - The Japanese players wants to start scoring some hits on the Parap Civil Airfield, but it's not
really safe to bring bombers into the area before the Allied P-40 has been neutralized. So, the next activation will be an
air-to-air combat between the Japanese A6m and the Allied P-40. "Air Attack" modifiers are as follows:
- -4 - Subtraction of attacking unit's Air Combat Factor.
- +4 - Addition of defending unit's Air Combat Factor.

So, with 0 die roll modifiers, it's a pretty even contest. The only other consideration for air combat is that the Allies have an
Air Attack Priority that must be followed. The basic purpose of this priority is to prevent the Allies from ignoring
Japanese fighters and going directly after the bombers.
The Japanese die roll is a 1 (with 0 modifiers) which is subtracted from the attacking unit's Air Combat Factor
for a net result of 3. Because that result is less than the attacking fighter's Air Combat strength of 4, the defending
Allied P-40 suffers a step loss and is flipped over. Note that air combat is not simultaneous; the attacker either
scores a hit or does not score a hit.
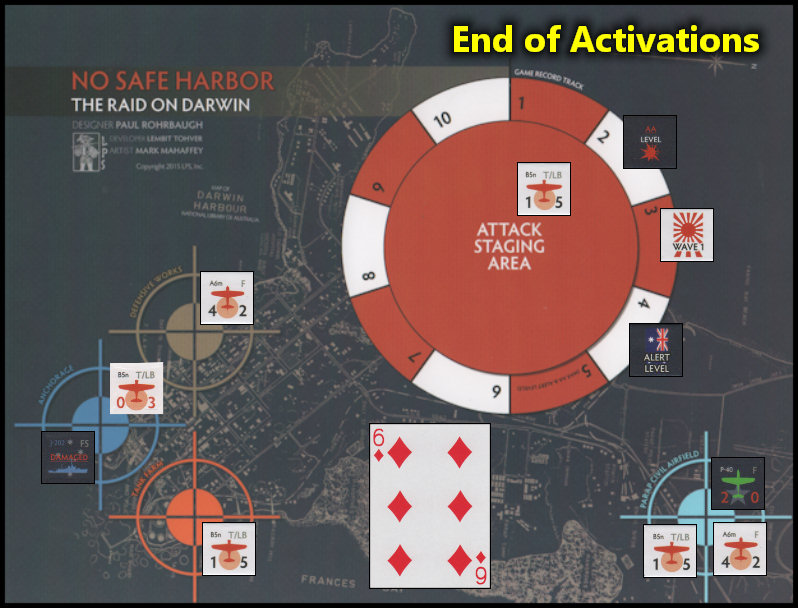
Third (and final) Activation - Now that the Allied fighter over the Parap Civil Airfield has been taken down a notch,
the Japanese player feels it's safe enough to bring in additional bombers to target that facility. So, one of the B5m TL/B
bombers in the "Attack Staging Area" is simply moved to the Parap Civil Airfield. This bomber will be eligible to attack
on the next Japanese card activation.
The final graphic, below, shows the game situation at the end of the Japanese activation. Next, another card will be
drawn, and acted on accordingly. If it is another red numbered card, the Japanese will be able to immediately execute
more attacks and movement. If it is a black numbered card, the Allies will have a chance to fire AA from the facilities
or strike back with their P-40 aircraft. A black "face" card (J, Q, K) will give the Allies an opportunity to repair
the naval unit that was just damaged, and a red "face" card forces a roll on the Random Events table. And so the game
turn continues until such time as 1) there are no more Japanese air units left on the map (either they've been destroyed
or have voluntarily exited the map) or 2) the Joker is drawn from the deck, ending the turn immediately.
In addition to executing attacks on the facilities, the Japanese player must also bear in mind that his bomber units may
only bomb once per game turn, after which they must spend another activation to exit the game map. If they fail to
exit the game map by the end of the turn (whether or not they've dropped ordnance), they remain on the map, ineligible to bomb
again on the following turn. In effect they are neutralized for a complete turn.
So, in our example, the reduced strength Japanese TL/B unit over the Anchorage has already executed an attack for this game
turn (against the Allied naval unit) and is therefore ineligible for any more attacks this turn. The next time a red numbered
card is drawn, the Japanese player may want to consider using an activation to exit the TL/B off the map, ensuring that it is
available for the next game turn. Of course, that's one less activation that can be used for current game turn bombing attacks
with other bombers that have not yet attacked. It's all part of the balancing act that makes up an effective Japanese strategy.
Summary
What I Liked About the Game
* I'm not immune to the lure of a pretty face, so I find it more and more difficult to get motivated to play a game
that does not have a huge mounted map whose artistic quality is just a hair shy of The Mona Lisa, with
counters and cards that look like they were forged by the gods. But, fortunately, I force myself to do it anyway
because I know from long experience that a bland (or even ugly) exterior is quickly forgotten when the game just grabs you,
and outward beauty becomes simply insulting when the game is terrible. By my third play through, this game grabbed me.
* I think the aspect of this game that kept me wanting to play again was the operational depth of the choices
the Japanese player has to make. When playing the Japanese you are given the tools of destruction, but must decide how
to employ them most effectively. And you can screw it up very badly. The first game I played, I made lots of bad
choices and suffered a sharp thrashing. My initial reaction was "the game is broken". But I went back to the drawing
board, re-read the rules and victory awards more carefully, and was able to score a Minor Japanese Victory on my second game.

For example, you can earn 2 VP for every 5 hits on the Anchorage, which is better than the 1 VP you earn for scoring
10 hits on the Parap Civil Airfield. But the Anchorage, particularly when garrisoned by
naval units, can be a much tougher nut to crack. Consider that attacks on the Anchorage when naval units are present
allow the Allied player to fire AA *before* the air attack is resolved, and the naval units themselves get
to fire AA in addition to the Anchorage facility itself. Not so with the Parap Civil Airfield. So which has the better
risk/reward ratio? Also factor in the fact that Allied Air Units can severely hamper the Japanese effort, but must
be rolled for each turn. One of the negative (from the Allied perspective) modifiers on this die roll is the number of
hits on the Parap Civil Airfield! How about that risk/reward ratio now?
The Tank Farm is the juiciest target, yielding 3 VP for every 5 hits. But game rules prohibit any attacks on the
Tank Farm until a total of 20 hits (total) are scored on the other 3 facilities...
As a separate issue, you must know when to move your Japanese bombers off map, so they're not stuck
and rendered ineffective for the next game turn. After about half the total cards have been played, do you stick it
out and finish the current bombing run? Or just recall your bombers without dumping their payload to hopefully
use them for more lucrative targets next turn?
So, as you can see, the Japanese player is constantly having to recalibrate his strategy. Makes for an awfully
interesting game for the Japanese side.
* Getting beyond a "Minor Japanese Victory" is a real challenge! The longer the game goes on, the tougher the going
for the Japanese, even to the point where they're losing one or more VPs per Allied activation, and this level
of loss cannot be sustained for long.
* The game plays quickly, most times wrapping up within 60-90 minutes. Of course, due to the variable game turn length, the
game could take much more, or less, time. A quick playing game is definitely *not* an important factor to me, but I know
that many gamers place a big premium on shorter playing times, so I thought I'd mention it.
*** Oh, did I mention that it was free? I acquired this game for free along with my purchase of
Vercingetorix: Twilight of the Gauls. It's a tremendous value at that price!
What I Disliked About the Game
* I thought the Random Events took up an amount of time that was not commensurate with their value to the game.
What I mean is that some of the events were one-time only events (once per game, or once per turn) which required you
to keep track of them on a separate sheet of paper and another had an instantaneous effect but also modified a die roll
on the following turn, again forcing you to take notes. I utilized one of the blank counters as a reminder for
the events. If I thought the events made a real contribution to the game, I wouldn't even whine about having to keep
track... but I don't. An Event check is triggered each time a red "face" card (J, Q, K of Hearts and Diamonds) was drawn,
making it a 6 out of 33 draws possibility. I found myself shifting the Australian Alert Level up and down too many times,
which didn't do much to enhance game play. They were an annoyance, in my opinion.

* In contrast to the aforementioned depth of choices that must be mined by the Japanese player, the Allied player has
a pretty dull time of it. It almost seems as if this started out as a solitaire game, then was morphed into a two-player.
I say this because the Allied player's moves are totally reactive. There are very few proactive choices to be made. One that
comes to mind is the decision to move the naval units off map (escape) and bag the victory points... but leave the Anchorage
vulnerable, versus leaving the naval units in the Anchorage to inflict maximum damage on Japanese aircraft... which may or
may not result in a surfeit of VPs. The Japanese player can, however, choose to just ignore the Anchorage and bomb
only the other facilities, so even that Allied decision is at least partly driven by Japanese choices.
* Finally, it must be mentioned that there are a couple of items in the rules that required clarification, in my opinion,
and will likely be addressed in official game errata soon. The most important of which I feel compelled to publish here:
- Each Naval unit may only make 1 AA "shot" per card draw (already in the rules), but the rules don't mention that each
installation may only make 2 AA "shots" per card draw with a hit value of 1 through 5, depending on the "Alert Level".
So, if the Allied player drew a black 10 for instance, and there was only a single Japanese plane over any of his
facilities, he would not be allowed to take more than 2 AA shots at that plane.
- Sequence of play item 3 and the "5" space on the map wheel both incorrectly state that the maximum "AA Level" is 5.
The maximum "AA Level" is 2, as stated correctly in rule 4.4.1.1 second paragraph ("The Australian AA Level cannot be
reduced below 0 (remove the marker) or increased above 2 regardless of the circumstances")
Fortunately for all of us, Paul Rohrbaugh is a big believer in supporting his games, so the minor rules questions
were quickly addressed and therefore never really impeded play.
Final Thoughts
The bottom line is that I enjoyed playing the game as the Japanese player, but was not thrilled playing the other side.
While it's true that the Allies must sometimes make tough choices about where to defend in situations where you have Japanese
planes covering several of your facilities at the same time (which can be looked at as the inverse of the Japanese attack
choices) you still get the feeling that you could be replaced with a marginally intelligent Allied "bot". And it got a little boring
in my opinion. Maybe someone else with better command of their attention span will find Allied play more challenging.
But I highly recommend playing the Japanese side. Since the game plays pretty quickly, I suggest playing your opponent
in back-to-back games, switching sides after the first game, and awarding the overall win to the player with the higher Japanese
victory point total. I also think there's a market for a solitaire version of this game, and I hope that Paul
Rohrbaugh and/or Against the Odds consider publishing one.