Overview
Buy Gulf Strike from
Noble Knight Games

Gulf Strike is a game of planning. Let me repeat that. Gulf Strike is a game of planning. I could probably just end the article right here and consider it a great public service to the Gulf Strike playing community, but ego compels me to expound. Planning, at all levels, is essential to winning this game, from “big picture” theater-wide planning all the way down to planning missions for Special Forces detachments. This article examines the challenge of safely delivering heavy U.S. ground reinforcements via naval transport to the theater of operations covered by Gulf Strike Scenario 2.
Overview
Scenario 2 postulates a Soviet invasion of Iran with the U.S. sending a considerable amount of military force to oppose the invasion. Left on their own, the Iranians are no match for the overwhelming Soviet power thrown against them but, with the help of a few U.S. carrier task forces and ground support from U.S. Marines, U.S. 101st Airborne Division, and U.S. 24th Mechanized Infantry division, they stand an excellent chance of taking the steam out of the Soviet thrust. U.S. airpower is critical and can extract a heavy price from Soviet air and ground units but, since ground units cannot be eliminated by bombardment alone, the U.S./Iranian player must put U.S. boots on the ground in order to execute the counterattacks necessary to prevent a decisive Soviet victory.
There are several levels of victory, but in order to attain a “Decisive” victory, one of the requirements is to control or dispute the Straits of Hormuz. This can be accomplished by mining strategic hex J-9 but that’s a tough thing to pull off once the U.S. carriers are in position and sending out SH-3 helicopters every Action Stage to sweep the mines. A more reliable method of controlling or disputing the Straits is to get Soviet boots on the ground in certain operational hexes near the Straits (4555 and 3557 for Scenario 2). So, the U.S. needs to get its heavy mech brigades into the action either to prevent the Red Army from reaching these hexes, or to dislodge them by force.
Playing the Game
Now, on to the really important part: playing the game.
The Problem
Most of the U.S. ground formations arrive via C-5 air transport and therefore have an excellent chance of getting safely in theater. However, the units of the 24th Mech Division, which are absolutely essential for a credible U.S. counterstrike, arrive via naval transport from the south. These heavy brigades (one armor brigade and two mechanized brigades) are ineligible for air transport and therefore must ride the waves into combat. The Soviets will use every means at their disposal to send these troops to the bottom of the Indian Ocean (or Mozambique Channel… or Arabian Sea…), so great care must be taken in getting these units ashore.
Reinforcements
- Game Turn 1 – CV-63 Carrier Group: As tempting as it may be to rush this Carrier Group right into the mix, do NOT do it! This Carrier must hang back in the vicinity of Diego Garcia, where a land-based F-15 can also provide air cover, until the 2nd Carrier arrives on Game Turn 7.
- Game Turn 7 – CVN-65 Carrier Group: At this point, these two Carrier Groups should form an inseparable pair. If there are not enough allowable naval moves to move them both in the same Action Stage, then don’t move either one of them. They may be used to help destroy the Soviet surface fleet, depending on where it’s located, but they must not stray too far into Backfire range (that’s 16 strategic hexes, if the “In-Flight Refueling” option is being used; 8 hexes otherwise) or remain within Backfire range any longer than absolutely necessary. Both CV-63 and CVN-65 must return near to the south edge of the strategic map by Game Turn 15 to assist in the escort of the ground units.
- Game Turn 15 – CVN-68 Carrier Group, 5th MAB – Loaded on Amph naval unit, 5th MAB – Support battalion loaded on LHA naval unit, 2 Airbases and 1 Truck Unit – Loaded on Trans naval unit: The Amph and LHA units, with Marines aboard, should proceed with all haste directly to the U.S. port in Somalia (if available) or Diego Garcia. More about this later.
- Game Turn 16 – 24th Mech Division (3 Heavy Brigades), 1 Truck Unit, 2 Airbases – Loaded on two Trans naval units as the U.S. player sees fit: These units must enter the strategic map and make a bee-line for the Straits of Hormuz. More details on this later.
Preparing the Strategic Map
In order for this strategy to have any chance of success, the U.S. player must “shape the battlefield” before allowing critical Game Turn 16 reinforcements to enter the theater. From Game Turn 1 though Game Turn 15, the strategic map must be prepared as follows:
- The Port/Airfield hex in Somalia (D-18) must be available to receive U.S. units and there must be a U.S. airbase present with at least one C-130 ready to fly. There is a Random Political Event (#6) that might cause this Somali hex to be unusable, in which case the Port/Airfield on Diego Garcia (S-22) must be available and a U.S. airbase must be present with at least one C-130 ready to fly.
- The entire Soviet Navy must be eliminated. First use U.S. submarines and S-3 aircraft from the carriers to eliminate all Soviet submarines, then unleash all remaining U.S. submarines (and British submarines if you get lucky with Random Political Event #2) on the Soviet surface fleet. If absolutely necessary the two Carrier Groups (CV-63 and CVN-65) can get involved in the fight. But always keep them together! The four F-14 interceptors (two on each carrier) provide the minimum required protection against the four Soviet Backfire (TU-26) bombers that may still be on the hunt.
- Use your B-52 bombers exclusively to target any Soviet airbases outside the Soviet Union proper. If you have to call in the Iranian air force to help out, then do so. If you must base some U.S. F-15s or F-4s (that arrive as reinforcements on Turns 3 and 6) in Somalia or Pakistan to help out, then do it. Special Forces can do an admirable job of shutting down airbases that are not properly protected. Pull out all the stops, because you can allow no possibility of Soviet basing for Backfires in Afghanistan, Sri Lanka, Ethiopia, Yemen, Democratic Yemen, Syria or Iraq. This will ensure that the Somali hex D-18 and Diego Garcia are safe ports. What I’m trying to say is, if Turn 15 arrives and there are still Soviet Backfires based outside the Soviet Union, then you are relieved of command and need to stop playing this game immediately and forever. Nuff said.
- There must be at least one U.S. airbase unit in the Iranian city of Konark (in strategic hex L-09) and in the Pakistani strategic hex of P-09. These will be required in order to receive air-ferried ground reinforcements into the theater of operations. Only one will ultimately be used but having both prepared provides flexibility.
Sequence of Events
As in real wars, unpredictable events can wreck the most carefully thought out Gulf Strike plans. But you must have a plan nevertheless. This next list represents one possible sequence of events. If fate intervenes unfavorably, well then you’ll just have to improvise, won’t you? One thing that can certainly screw up any U.S. plan is lack of ability to move the navy. For purposes of this example, we’ll assume two allowable naval moves for each Naval Movement Determination Phase. This comes out to an average of 6 movable units per Game Turn which is a reasonable assumption. Again, this may vary, so you may have to adapt to changing circumstances. But the objectives will not change; just the timing.
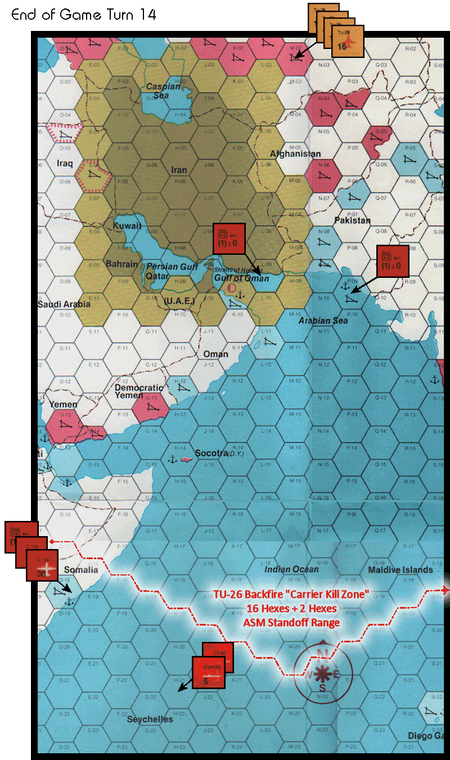
Game Turn 14
By now, you’ve got the entire Soviet navy destroyed, all Backfire bombers cowering at airbases within the borders of the U.S.S.R., and a U.S. airbase with at least one C-130 ready to rock in Somalia (preferably) or Diego Garcia. In this example, we’ll assume Somalia. Also, you have a U.S. airbase in Konark, Iran (operational hex 6162), and a U.S. airbase in Pakistani strategic hex P-09. Finally, both carriers currently in play (CV-63 and CVN-65) are located in the vicinity of the Seychelles, let’s say in hex H-21.
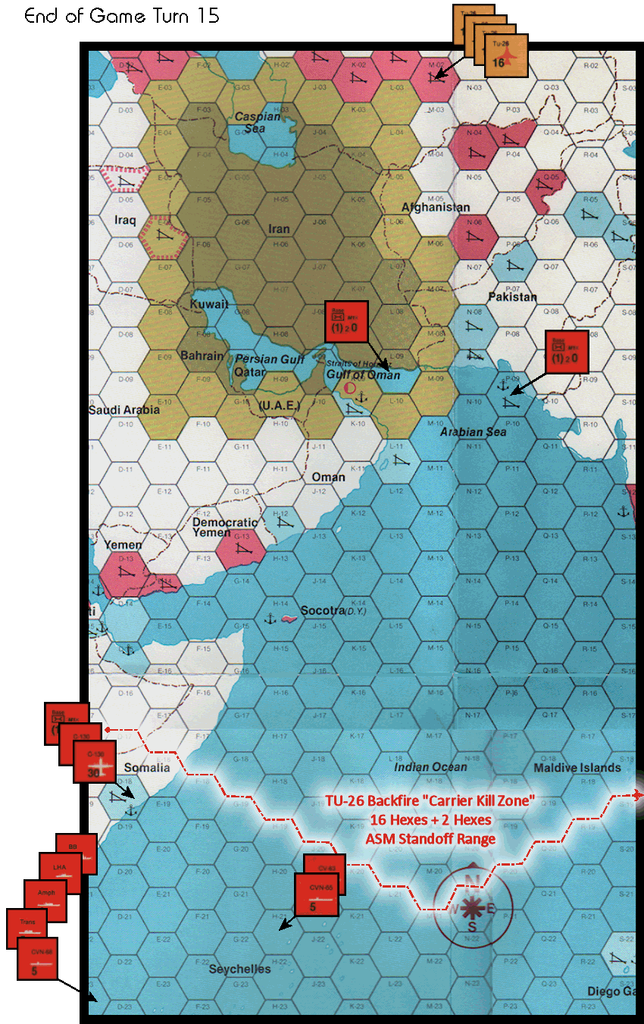
Game Turn 15
New reinforcements arrive in hex C-26. The Carrier (CVN-68), the Amph unit carrying the Marine Brigade and the LHA carrying the Marine Battalion should all make full steam towards Somali hex D-18. The plan is to drop these ground units off in Somalia where they can be flown by C-130 into the Iranian city of Konark (in strategic hex L-09) or Pakistani strategic hex P-09. The rest of the ground reinforcements on the Trans unit (i.e. Truck and two airbases) can also move to Somalia, but they are of secondary importance. The Marine units must be unloaded in Somalia first so they can be flown into Iran or Pakistan. CV-63 and CVN-68 carriers remain in hex H-21.
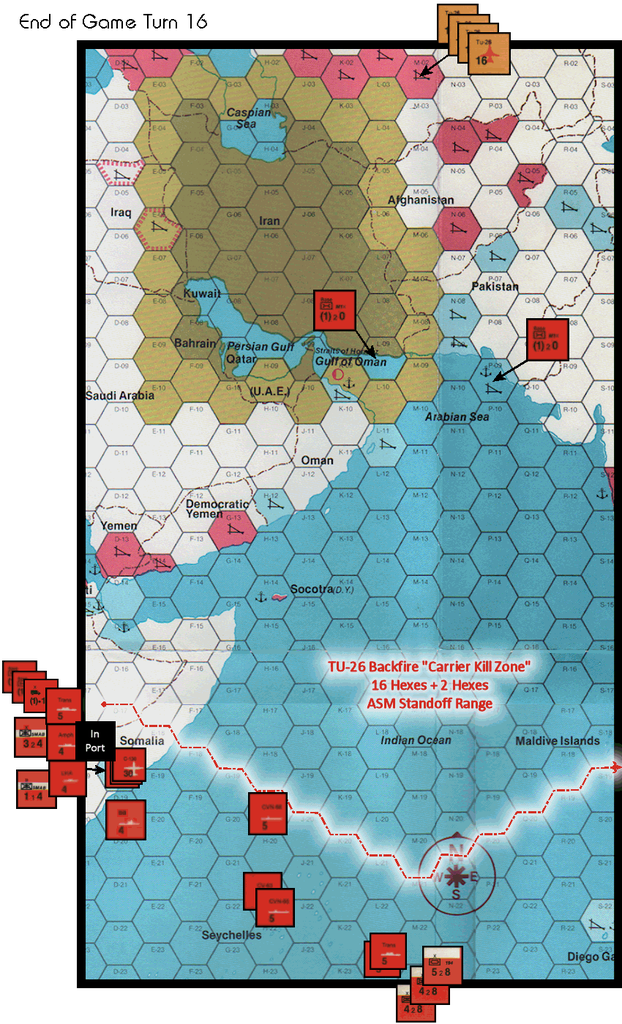
Game Turn 16
The “heavies” finally arrive. These guys are not eligible for air transport so they’ll have to ride the Transports all the way into Iran. Here’s the real challenge. These two Transports, loaded with the 24th Mech Division should enter the map on strategic hex L-26. They will be proceeding directly up hex column “L” for an eventually landing in Iranian hex L-09, near Konark. They end the turn in hex L-23. The Trans, Amph, and LHA unit continue into the port in Somali hex D-18. During the End Stage, they will switch to “In Port” mode so that they can unload their ground units at the end of the following Game Turn. Keep in mind that while naval units are “In Port”, they are considered Detected surface units (even the submarines). In other words, sitting ducks. That’s why I choose to unload them outside the Backfire Kill Zone. Finally, CVN-68 turns east and heads into hex H-19, still out of the Backfire kill zone. The Battleship and Submarine cannot move this turn since we’ve used up our 6 naval moves for the Game Turn, and so they will remain in hex D-19. Both CV-63 and CVN-65 must remain in hex H-21 again.
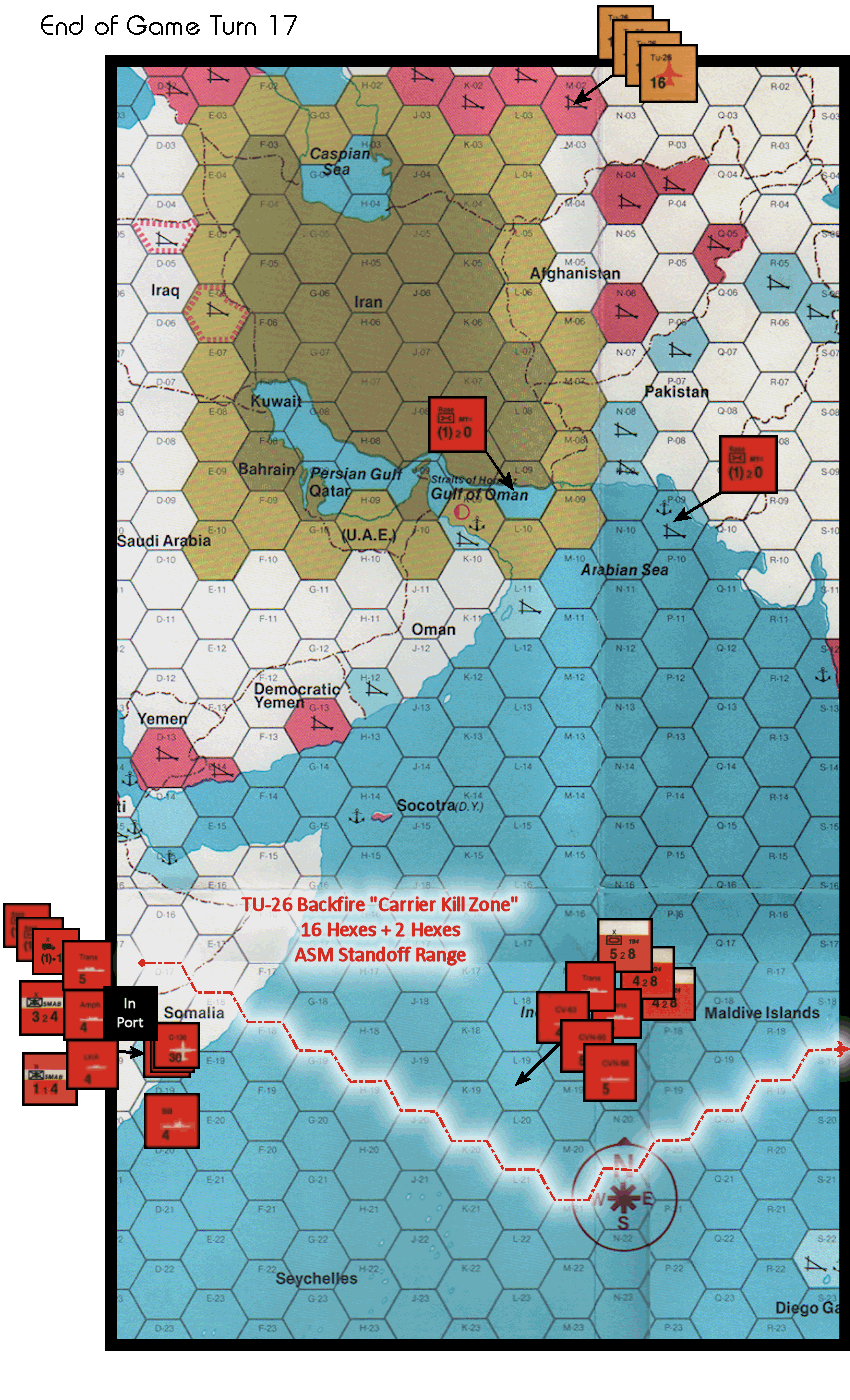
Game Turn 17
Time to cross the line into the Backfire Kill Zone. Great care must be taken to make moves in the right order. First, CV-63 and CVN-65 should move together to hex L-19. Next the two Transport units carrying the 24th Mech should move to hex L-19. Then, CVN-68 can also move into hex L-19. I’ll no longer be tracking the Battleship and Submarine, except to say that they should try to line up behind the Carriers and follow them north, as the Battleship may be useful for shore bombardment later in the game. The Carriers can’t afford to wait for the Battleship since the ground reinforcements must be delivered ASAP. So, either the Battleship is put at risk or is left behind, out of the Backfire Kill Zone, where it can’t do any good anyway. Your call. During the End Stage of this turn, the ground units unload into the Somalia Port and the Transport, Amph and LHA naval units switch out of “In Port” mode to “Underway” mode (and are now “undetected” again).
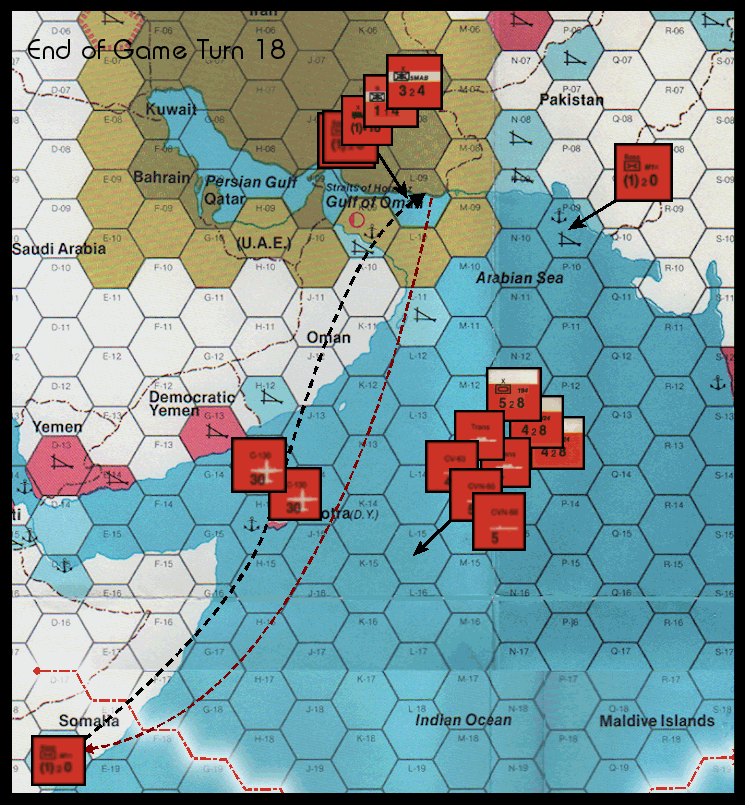
Game Turn 18
The massive, three-carrier task force, continues to escort the Transports directly up row L, ending this turn in hex L-15. If you get real lucky and roll 5 naval moves in the same Action Stage, then move all 5 naval units together. Otherwise, move two carriers with one Transport, and then the remaining carrier with the other Transport. The two C-130s in Somalia can now fly the 5th MAB Brigade and Battalion into Iran in (relative) safety in the First Action Stage. The C-130s can return to Somalia during the Second Action Stage to pick up the Truck unit and one of the airbases, returning to Iran with those units on the Third Action Stage. The game turn should end with two airbases left in Somalia (the original airbase, and one of the airbases from the Transport). Note: If the operational map area around Konark, Iran is too hot, then fly these units into another air field in Iran, or into Pakistan on the Strategic Map. Take every opportunity with air strikes (both U.S. B-52 and Iranian), Special Forces missions, airborne assaults with Marine and Airborne units, etc., to inflict as much damage as possible on all Soviet airbases within striking distance of Konark.
Game Turn 19
The C-130s should completely evacuate Somalia during this Game Turn, taking every unit there on to the operational map in Iran, if possible. The Carriers and Transport continue their advance to hex L-11. Continue to pound away at all Soviet airbases in the vicinity.
Game Turn 20
The Carriers and Transports should now be arriving in Konark, Iran and can switch to “In Port” mode during the End Stage. Move any ground units currently in Konark out of the city to ensure that there will be no stacking problems when the 24th Mech units land next turn. As mentioned earlier this is the time of greatest danger since all “In Port” naval units are considered detected and the ground units are still on board (and will thus go down with the ship if sunk). Every available air unit on the Carriers with an anti-air rating should be assigned to Interception Mode at the start of the turn. Likewise every available air unit based at Konark (or anywhere else in the vicinity) should be assigned to Interception Mode. The AWACS unit should be placed in the vicinity as well. Between the AWACS and the three E-2s on the Carriers, there is virtually no possibility of any Soviet strike missions getting through undetected. Your opponent will probably send his entire air force to attack these ships during the course of the turn. Reserve the Carrier’s F-14s to oppose Backfire strike missions. Only the Backfires have an ASM rating which allows them to fire from 18 operational hexes away. Any other aircraft without an ASM rating will have to get into the same hex with the Carriers to bombard, so let them come. The Carriers all have 8 anti-air ratings, and the airbases and ground units all have anti-air ratings, so it will be very difficult for the Soviets to actually survive long enough to drop ordnance. Once again, use all available means to put Soviet airbases out of action and damage their aircraft.
Game Turn 21
If you can weather the storm through this turn, during the end stage all ground units on the Transports will be successfully unloaded at Konark. Naval units will become undetected again.
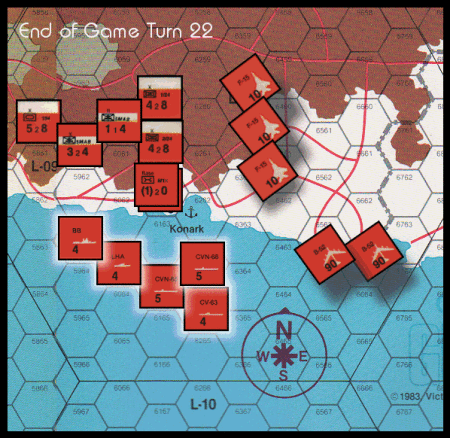
Game Turn 22
Shift to an aggressively offensive posture with all available air, ground and naval units. Unleash hell on the Soviets! You only have nine Game Turns to try to reduce their victory level, and it will take a minimum of three Game Turns just to get the 24th Mech (even assuming Travel Mode) into the vicinity of Bandar Abbas.
Be Agile and Adaptable
Obviously, a lot of the assumptions in this article could prove false therefore you must remain agile and adaptable in your thinking and responses. If you are unable to completely eliminate the Soviet Navy, then it may be advisable to delay one turn to allow your Battleship and Submarine (reinforcements from Turn 15) to catch up with the three Carriers before proceeding. In addition, it will have to be a “fighting advance” northward across the Indian Ocean, rather than the cake-walk it would be if the Soviet Navy was scrubbed.
If the Somalia Port/Airfield are not available due to Soviet mining or Port bombardment earlier in the game, or if you hit the unlucky Random Political Event which ends up denying you the use of this Port, then bring your Turn 15 reinforcements on to the strategic map at hex S-26, instead of C-26, and head straight for Diego Garcia. Since your C-130s only have a 15 strategic hex range, you’ll either have to fly the Marine units (and Truck, Airbases, etc.) into Pakistan or spend the extra supply points to refuel your C-130, if that optional rule is in effect.
Adhere to the spirit of the suggestions in this article, rather than following every instruction blindly. If one of your Carriers is sunk by a Soviet Backfire (TU-26), proceed with the plan since there will be one less Backfire to deal with. Even if the Backfire sinks the Carrier, it will trigger automatic detection (see the Detection rules on page 33-R-2) allowing the F-14s on one of the other Carriers to intercept and destroy it. So there’s no reason, if the Carrier is not travelling alone, that a Backfire should ever survive an attack on a U.S. Carrier.
On the other hand, if you find that the Iranians are putting up a relatively successful defense, and the Soviets are bogged down in the Zagros Mountains, feel free to adapt to the circumstances and land your U.S. ground forces closer to Bandar Abbas. The sooner these units get in the vicinity of Bandar Abbas, the better.
There is also an assumption in this article that the Soviets will not break any land-speed records motoring across Iran and reaching the Straits of Hormuz before your Carriers and Transports get anywhere near the operational map. Techniques for preventing that occurrence are the subject for another article…
Summary
Without careful planning and extreme caution, your Transports (and 24th Mech Division ground combat units) will surely all find themselves at the bottom of the Indian Ocean. This article suggests a very cautious strategy for the U.S. player to get his ground reinforcements ashore safely. It may seem a bit overly cautious as you’re watching the Soviet Armies closing in on Bandar Abbas but I assure you it is not overly cautious. One Backfire bomber with one ASM attack can easily sink a carrier… or a troop transport; you can leave nothing to chance. If you can get your heavy ground reinforcements into Iran on the operational map with 7 or 8 turns remaining in the game, that will be sufficient time to execute the counterattacks necessary to clear the Bandar Abbas area of Soviet units, denying them a Decisive Victory.