Overview
Buy from
Noble Knight Games

Empire of the Sun, designed by Mark Herman and published by GMT Games, is a card driven, strategic level board game of combat in the Pacific theater during World War II. It’s basically a two player game although it plays well as a four player game. The map covers the entire extended theater of operations, from China, Japan and Alaska in the north to Australia and Fiji in the south; from India on the western part of the map to Hawaii on the eastern end. It is a hex-based game which is unusual in that most card driven games tend to be “area movement” type games.
The game contains ground, air and naval units. The ground units are mostly Corps or Army sized units with the occasional division or regimental sized unit thrown in (e.g. US Marines, Japanese special naval infantry units, etc.) Air units represent large formations such as air wings and regional air forces. Naval units may represent either a small mix of capital ships, battleships and carriers (which generally bear the name of a single ship) or larger groups of cruisers, light cruisers, destroyers, etc.
Combat is an interesting game sub-system where luck plays a significant role, but not a dominant one. Proper force composition prevents an unlucky roll of the dice from becoming a disaster. Carriers and ground-based air assets are given the weight they deserve and air Zones of Influence (ZOI) are a key concept to be grasped before this game can be played well.
The number of strategic and tactical options, coupled with a variety of paths to victory, are what give this game its extensive replay value. I’ll address Political Will and victory conditions later in the article.
As I contemplated this review, it was hard to decide where to begin. Each scenario I played revealed another aspect of the game that I wanted to cover in my review. Rather than risk paraphrasing the entire rule book, I decided to focus on elements that a game consumer would want to know about when deciding whether or not to purchase the game. Not a lot of detail but a good, solid overview. Over the next few months, we’ll be following up with articles that address specific facets of the game in more detail.
The Setup
I realize that setup instructions may not be high on every gamer’s priority list, but confusing setup instructions are one of my pet peeves so I have to mention it. I need to know that when I get my newly purchased game home, I can set it up quickly and begin the learning process immediately. Empire of the Sun scores very highly in the setup department. There is a Master Scenario Setup List in the rule book that lists the complete setup locations for each yearly scenario as well as the full campaign scenario. Perfect.
The Rules
When the game was first released, I heard quite a bit of complaining about the rules; how confusing and disorganized they were. My first play of the game was with the version 2.0 rules, so I can’t comment on the early “confusion”. But I must say that some parts of the v2.0 game rules can, with some justification, be considered “fiddly”. Now “fiddly” is an adjective that’s difficult to define… but I know it when I see it. Let’s just say you will find yourself flipping back and forth through the rule book quite a bit until you get fully comfortable with the game system.
Overall, when considering the number of moving parts that must (and mostly do) mesh seamlessly to make the game work, I’d have to say the rules do a decent job of making it all digestible.
The Cards
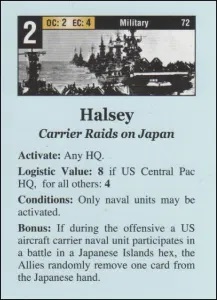
Empire of the Sun - Sample Card
Each side has its own deck of approximately 80 playing cards which drive the game’s action, hence the “card-driven” moniker. Besides a unique card identification number and a general card “type” (informational), each card displays three important pieces of information:
- Operations Value
- Events
- Intelligence Values
When a card is played to conduct an offensive (the term used in Empire of the Sun for a player action or operation), it may be played as
an Event Card (EC) or as an Operations Card (OC).
Operations Value
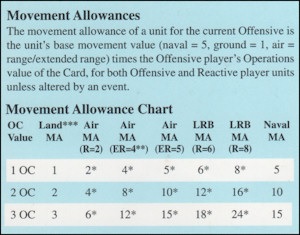
Empire of the Sun - Operations Values
When played as an OC, the operations number in the upper left corner determines (or partially determines) how many units you may activate and how far they
may move. For example, if the U.S. player played a 2 Ops card and designated the ANZAC HQ as the “activating” HQ, he would be able to activate 3 units
total: one for the Efficiency Rating of the HQ (1) and two more for the 2 Ops value of the card. The distance these three units could be moved is
determined by multiplying the base movement allowance of each unit by the Ops value of the card. So, naval units could move 10 hexes (base movement
allowance of 5 x 2 Ops), ground units could spend 2 movement points (base movement allowance of 1 x 2 Ops). All air units have differing ranges and
(possibly) extended ranges, both of which would be multiplied by the 2 Ops value to arrive at their final range.
The Ops value of the card played by the offensives player also governs the number of units that the reaction player may be allowed to activate, as well as the movement allowance of reaction units.
Events
If played as an EC, the instructions in the card’s event text drive the action. If it is a Military type event card, the event text may supersede the
number of units that can be activated, how far they can move, and may influence the battles themselves. It may also impose other restrictions or grant
some type of bonus to the activating player. Political type cards generally instruct the player to perform some type of action not directly related
to unit movement or battle activities. Resource type cards will normally provide some unexpected resource or reinforcement. And Reaction type cards
are used by the defender to oppose an action by the offensives player. As in most card driven games, the event text on the card may supersede standard rules.
Ingelligence Values
At the core of the Empire of the Sun combat sub-system is the notion of an Intelligence Condition, which may be either Surprise Attack, Ambush, or Intercept.
The Intelligence Condition has a huge impact on combat resolution. The Surprise Attack condition benefits the attacker, the Ambush condition benefits
the defender, and the Intercept condition benefits no one.
The small numbers near the top left of the card (i.e. “OC:2 EC:4”) are the target numbers that the reaction player must roll (e.g. that number or less) in
order to change the Intelligence Condition from its default level of “Surprise”. So, for example, if the offensives player plays a card as an OC (for the
Operations value) and the card shows “OC:2 EC:4”, the reaction player must roll 2 or less (on a 10-sided die) to change the intelligence condition to “Intercept”.
If the offensives player had played the same card as an EC (for the event), the reaction player would have had to roll 4 or less in order to change the
intelligence condition.
The underlying idea is that EC offensives are generally larger operations that would be harder to keep secret. In game terms this means that offensives
initiated by EC may declare multiple target hexes, whereas those initiated by OC can only have one target hex (or, more properly, Battle Hex).
The only way that a reaction player can achieve an “Ambush” intelligence condition is via reaction card play; it cannot be accomplished via roll of the dice.
Playing the Game
There’s no better way to get the basic feel of a game than to run through a typical game turn or action segment, so here goes…
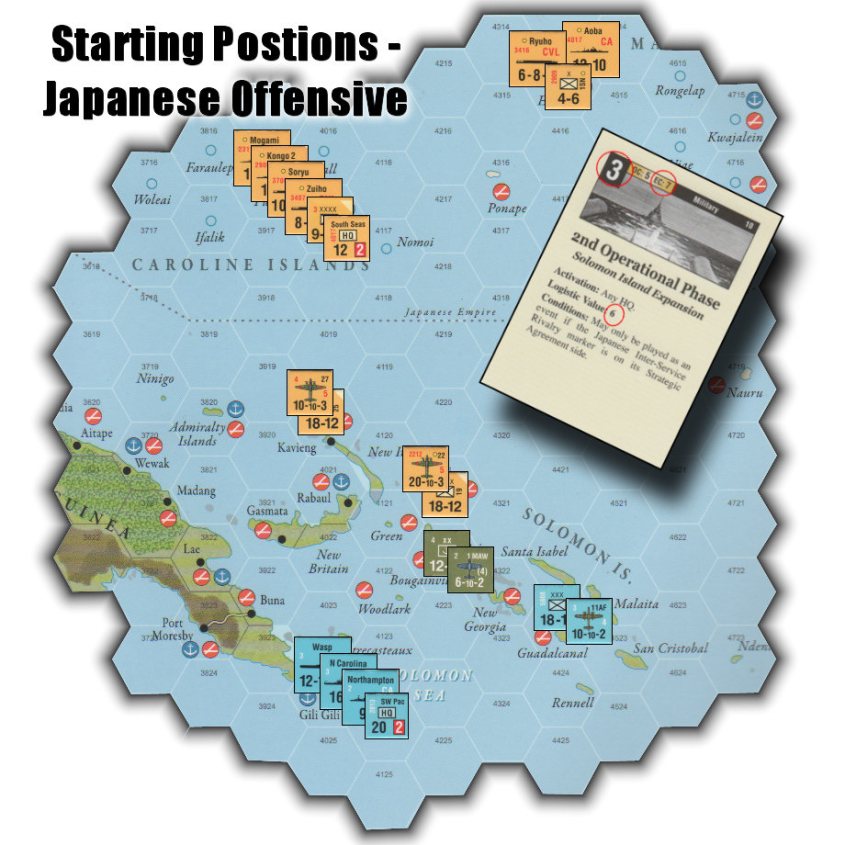
Empire of the Sun - Turn 1
It is the Japanese player’s turn to play a card. He announces an offensive using the Event of card #10, 2nd Operational Phase:Solomon Island Expansion,
and identifies the “South Seas” HQ as the activating headquarters. The card title and sub-title are there just for flavor. It does not govern where
or when the card can be used. The important information on this card is as follows:
- Ope Value of 3 - Governs the movement limits for all units, both offensive and reaction. If the card was played as an OC, it would also govern the number of units that could be activated.
- EC Value of 7 - Since the card is being played as an Event, the EC number takes precedence over the OC number, and is the number the Reaction player must roll in order to change the Intelligence Condition to “Intercept” (otherwise it remains at “Surprise Attack”).
- Activation - Any HQ. Some cards restrict the HQ that can be used to activate units, but not this card.
- Logistics Value - Add this number (6) to the HQ’s Efficiency Rating of 2. Therefore, up to 8 Japanese units may be activated.
Offensives Player Unit Activation
The 8 units designated for activation are:
- Eniwetok (hex 4415) – Ryuho CVL and Aoba CA naval units; 1SN Naval Infantry unit.
- Truk (hex 4017) – Kongo 2 Battleship; Soryu CV
- Kavieng (hex 4020) – 27th Air
- Baka (hex 4221) – 27th Air; 19th Army
All of these units are well within the South Seas HQ activation range of 12 hexes. All hexes of the Solomon Islands and New Guinea that are not
physically occupied by Japanese units are considered to be US controlled hexes.
Movement
Movement allowance for all naval units, and any ground units being amphibiously transported, will be 15 hexes (5 base movement x 3 for the Ops
card value). The Ryuho CVL escorts the Aoba CA, which is allowed to carry the 1SN Naval Infantry unit. They move together to New Georgia (hex 4322).
Since the CVL has an Air Zone of Influence (ZOI – a two-hex radius around all ground-based air units and carrier units), it neutralizes the ZOI
exerted by the US air units over this hex and its approaches. Without this neutralization, the ground unit would not be allowed to be transported
through the US Air ZOI.
The Kongo 2 battleship moves from Truk to Bougainville (hex 4222) and the Soryu CV moves to hex 4219 (where it can provide air support to any battle hex within its 3-hex range).
The 27th Air (on Kavieng) and 22nd Air (on Baka) don’t actually need to move because the hexes they intend to target (not revealed to the US player yet) are already within their movement ranges (numbers on the lower right corner of air units). If they needed to move, their movement allowance would be 3x their printed movement allowance, staging from friendly airbase to friendly airbase. The 3x allowance is, again, due to the 3 Ops card that was played.
The final unit to be accounted for is the 19th Army unit on Baka. This unit performs an Amphibious Assault on Bougainville. There are no actual naval units involved in this move. Instead there are abstract “Amphibious Shipping Points” (ASPs) that are used to transport ground units in this manner. When being transported this way, ground units move like naval units, but must never come under an un-neutralized enemy Air Zone of Influence. The air unit on Baka, as well as the Ryuho CVL now on New Georgia, both provide this neutralization, so the amphib assault proceeds.
Declare Battle Hexes
Since the card was played as an EC, more than one Battle Hex may be declared. The Japanese player declares Gili Gili (4024) and Bougainville (4222) as Battle Hexes. He also declares that Ryuho and Aoba are committed to supporting the landing of the 1SN infantry unit on New Georgia, the Soryu and 22nd Air will support the amphibious assault on Bougainville, and the 27th Air will attack the US fleet at Gili Gili. In other words, he lays out all the battles and the participants in each. Note that since there are no US units on New Georgia (4322), there is no Battle Hex declaration, even though the hex is US controlled. The US player, during reaction, may have an opportunity to intervene and turn it into a Battle Hex, however (called a “Special Reaction Move”, which we won’t cover in this article).
Intelligence Condition Determination
Unless the US player has a special Reaction card that changes the Intelligence Condition (in our example, he does not), he must roll a die to see if he has caught wind of the pending Japanese operation (Intercept) or if it remains undetected (Surprise Attack). The EC # on the card is 7, the US player must roll 7 or less. This roll is modified by -2 since Japanese units did pass within the ZOI of an American air unit during the course of movement. The US player rolls an 8. With the -2 modifier, the net roll is 6 which is sufficient to have the Intelligence Condition changed to Intercept.
“Intercept” essentially means that the combat will be simultaneously. In the “Surprise” condition, the attacker gets to fire and apply hits first. With an “Ambush” condition, the reaction player has that advantage.
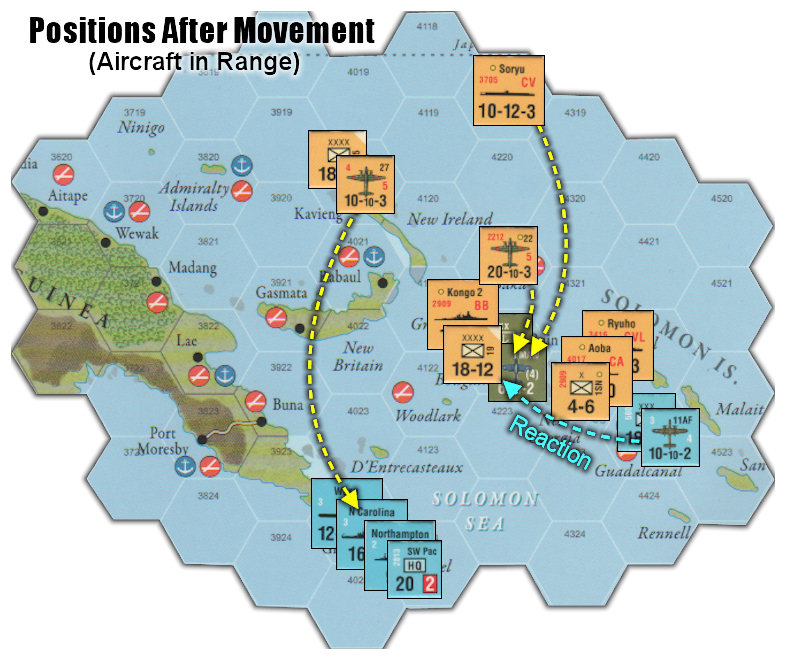
Empire of the Sun - Positions After Movement
Reaction Move
Because the Intelligence Condition is “Intercept”, the reaction player is allowed Reaction Movement, if there is a friendly HQ within range of any of the Battle Hexes. The US player’s SW Pac HQ fulfills this requirement. The US player may now activate a number of units equal to the HQ’s Efficiency Rating plus the OC value of the offensives player’s strategy card (even if he played it as an EC). In this example, that would mean that 5 American units can react.
Consider the situation here. Bougainville is under attack by a powerful invasion force. The US fleet in Gili Gili is being attacked by a Japanese air group. And the island of New Georgia is being occupied by a smaller invasion force. Any or all of these attacks can be opposed. The only restriction placed on the reacting player is that any unit which is currently being targeted in a declared Battle Hex may not be used to react into another battle. The Japanese player has wisely used his air unit to “pin down” the US fleet, making in ineligible for supporting other battles.
The Reaction player is allowed to use only one Amphibious Shipping Point (ASP), and the US Army corps costs 2 ASP to move. So no ground reinforcements will be coming to help the Marines on Bougainville.
The sole remaining eligible reaction unit is the 11th AF on Guadalcanal. The US player decides to commit it to the defense of Bougainville. Again, the 11th AF unit does not actually need to move, as it’s already within its 2-hex range of Bougainville, but it is verbally identified as being committed to the battle.
Battle
There are potentially two steps to every battle: first, if opposing air or naval units are present, Air & Naval Combat is resolved, followed by Ground Combat if opposing ground units share the hex. Since the US player did not oppose the Japanese 1SN Naval Infantry landing on New Georgia, there will be no battle there and the Japanese player will simply assume control of the island during the Post-Battle Movement phase.
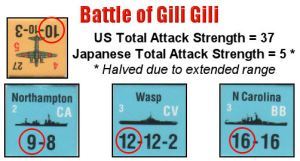
Empire of the Sun - Battle of Gili Gili
Let’s do the smaller battle on Gili Gili. The odds are heavily against the Japanese 27th air unit, but he’s done his job of preventing the
US fleet from lending aid to the main battle brewing on Bougainville. Air/Naval Combat is resolved like this:
Each side sums up their total Attack Strengths (the number in the lower left corner). The total Attack Strength for the US is 37. Because the
Battle Hex is 4 hexes away from the Japanese air unit, forcing it to use Extended Range (the red number 5 near the bottom right corner), the Air unit’s
Attack strength of 10 is halved to 5 for this battle.
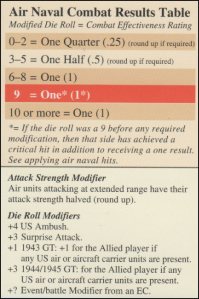
Empire of the Sun - Air Naval Combat Results Table
Next, each player determines the Combat Effectiveness of their units by rolling on the Air Naval Combat Results Table. The Japanese player rolls
a 6, and there are no modifiers to the die roll, indicating that his combat strength multiplier will be x 1. So, 5 x 1 = 5, and the Japanese may inflect 5
total “hits” on the US units. The US player rolls a 2, which quarters his attack strength to 9.25 which rounds up to 10.
Combat is simultaneous so both players apply hits at the same time. The US compares the number of hits he has earned against the Defense Strength of the Japanese unit(s). He has 10 hits to apply and the Japanese air unit’s Defense Strength is 10, so he flips the air unit to its reduced side. If the US player had scored 20 hits, he’d be able to inflict another hit on the Japanese air unit and eliminate it.
Because the lowest Defensive Strength of any US naval unit is 8 (Northampton) the Japanese player does not have enough hits to do any damage. All US units remain undamaged.
The larger battle on Bougainville has both Air/Naval and Ground elements involved. If the Japanese player wins the Air/Naval portion of the battle, he may proceed with the ground assault. If not, the assault will be turned back.
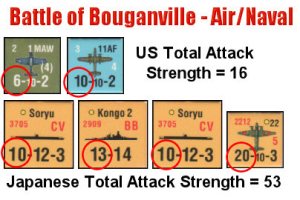
Empire of the Sun - Battle of Bouganville
As in the last battle, the Attack strengths of the each side’s Air and Naval units (only) are totaled. Don’t forget to include the Soryu CVL because, although it is not directly in the battle hex, the hex is within its range and therefore it can participate in the battle. In this battle, the US has a total attack strength of 16 (11AF = 10, MAW1 = 6), and the Japanese have a total attack strength of 53. The Japanese roll on the Air/Naval CRT is 5 and the US roll is 7. The Japanese 5 roll means that the attacking strength points are reduced to half value (27). The US 7 roll indicates that the US attack strength retains its full value of 16.
The US has 16 hits to apply and decides to apply these hits against the Japanese Kongo 2’s 14 defensive strength. The Kongo 2 is flipped to its reduced side. The remaining 2 hits simply are lost. The Japanese player has 27 hits to inflict. Both air units have a defensive strength of 10 so the first 20 Japanese hits are spent flipping them both to their reduced sides. The rules prohibit you from killing off a unit until all units involved in the battle have been “reduced”, so all 20 hits could not legally be applied to a single air unit. Note that although the US air units have weaker attack strengths on their “reduced” sides, their defensive strength remains at 10, so the remaining 7 Japanese hits are insufficient to do any further damage.
The official procedure for determining the winner is as follows: Each side adds up the attack strengths of all remaining units, and the side with the higher total is the winner. Flipping the Kongo 2 naval unit to its reduced side only lowered its attack strength by 6 points, so the Japanese still have 47 attack strength points (not halved), and the US player now only has 8 attack strength left. Therefore the Japanese player has won the Air/Naval battle, the amphibious assault has not been turned back, and the ground combat may proceed.
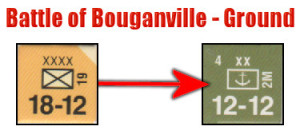
Empire of the Sun - Ground Battle of Bouganville
Ground combat is similar to Air/Naval combat in the sense that a die is rolled, a Ground Combat CRT is consulted to determine the effectiveness of the respective ground units, attack strength points garner hits which are applied against enemy unit defense strengths. So first we consult the Ground CRT for modifiers that need to be applied.
There are two modifiers that apply to the Offensives player…
- +2 If only the Offensives player has naval units in the battle hex.
- -2 If Defender in "Mixed" hex (terrain modifier).
… for a net modifier of zero. The Japanese player rolls a 4 which means that his ground strength will remain at x1 for a total of 18.

Empire of the Sun - Ground Combat Results
One modifier will be applied to the reaction player’s combat effectiveness die roll…
- +3 If Offensive uses Amphibious Transport.
… for a net modifier of +3. The US player rolls a 3 which is modified up to 6. His ground strength will also be x1 for a total of 12.
The Japanese player’s 18 hits are sufficient to inflict a hit on the US Marines defensive strength of 12, but there are insufficient hits remaining to cause the destruction of the Marine division, so the Marine unit is flipped to its reduced side and the remaining 6 hits are lost.
Now it’s the US player’s turn to inflict hits and the Japanese player does not fare so well. First of all, the rules state that an Offensives ground unit that enters a battle hex via amphibious assault has its defense strength halved for calculating hits. Halving the Japanese defensive strength drops it from 12 to 6. The US Marines attack strength is 12, which allows it to inflect two hits on the invader, eliminating it completely.
Between the reaction player’s +3 die roll bonus and the offensive player having to halve his defense strength, you can see why amphibious assaults are a risky proposition and must only be attempted with proper planning and support. The invasion of Bougainville has failed!
Post Battle Movement
The final stage in EOTS combat is Post Battle Movement. This is when ships return to ports, air units fly to friendly airfields (if not already on one), and ground units retreat if necessary. The Japanese player returns Ryuho and Aoba to the port at Eniwetok, although with 15 movement points to spend, they could have gone to Truk or any other friendly port within range. The damaged BB Kongo 2 returns back to Truk. The 22nd Air and damaged 27th Air are both based at friendly airbases, so no movement needs to take place. Finally, the Japanese 1SN Naval Infantry unit on New Georgia remains on the island and a Japanese control marker is placed there.
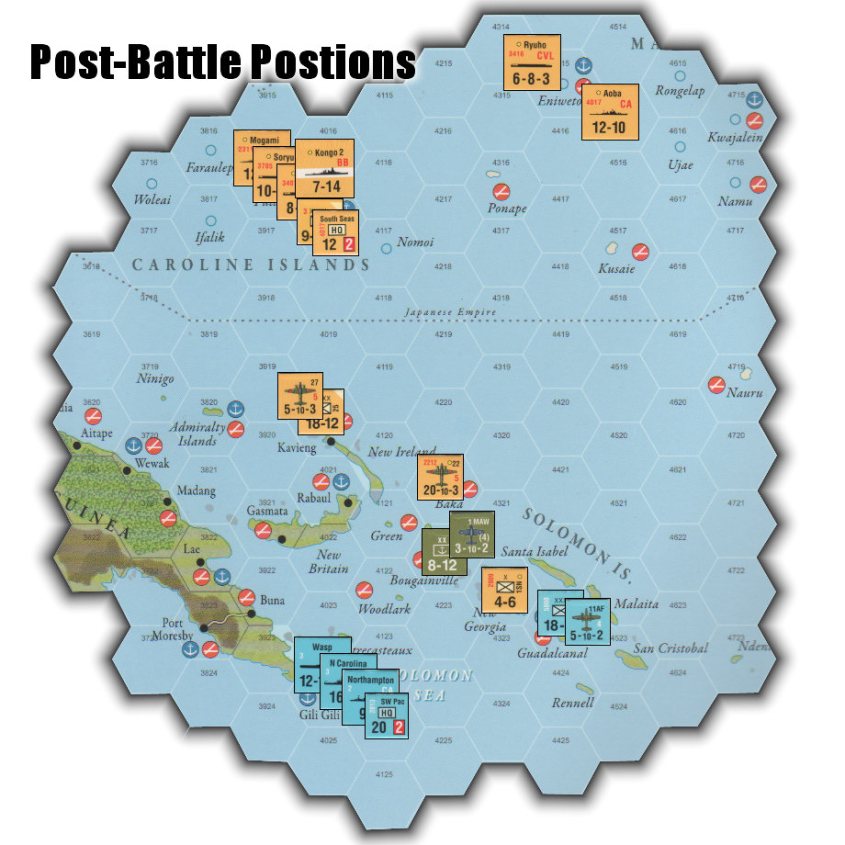
Empire of the Sun - Post Battle Positions
As the US won the battle for Bougainville, there is no need to retreat during Post-Battle movement. Although damaged, the 2nd Marine Division and 1st Marine Air Wing remain in possession of Bougainville. The 11th Air Force is also damaged but is based safely on Guadalcanal so no movement is necessary there either.
This concludes the Offensive initiated by the Japanese player playing the “2nd Operational Phase” event card.
Winning the Game

Empire of the Sun - Political Will Marker
The Empire of the Sun Campaign game has the following victory conditions:
- If during the Game Turn 12 End of Turn Phase, Japan has been successfully strategically bombed on four consecutive turns, has one or less Resource Hexes, and a B29 is in range of Tokyo, the US player wins immediately (The “A-Bomb Victory”).
- If the US player controls all hexes on the Japanese Home Island of Honshu, the Japanese player surrenders (The “Invasion of Japan Victory”).
- If the US Political Will marker ever reaches the “Negotiations Box” (level zero), the Japanese player wins immediately.
- If the US does not win by the conclusion of Game Turn 12, the Japanese player wins.
I’m not going to discuss most of the victory conditions listed above in any detail since I think they’re pretty self-explanatory. They involve the US player controlling territory close enough to the Japanese home islands to allow for a sustained bombing campaign or, failing that, an actual invasion of Japan proper. And, obviously, survival itself is a victory for Japan.
Also, Resource Hexes will not be addressed in detail except to say that they represent locations on the map that Japan requires to secure its supply of oil and other natural resources. The inability of Japan to control all of these hexes will reduce the number of strategy cards that the Japanese player may draw each turn. Not good for the Japanese player.
Where things really start to get interesting is in the tracking of US Political Will. The campaign game begins with US Political Will at 8 (after Pearl Harbor). This level can get higher or lower (but mainly lower, in the early stages of the game). There are a plethora of events and conditions that affect US Political Will:
- Burma surrenders (-1)
- Dutch East Indies surrenders (-1)
- Malaya surrenders (-1)
- Philippines surrenders (-1)
- Occupation of Alaska (-1; continuously occupied by Japan for three consecutive turns)
- Occupation of Hawaii (-1; continuously occupied by Japan for two consecutive turns)
- India Unstable/Surrenders (-2; if “Unstable” for two consecutive game turns)
- Chinese Government Collapses (-2)
- Australia surrenders (-2)
- US Casualties (if the US, as attacker, loses an entire attacking force of division or corps size)
- Strategic Naval Situation (no US carriers on the map at end of any Game Turn)
- Progress of the War (-1 per turn; from Game Turn 4 on, US must recapture a certain number of Japanese controlled hexes each turn)
- Strategic Warfare (+3 one time; Japan controls 3 or less Resource hexes between turns 5 and 12)
- Strategic Bombing (+1 per turn; If bombing reduces Japan’s hand by one or more cards)
Note that these same events/conditions accrue Victory Points in the shorter scenarios, rather than using the Political Will Track. But the events described are exactly the same as in the campaign game (i.e. the surrender of the Philippines requires Japanese control of Manila and Davao, no matter which scenario you’re playing, or whether you’re rewarded with Victory Points or changes in Political Will).
This puts you squarely in the military commander’s seat, as you attempt to make the best decisions on how to prosecute the war. You can go after the “big fish”, like Australia, India or China, but bringing about the desired result in those locations is as difficult as you’d expect such feats to be.
Bringing Australia to heel is a straightforward military operation; the Japanese must control specific real estate in the “Land Down Under”. But to do the same for China and India would triple the size of the game. So, some clever abstractions were invented.
China

Empire of the Sun - China Status
There is a whole process that governs the abstract Japanese operations in China, but the basic concept is as follows. The Japanese player is
considered to have x number of divisions in China and may conduct Chinese Offensives either via specific event cards, or via OC with play of
a 3-Ops card. Each successful Chinese Offensive moves the China marker one space closer to Chinese “Govt Collapse”. The payoff for Chinese Govt
Collapse is the loss of 2 US Political Will points. Meanwhile, the focus on China will surely have a deleterious effect on operations elsewhere
in the Pacific. Is the prize worth the pain? That’s for you to decide.
Of course, the Japanese player is free to ignore China and trade the abstract divisions in China for real divisions that can be put to work on the main map. Again, your choice.
India
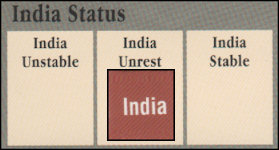
Empire of the Sun - India Status
The Japanese objective for India is to shift the India Status marker into the “India Unrest” box and retain it there for two consecutive
National Status Segments, which occur near the end of each Game Turn. Then, the status marker can be moved to the “India Unstable” box
where, if it can be retained there for an additional two consecutive turns, will force an Indian Surrender. Shifting the Status marker can be
effected by either conquering territory in northern India, or by play of special event cards. Any time the US player regains control of any
conquered portion of India, or plays an upsetting India event card, the India Status marker is moved back to the “India Stable” box and the
Japanese player must begin the whole cycle again. It can be quite frustrating for the Japanese and quite satisfying for the US player who, tired of
getting his slats kicked in on the main map, needs some revenge to balance things (however abstract).
All of the smaller countries and territories have their own triggers for National Surrender; mostly control of certain cities or resource hexes. Standard military conquest is the order of the day for these countries.
Progress of the War
I’m going to mention just one more interesting game mechanic that’s linked to Political Will because it’s my favorite: the Progress of the War directive
imposed on the US player. I suppose that, for some US players, there might be a temptation to play it safe. Just hang back, building up an overwhelming
military machine while the Japanese run wild in the Pacific. Then unleashing the accumulated might of the US Pacific Fleet in a massive burst of energy.
The Progress of the War restriction discourages the American player from doing this. It kicks in on Game Turn 5 (1943, in earth time) and requires the
US player to recapture x number of Japanese controlled hexes (named locations, resources, ports or airfields) every turn (where x is equal to 4, or the
number of ASPs available to the US after the reinforcement phase). It becomes quite challenging to keep up that pace, and the Japanese often cash in on
the mistakes made by an opponent trying to keep up!
Summary
The options and variations just go on and on. I didn’t even touch on the War in Europe abstraction which draws off scheduled reinforcements to go
fight in Europe (the European theater always got the lion’s share of men and materiel), or US submarine warfare, or the Burma Road, or the Nationalist Chinese
troops, or Inter-Service Rivalry, etc. As I said in the overview, I didn’t want to just re-hash the rule book, but I feel I’m getting dangerously close to doing
just that, so I’ll end the feature enumeration right here.
The game is so varied and so wide open that you just don’t know where to start sometimes. You know all the rules, you set up the pieces and then you say, “OK, what do I do now?” Not in the sense that you don’t understand the game’s rules, but in the same way that the actual historical commanders agonized over decisions about assigning means to objectives. I believe you could play this game every day for a year and not see the same situation twice. Mastery of Empire of the Sun is not just the result of repetition and memorization.
When you play EOTS, you are totally engaged, whether you’re the offensives player or the reaction player at the moment. The game system does not allow for slacking off in between turns! The reaction player must constantly evaluate the situation for opportunities to reduce the effectiveness of, or totally preempt, the attacker’s offensive either by card play or judicious Reaction Movement. Both players must stay focused on their game plan but learn to identify, and react to, threats that cannot be ignored.
Mark Herman wrote an article in GMT’s C3I magazine (Issue #17) back in 2005 titled, “Strategy Concepts in Empire of the Sun” that is the definitive strategy
article for this game. And may be the best strategy article I’ve ever read. (thanks to Scott de Brestian for providing the link to Mark’s article) After reading
it, everything totally clicked. It helped deepen my understanding of the game’s design, and imparted a few essential strategies and tactics that helped
advance my EOTS competence. I highly recommend his article to anyone really interested in learning more about this fine game.
Bottom line:
- Challenging game? …check
- Play balance? …check
- Competitive scenarios? …check
- High replay value? …check
- Innovative game mechanics? …check
- Fun to play? …double check
Do yourself a favor; buy this game. You’ll enjoy it for years to come.